> ## Documentation Index
> Fetch the complete documentation index at: https://docs.pickcel.com/llms.txt
> Use this file to discover all available pages before exploring further.
# How do I connect ChatGPT or Claude to the Pickcel MCP server?
> Connect ChatGPT, Codex, Claude, or Claude Code to your Pickcel digital signage account with the Pickcel MCP server. Setup steps, tools, and example prompts.
The **Pickcel MCP server** exposes your Pickcel digital signage account to AI agents (ChatGPT, Codex, Claude, Gemini and any other client that speaks the [Model Context Protocol](https://modelcontextprotocol.io)) as a set of callable tools. Instead of clicking through the console, you can ask an agent in plain language to list your screens, generate a design, upload media, build a composition, schedule content, or push an urgent Quickplay.
The Pickcel MCP server is available on the **Business plan**. If **APIs** doesn't appear under **Settings**, your account isn't on the Business plan yet.
## What you can do
Once connected, an agent working on your behalf can:
* **Upload** a new image or video straight into your media library from a local file
* Find your screens, media, layouts, compositions, templates, and schedules
* Create a layout, or reuse an existing one, and build a **composition** from your media
* Push an immediate **Quickplay** to one or more screens
* Create recurring daily **schedules** and assign them to screens
* Build **advanced schedules** that play only on specific dates
* Generate a signage **design** (a poster, greeting, or promo) and hand you an editor link to review it
It cannot delete anything yet. Deleting is planned for an upcoming release, so don't rely on it for anything destructive today.
## Set up the Pickcel MCP server
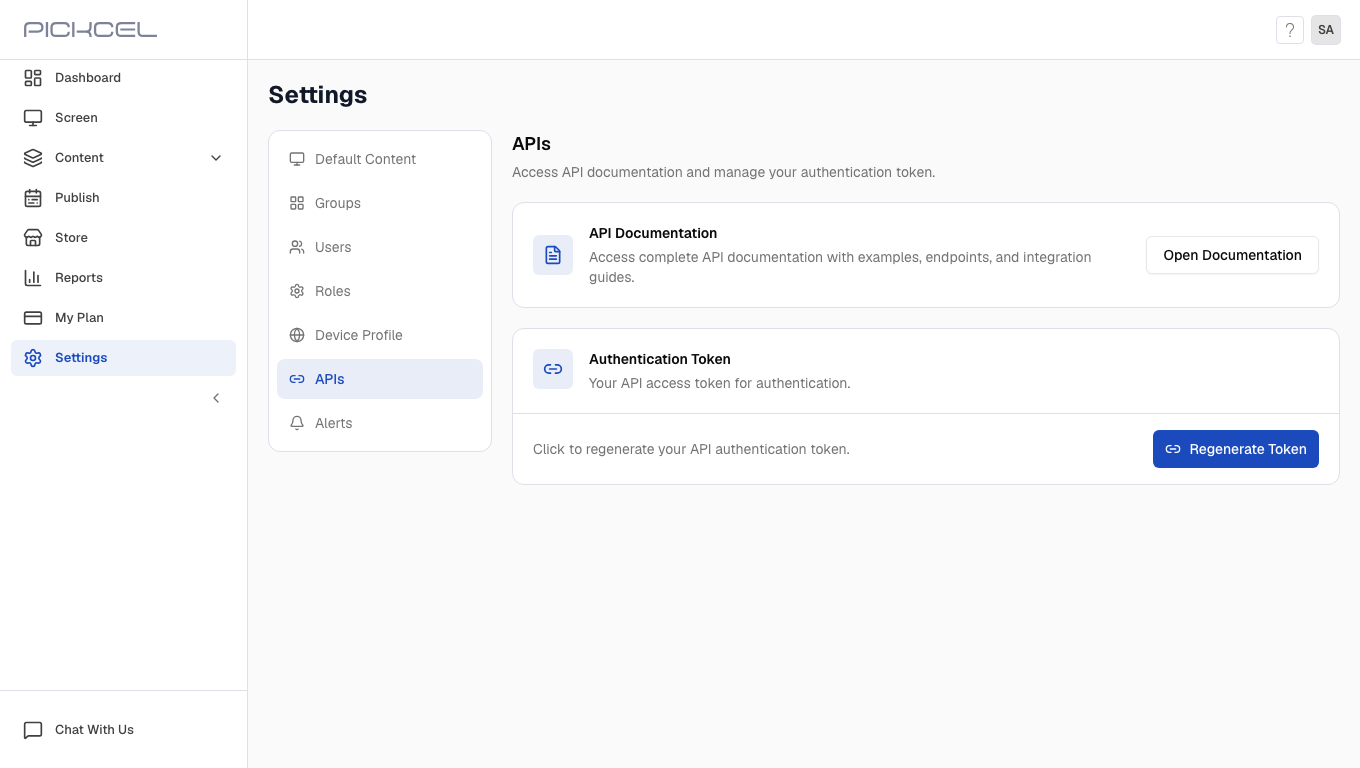
In the [Pickcel console](https://console.pickcel.com), open **Settings → APIs**, then click **Generate Token** under **Authentication Token**.
 Copy it immediately. You'll need it for the MCP connection command below, and once you close the page it's shown only in masked form.
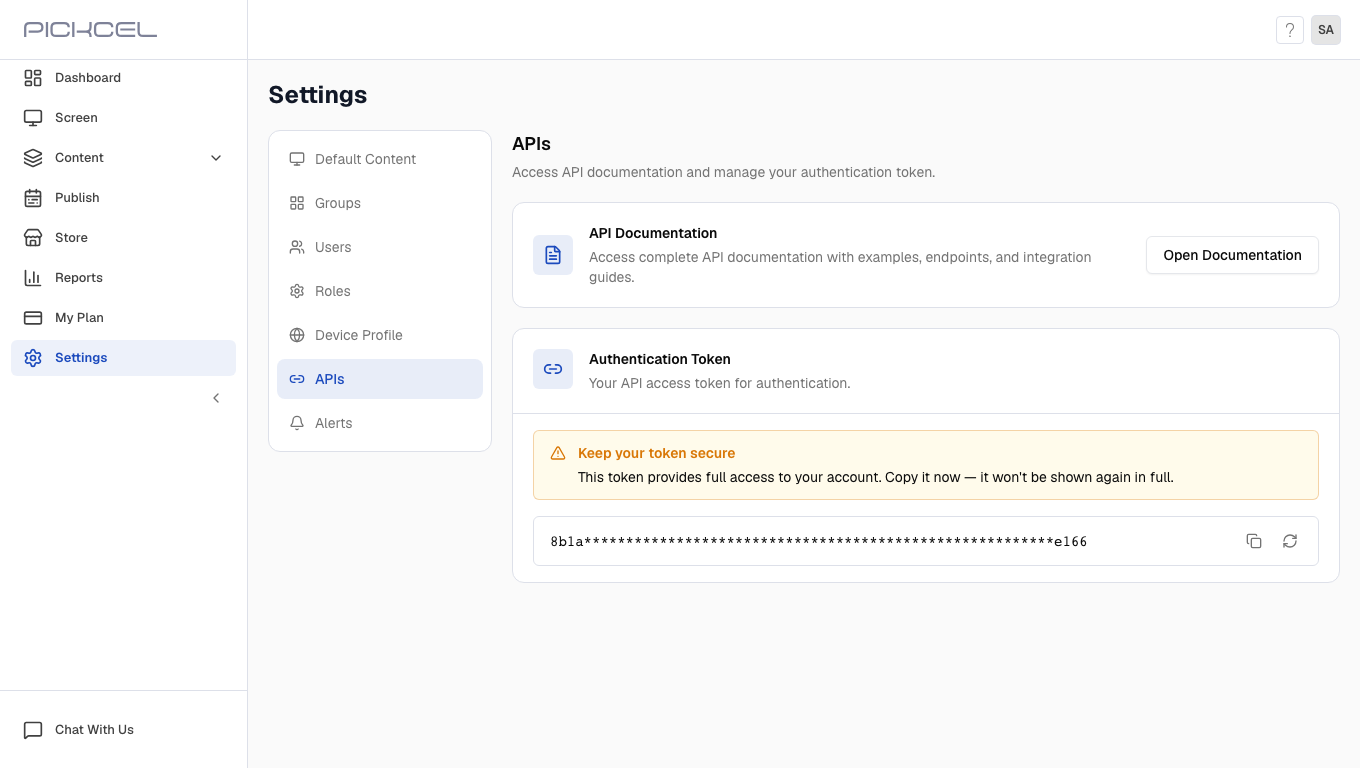 Your token gives full access to your account. Keep it private. If you regenerate it, the old token stops working immediately, so update it in your AI app too.
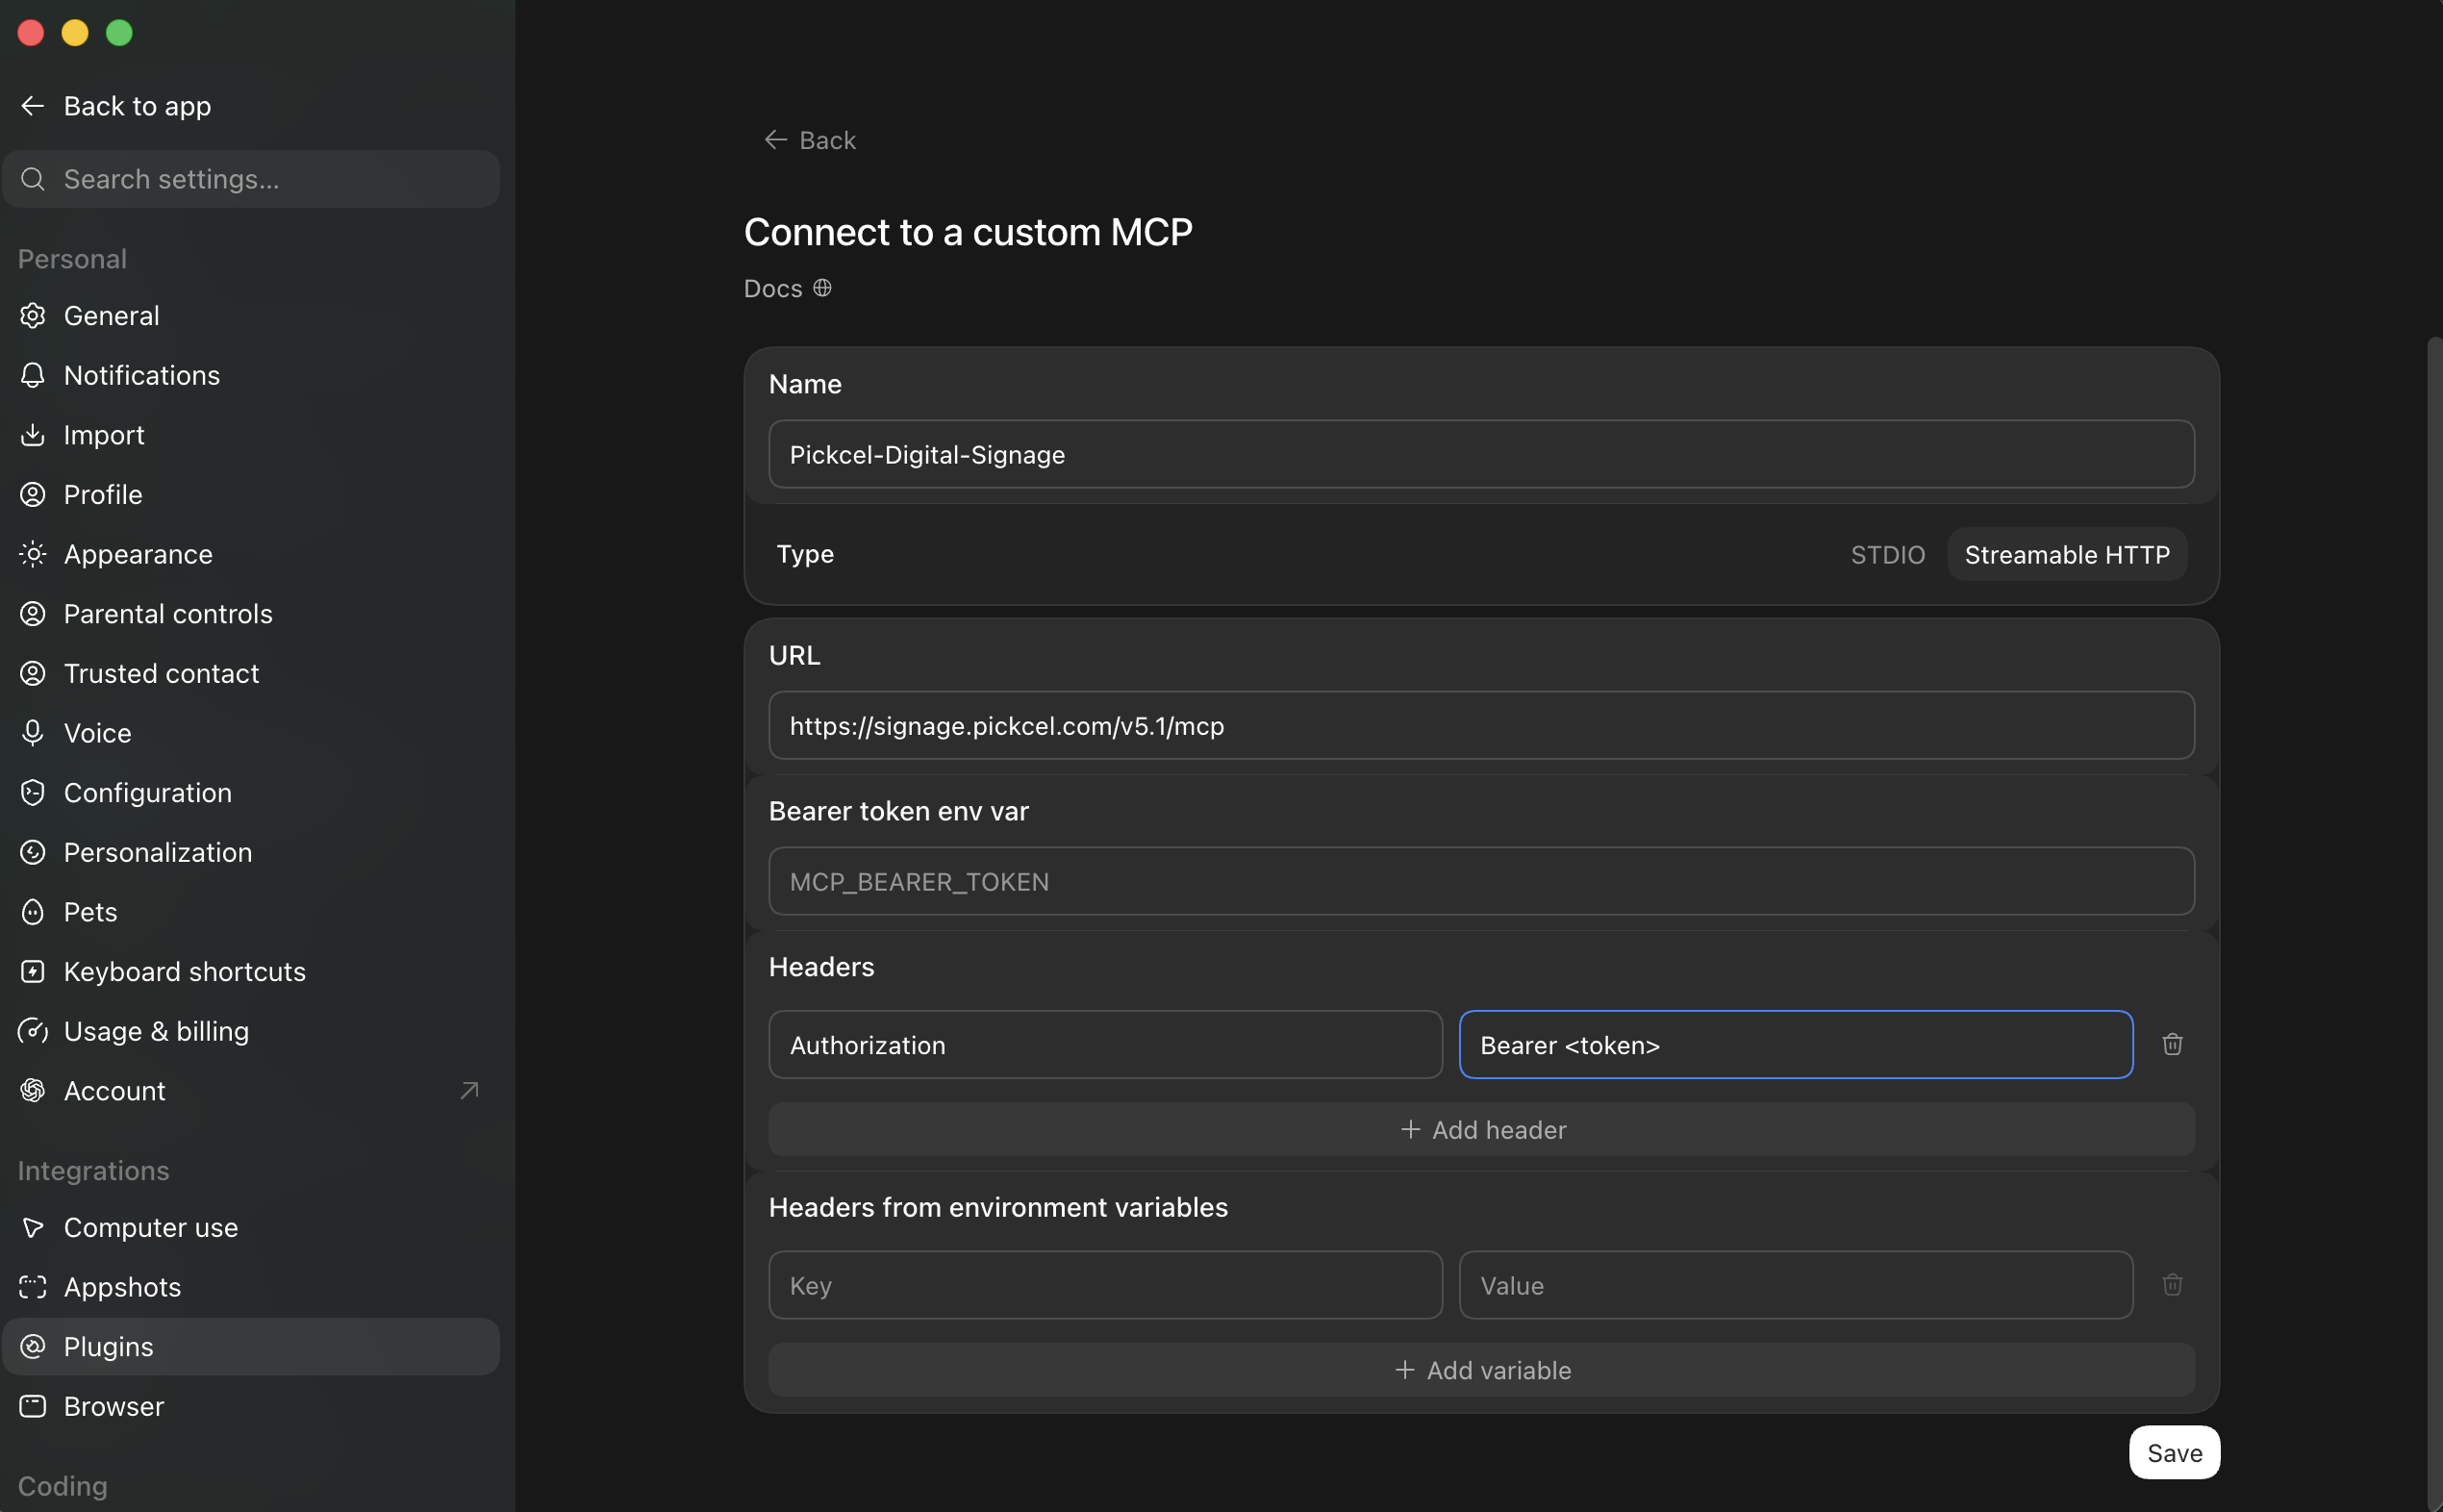
In the ChatGPT app, open **Settings → Plugins**, select the **MCPs** tab, and click **Add → Connect to a custom MCP**.
1. **Name:** `Pickcel-Digital-Signage`
2. **Type:** **Streamable HTTP**
3. **URL:** `https://signage.pickcel.com/v5.1/mcp`
4. Under **Headers**, add:
* **Key:** `Authorization`
* **Value:** `Bearer `
5. Click **Save**.
Your token gives full access to your account. Keep it private. If you regenerate it, the old token stops working immediately, so update it in your AI app too.
In the ChatGPT app, open **Settings → Plugins**, select the **MCPs** tab, and click **Add → Connect to a custom MCP**.
1. **Name:** `Pickcel-Digital-Signage`
2. **Type:** **Streamable HTTP**
3. **URL:** `https://signage.pickcel.com/v5.1/mcp`
4. Under **Headers**, add:
* **Key:** `Authorization`
* **Value:** `Bearer `
5. Click **Save**.
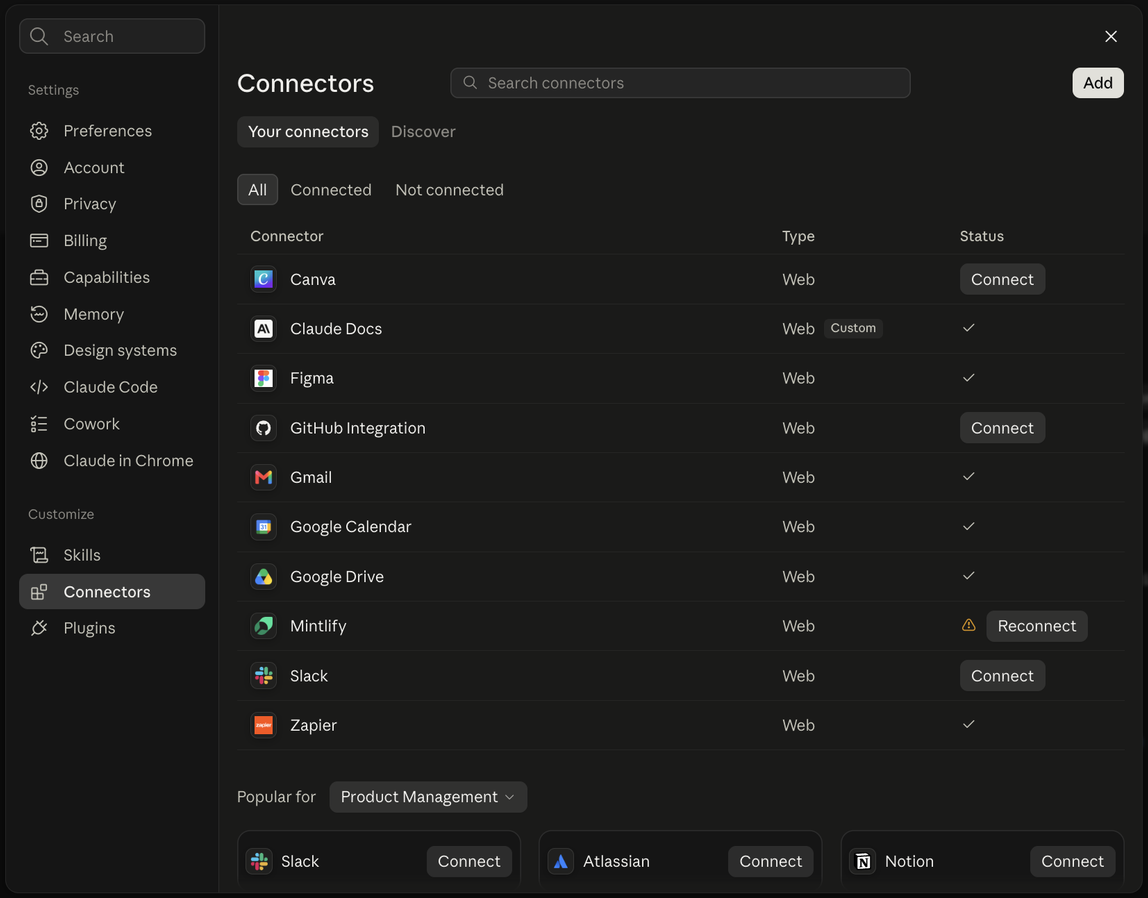
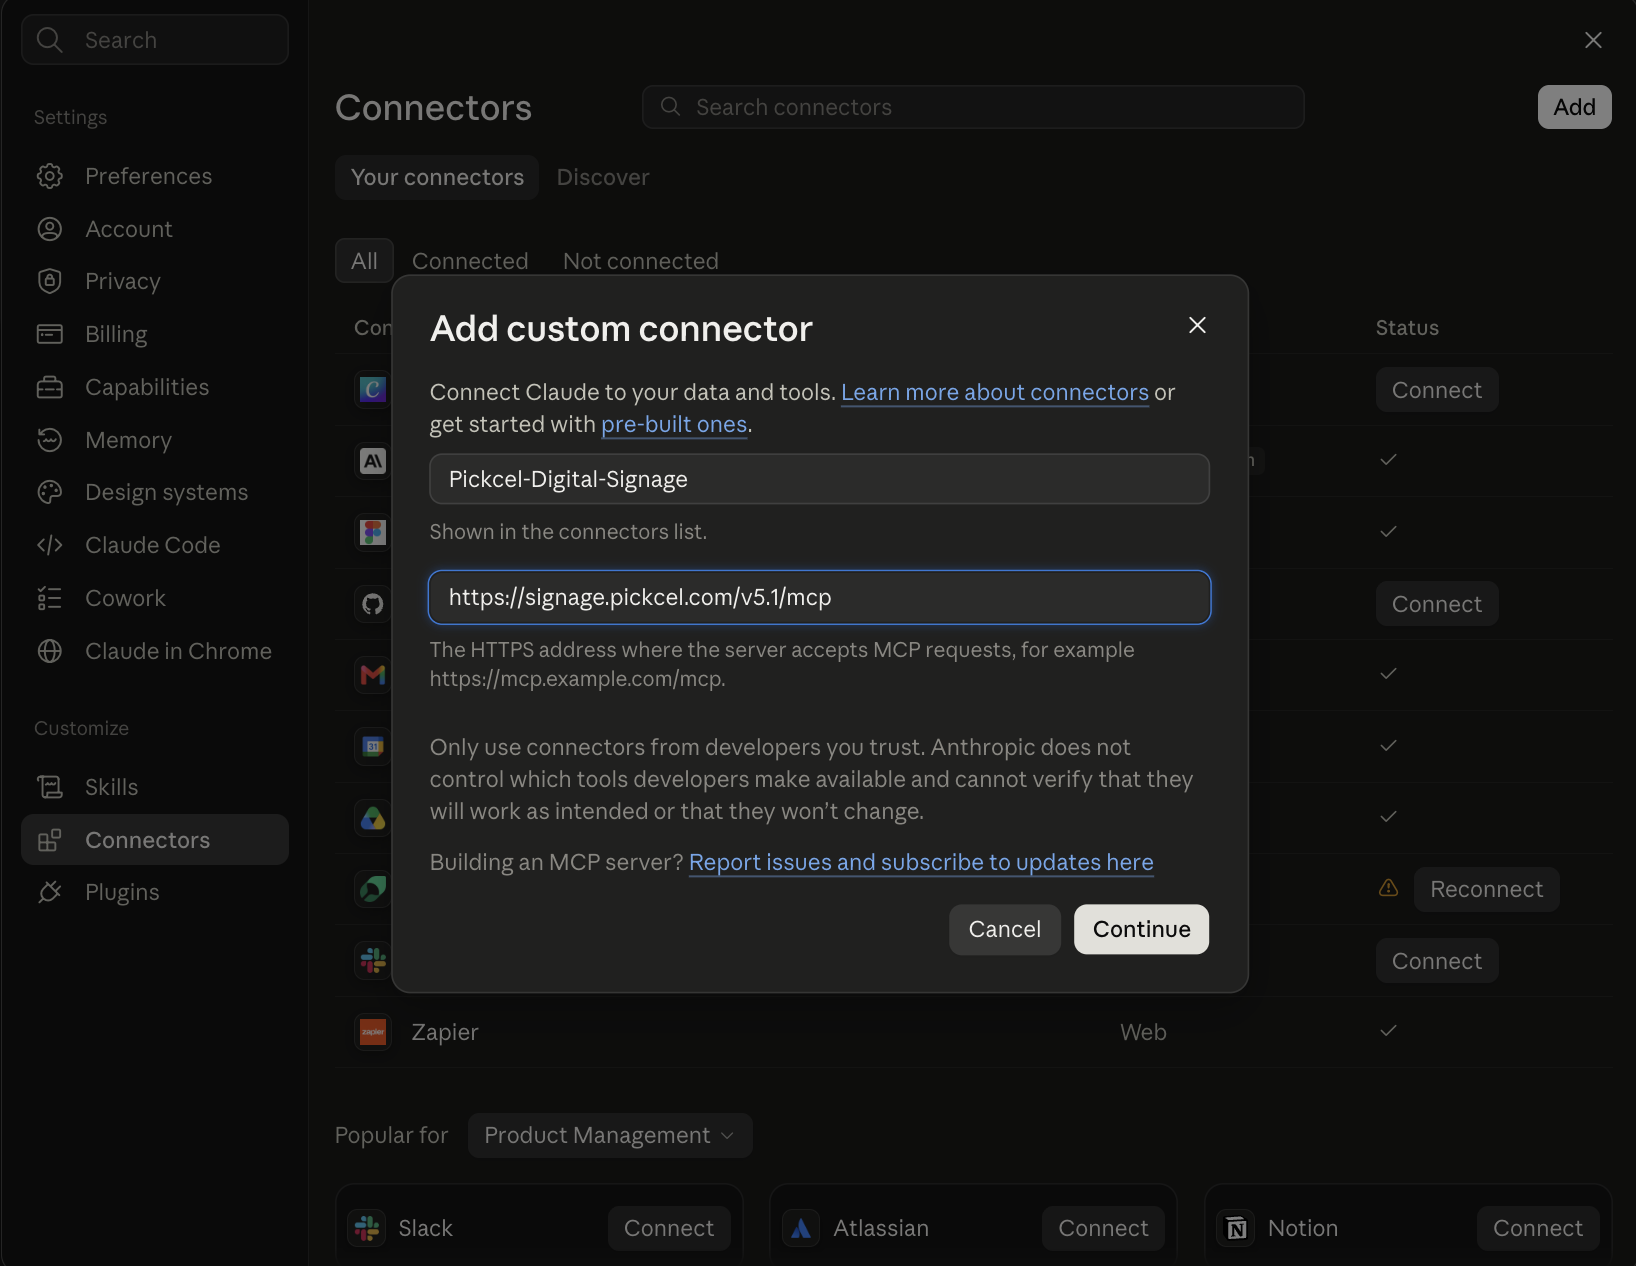
 In the Claude app (web or desktop), open **Settings → Connectors** and click **Add**.
 Enter the name `Pickcel-Digital-Signage` and the URL `https://signage.pickcel.com/v5.1/mcp`, then click **Continue**.
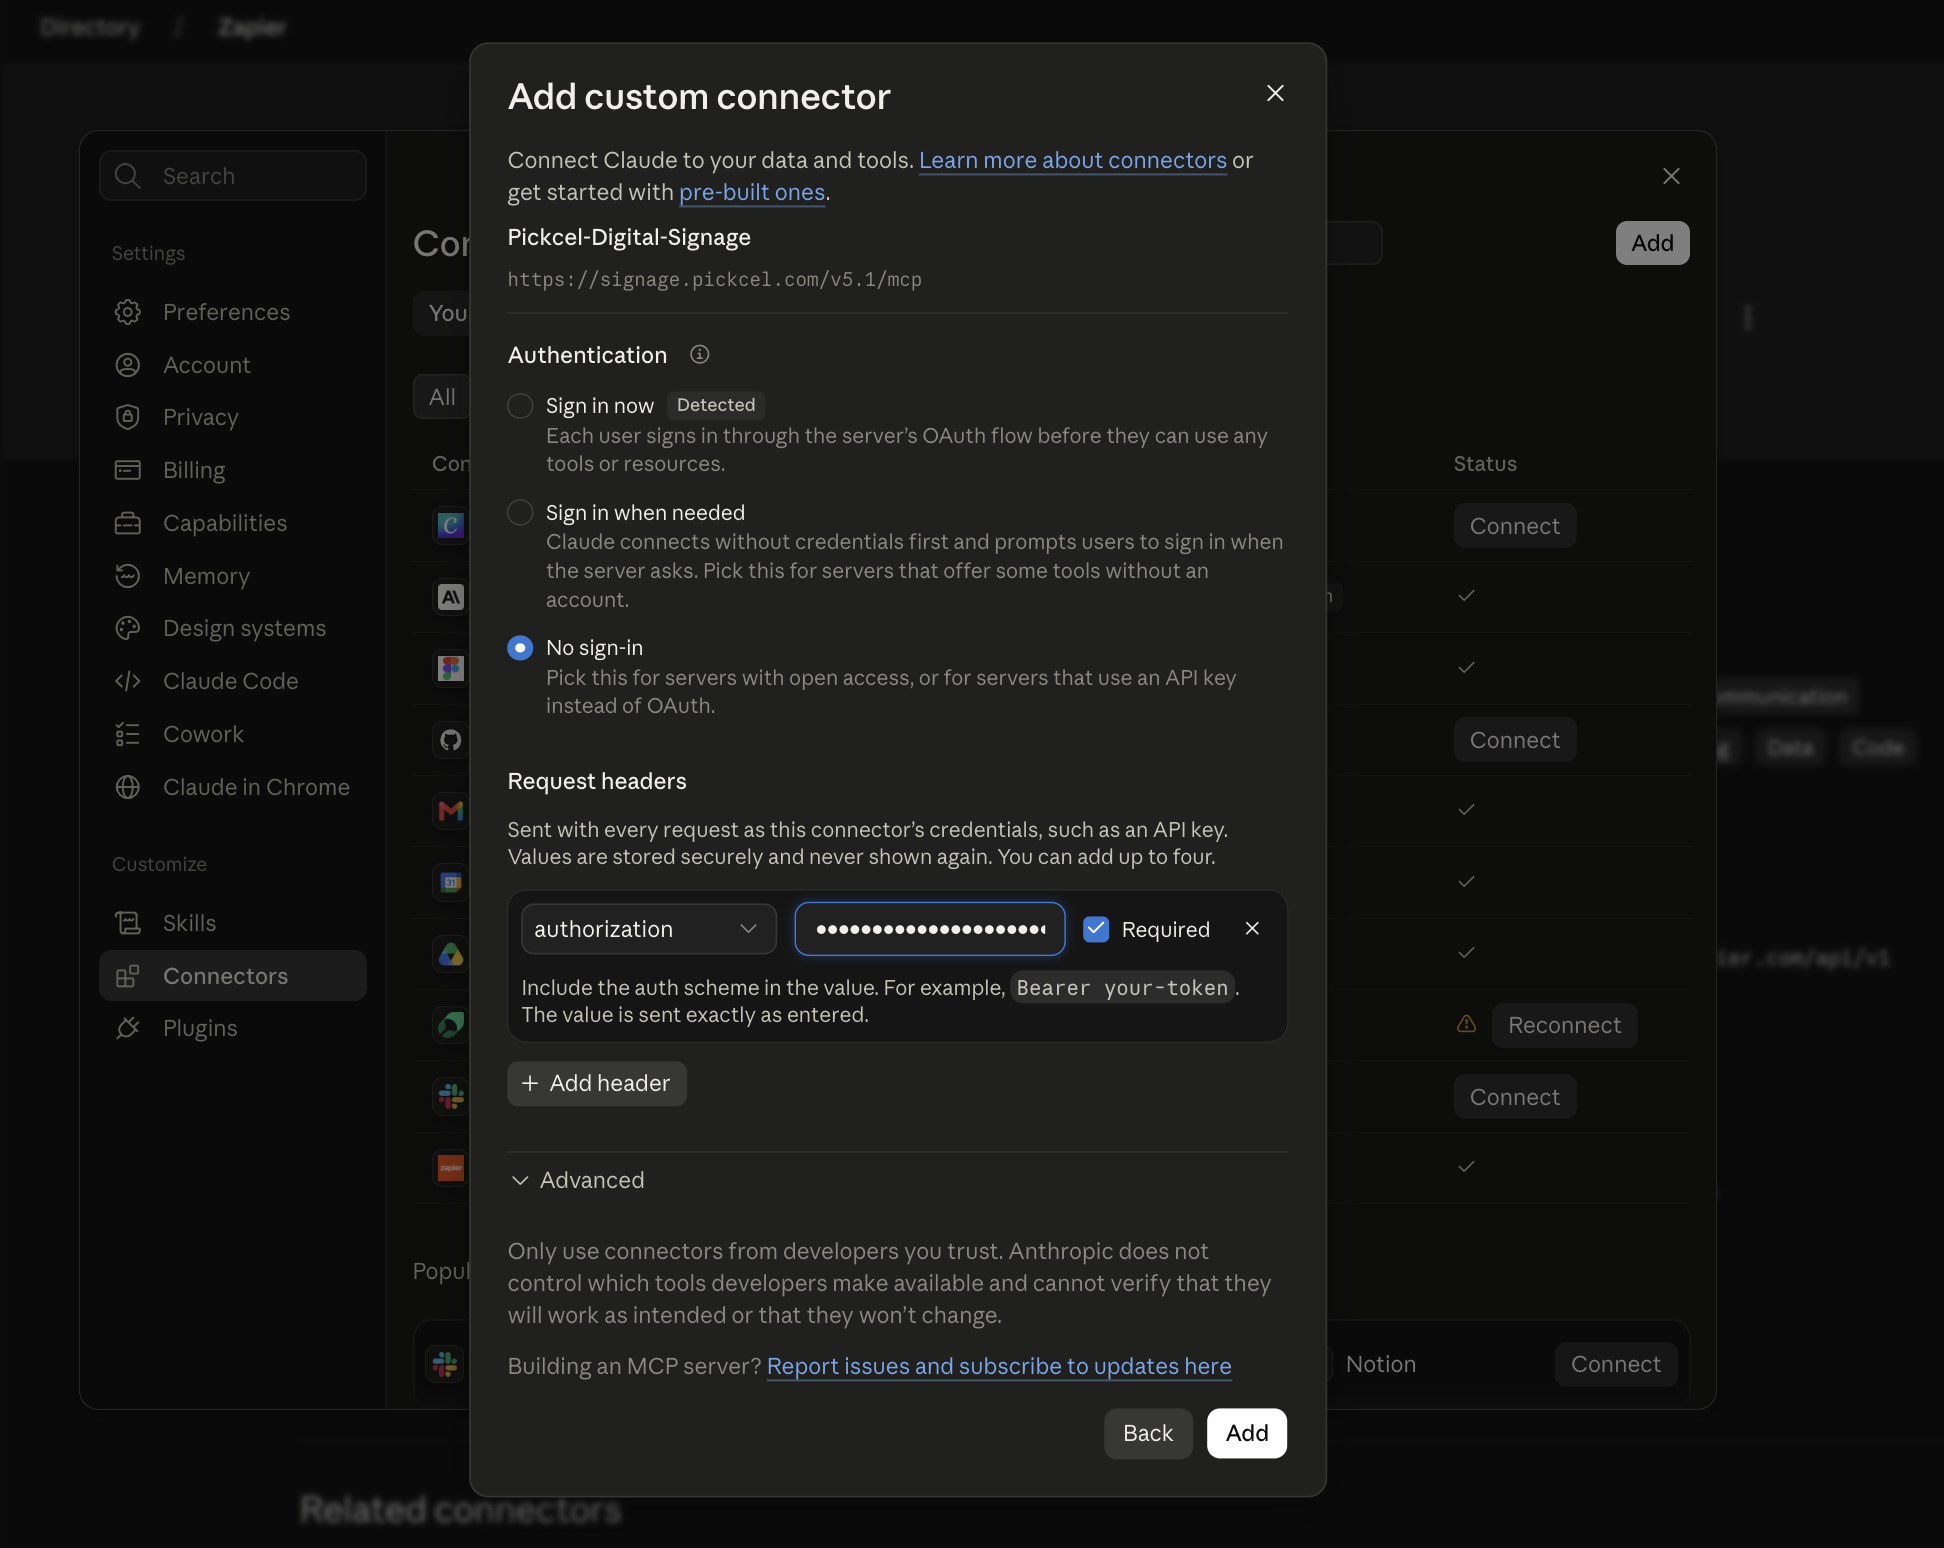
 Under **Authentication**, select **No sign-in**. Under **Request headers**, choose `authorization` and enter `Bearer ` as the value, then click **Add**.
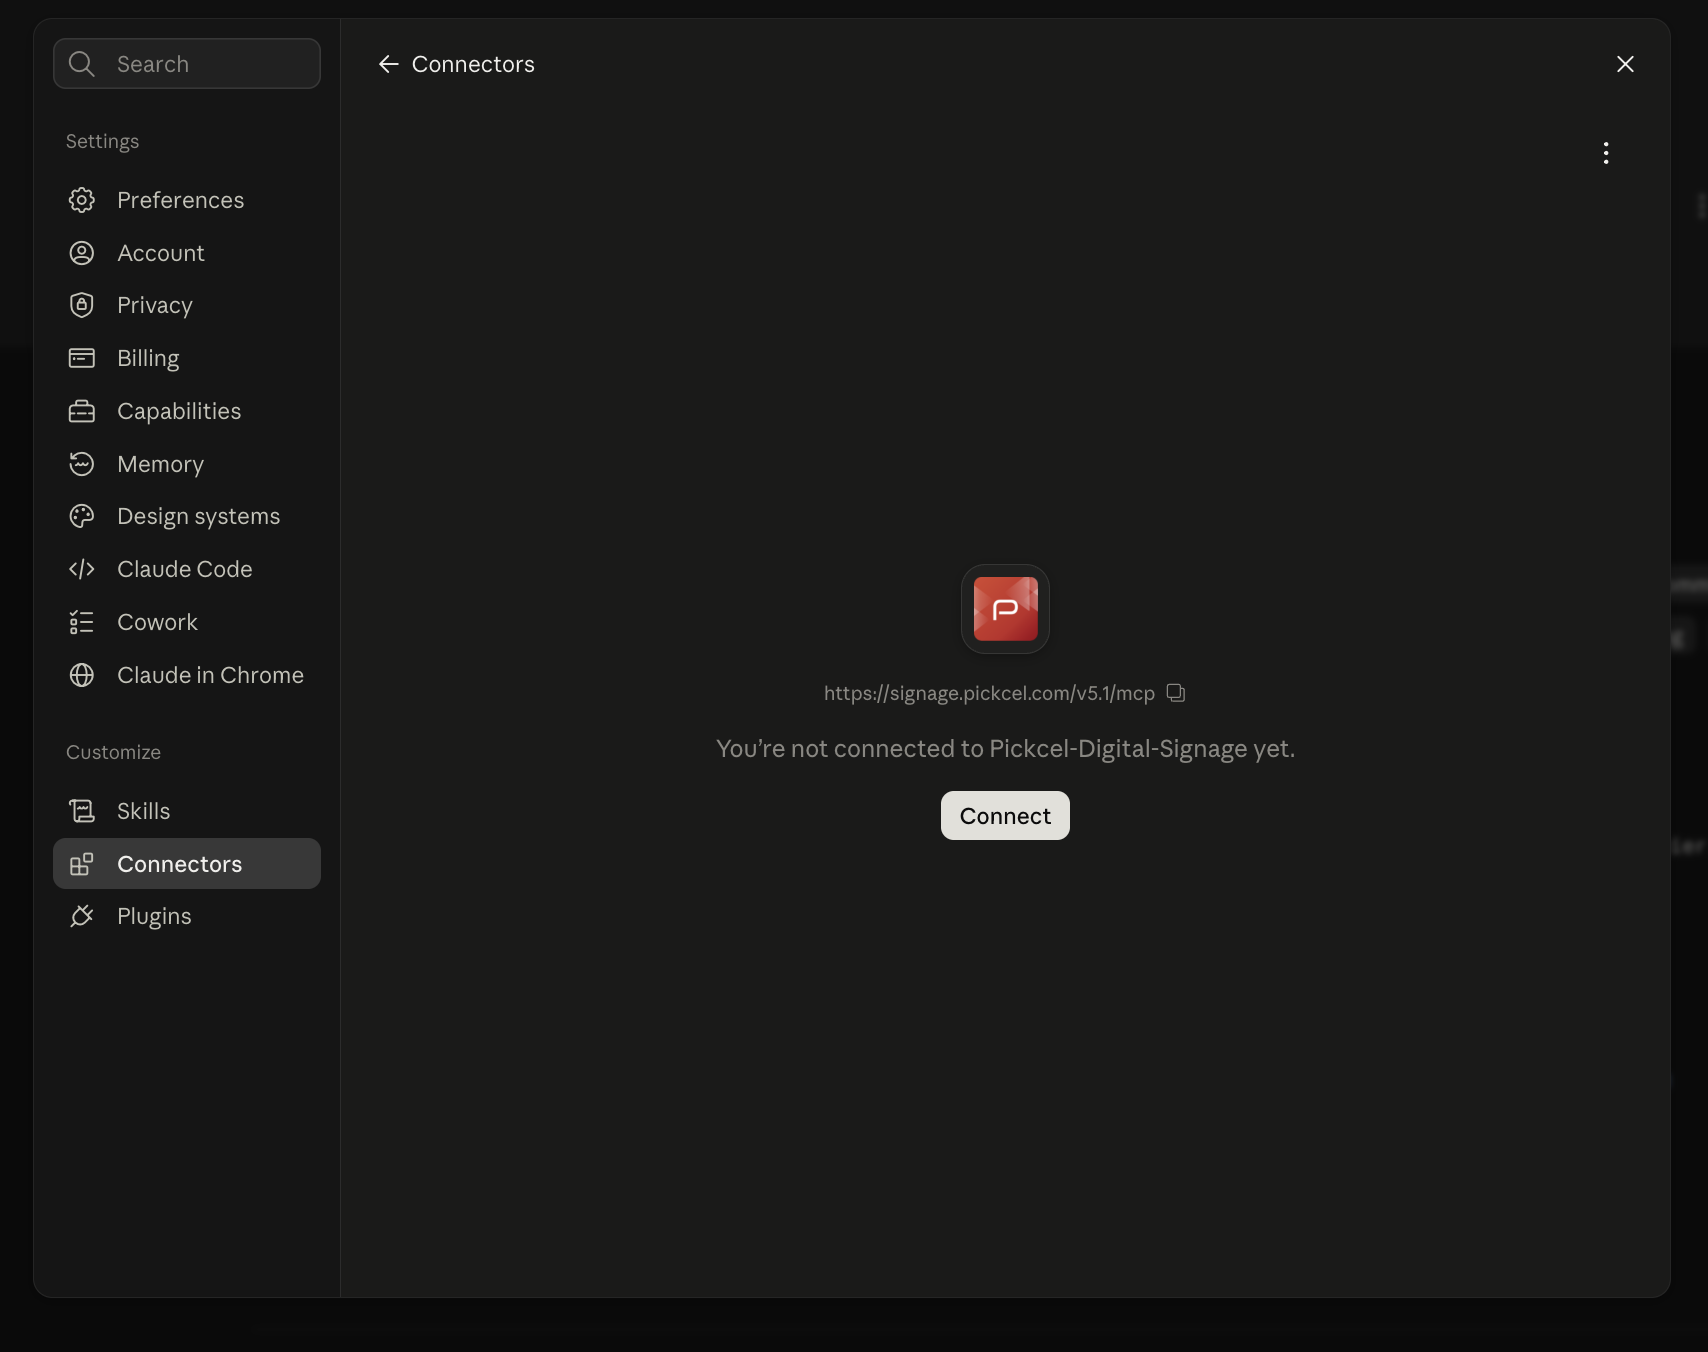
 Click **Connect**.
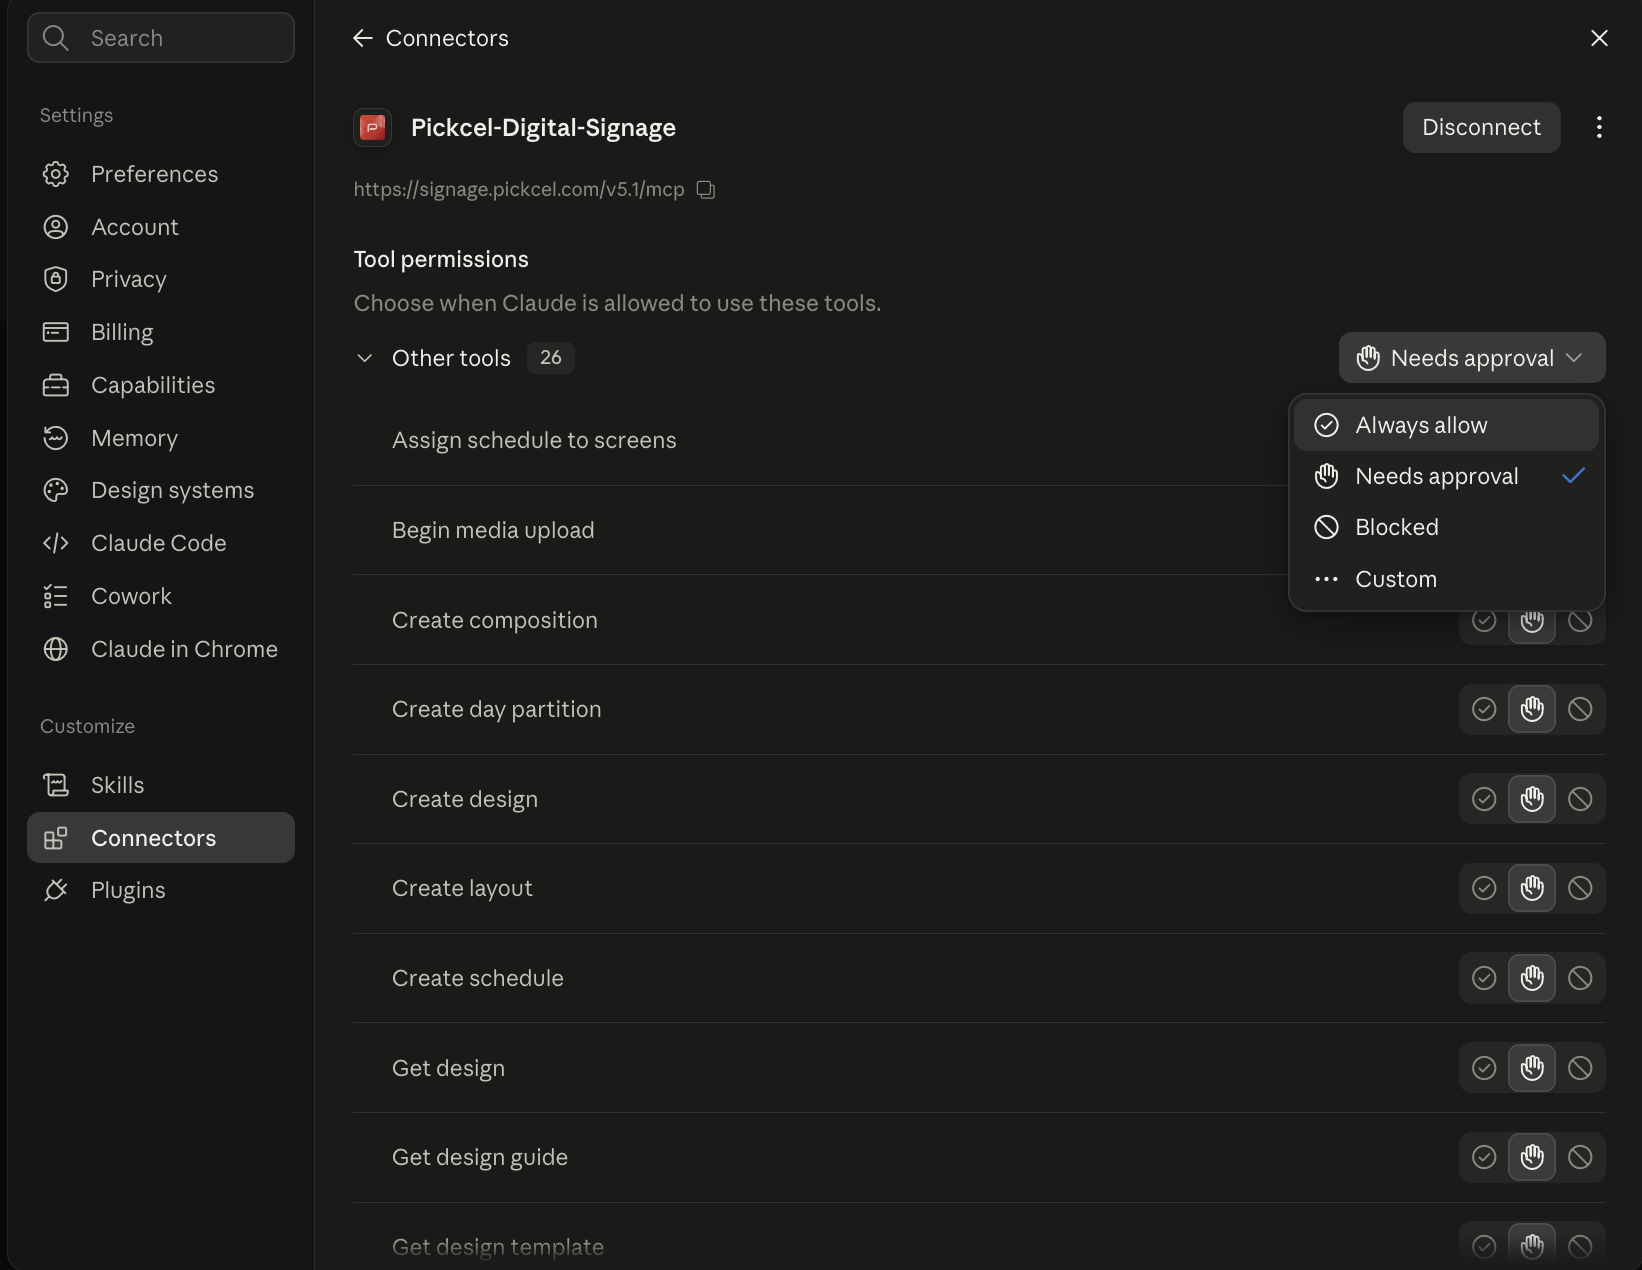
 Under **Tool permissions**, choose when Claude can use Pickcel's tools. Every tool starts on **Needs approval**. Change all tools at once from the dropdown, or set each tool individually.
 On a **Team** or **Enterprise** plan, an organization owner must add the connector before members can use it.
Run this in a terminal, replacing `` with the token you copied:
```bash theme={null}
claude mcp add --transport http --scope user pickcel-digital-signage \
https://signage.pickcel.com/v5.1/mcp \
--header "Authorization: Bearer "
```
Codex reads the token from an environment variable. Set it to the token you copied, without the `Bearer ` prefix. Add the line to your shell profile (for example `~/.zshrc`) so it's set in every terminal:
```bash theme={null}
export PICKCEL_API_TOKEN=""
```
Then register the server:
```bash theme={null}
codex mcp add pickcel-digital-signage \
--url https://signage.pickcel.com/v5.1/mcp \
--bearer-token-env-var PICKCEL_API_TOKEN
```
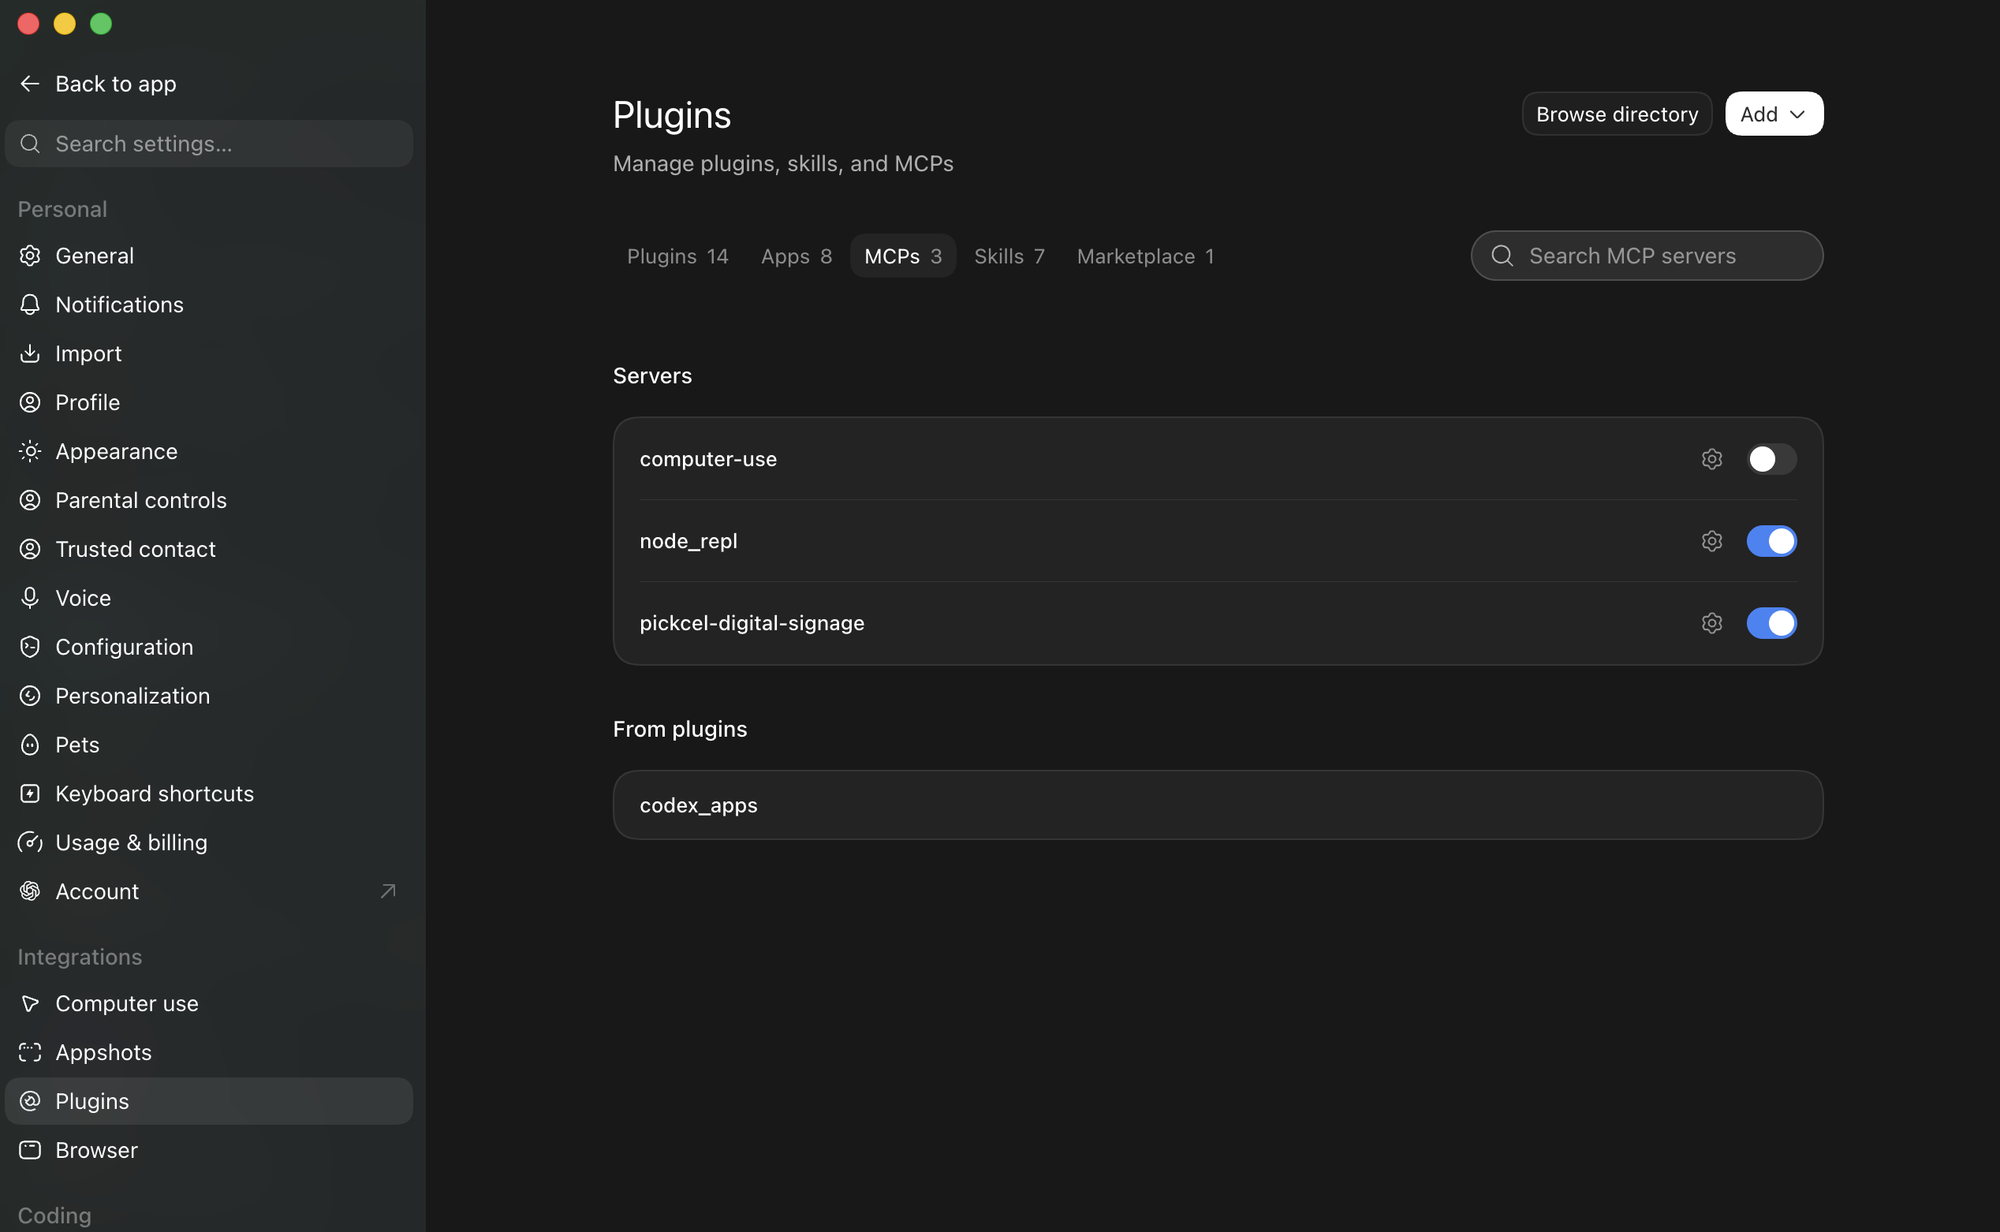
In **Settings → Plugins → MCPs**, `pickcel-digital-signage` shows under **Servers** with its toggle on.
On a **Team** or **Enterprise** plan, an organization owner must add the connector before members can use it.
Run this in a terminal, replacing `` with the token you copied:
```bash theme={null}
claude mcp add --transport http --scope user pickcel-digital-signage \
https://signage.pickcel.com/v5.1/mcp \
--header "Authorization: Bearer "
```
Codex reads the token from an environment variable. Set it to the token you copied, without the `Bearer ` prefix. Add the line to your shell profile (for example `~/.zshrc`) so it's set in every terminal:
```bash theme={null}
export PICKCEL_API_TOKEN=""
```
Then register the server:
```bash theme={null}
codex mcp add pickcel-digital-signage \
--url https://signage.pickcel.com/v5.1/mcp \
--bearer-token-env-var PICKCEL_API_TOKEN
```
In **Settings → Plugins → MCPs**, `pickcel-digital-signage` shows under **Servers** with its toggle on.
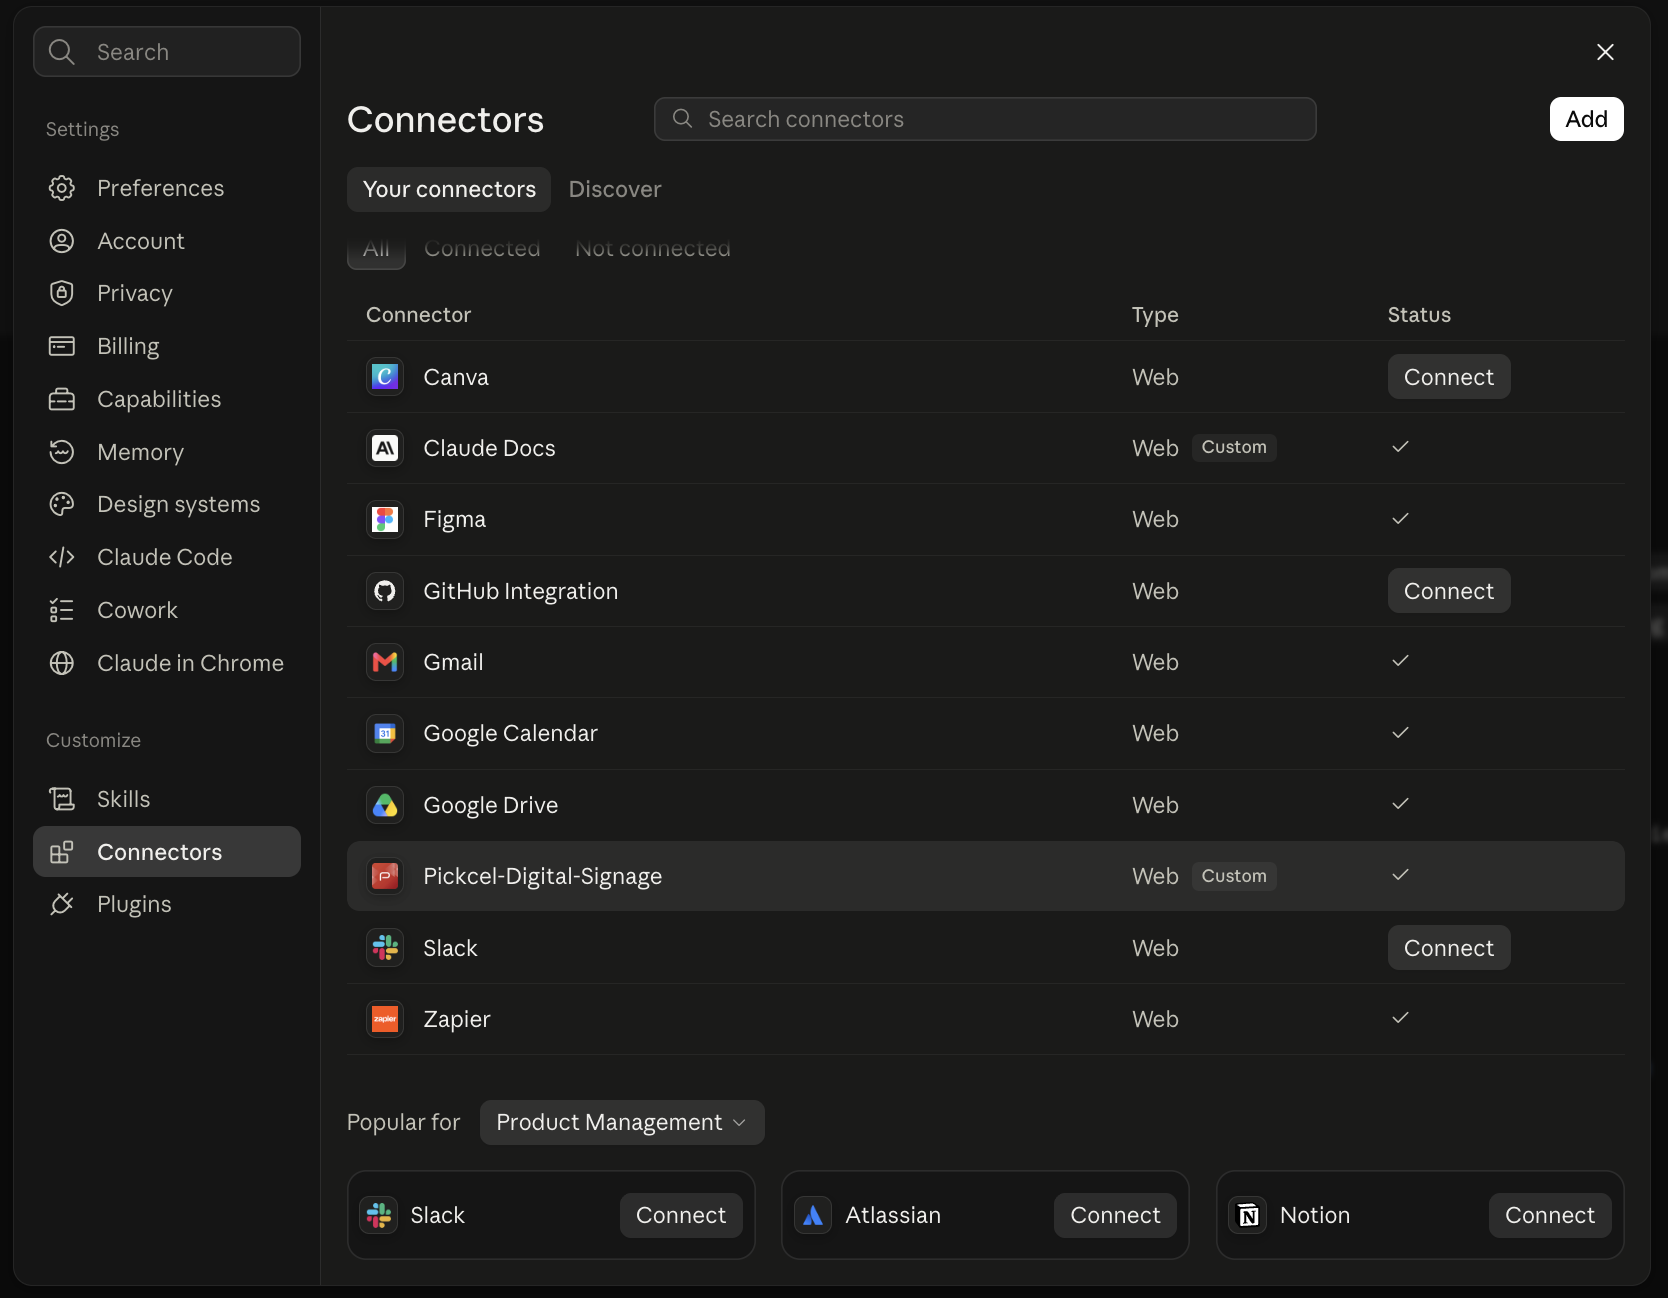
 In **Settings → Connectors**, `Pickcel-Digital-Signage` shows a checkmark under **Status**.
 Start `claude` and run `/mcp`. `pickcel-digital-signage` should show as connected.
Start `codex` and run `/mcp`. `pickcel-digital-signage` should show as connected, with its tools.
`codex mcp list` only confirms the server is saved. It shows the server as enabled even when the token is missing or wrong.
Ask in plain language, for example *"List my screens"* or *"Build a composition from my recent media."* See [Example prompts](#example-prompts) for more.
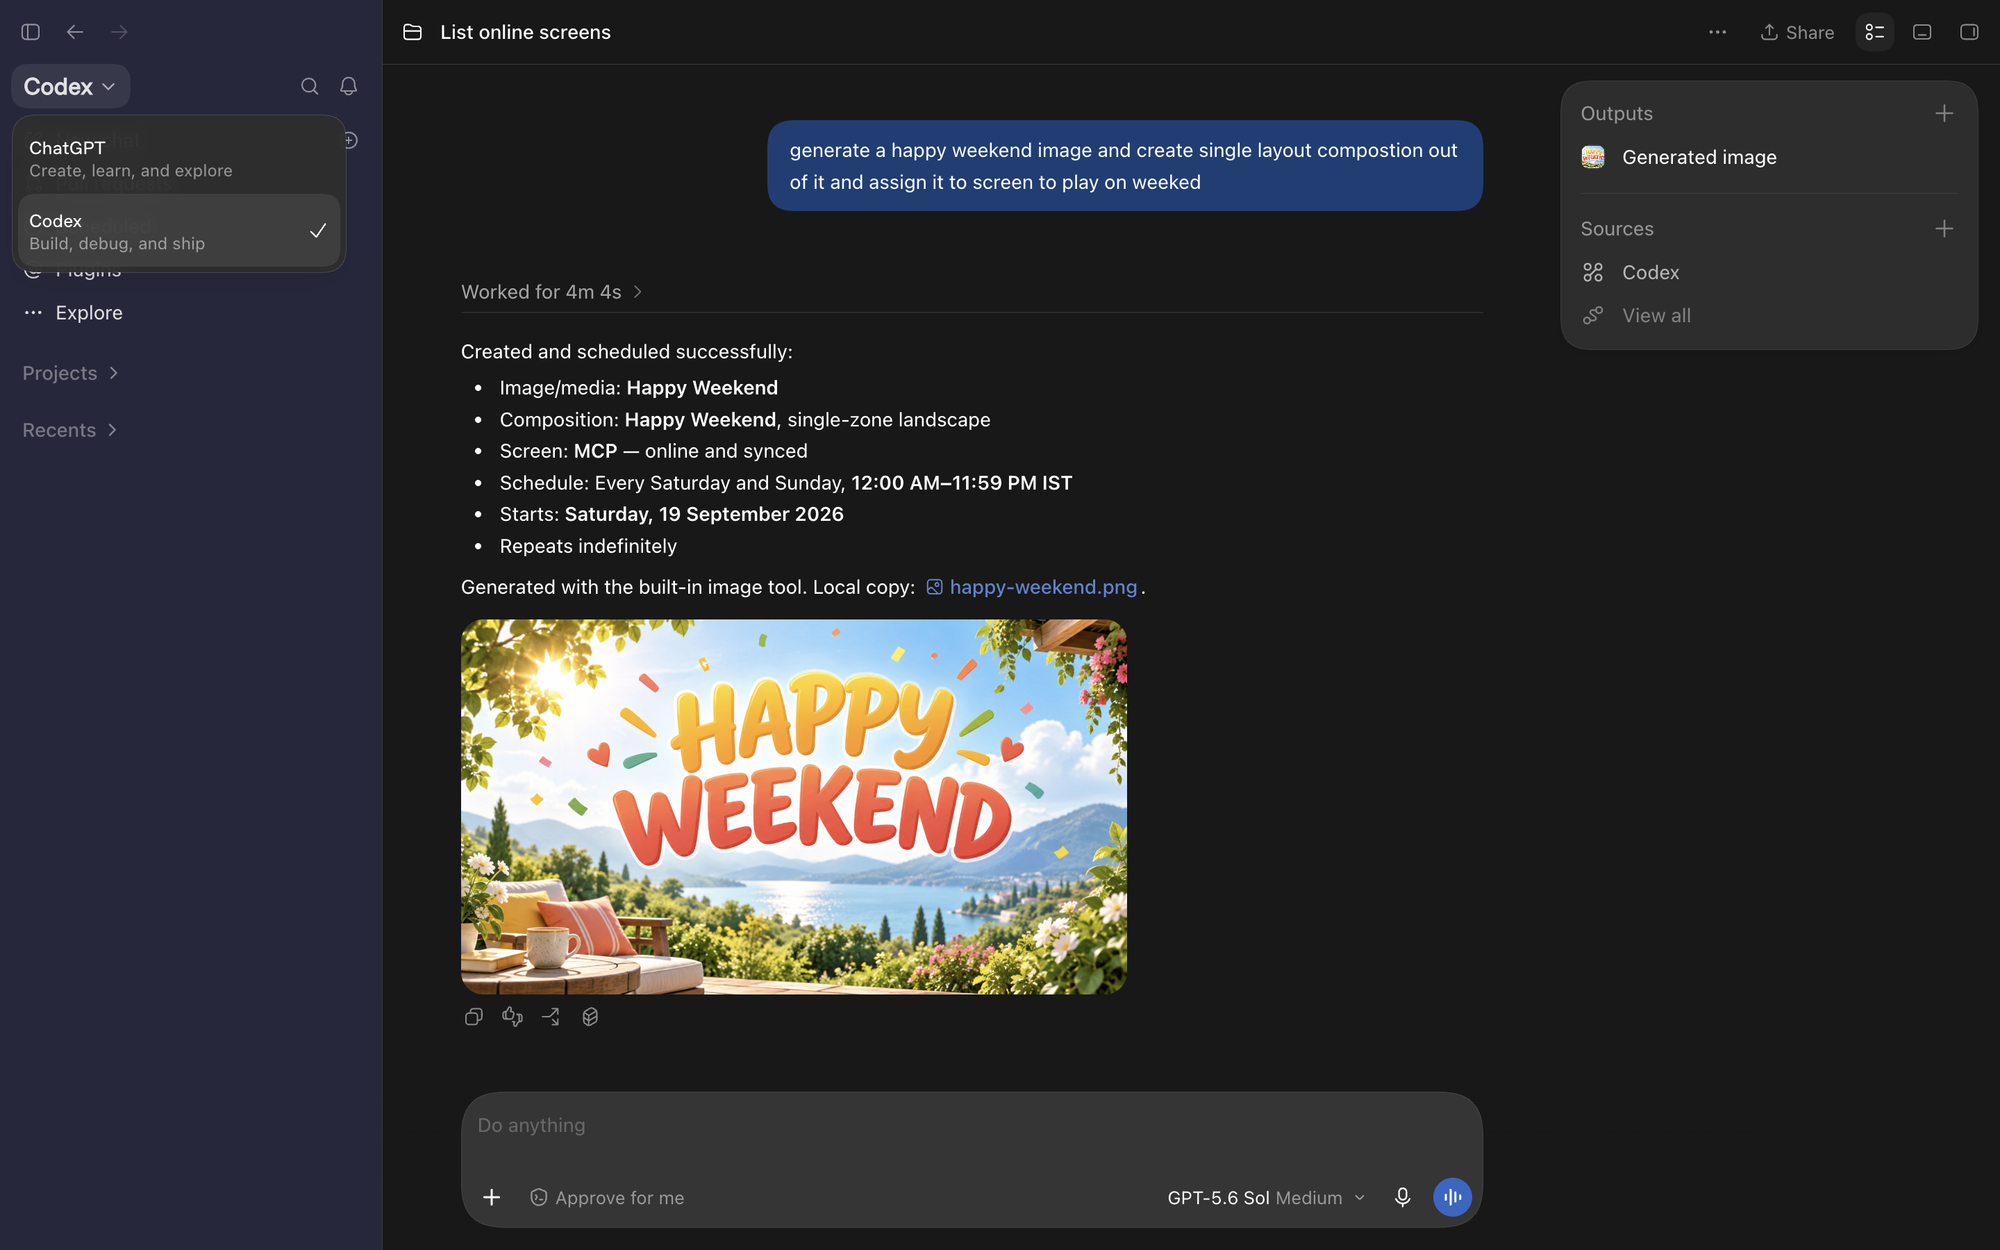
In the ChatGPT app, use Pickcel from **Codex**, not ChatGPT. Switch to **Codex** from the menu at the top left before you start prompting.
For example, this prompt in Codex generated an image, built a composition from it, and scheduled it for weekends:
Start `claude` and run `/mcp`. `pickcel-digital-signage` should show as connected.
Start `codex` and run `/mcp`. `pickcel-digital-signage` should show as connected, with its tools.
`codex mcp list` only confirms the server is saved. It shows the server as enabled even when the token is missing or wrong.
Ask in plain language, for example *"List my screens"* or *"Build a composition from my recent media."* See [Example prompts](#example-prompts) for more.
In the ChatGPT app, use Pickcel from **Codex**, not ChatGPT. Switch to **Codex** from the menu at the top left before you start prompting.
For example, this prompt in Codex generated an image, built a composition from it, and scheduled it for weekends:
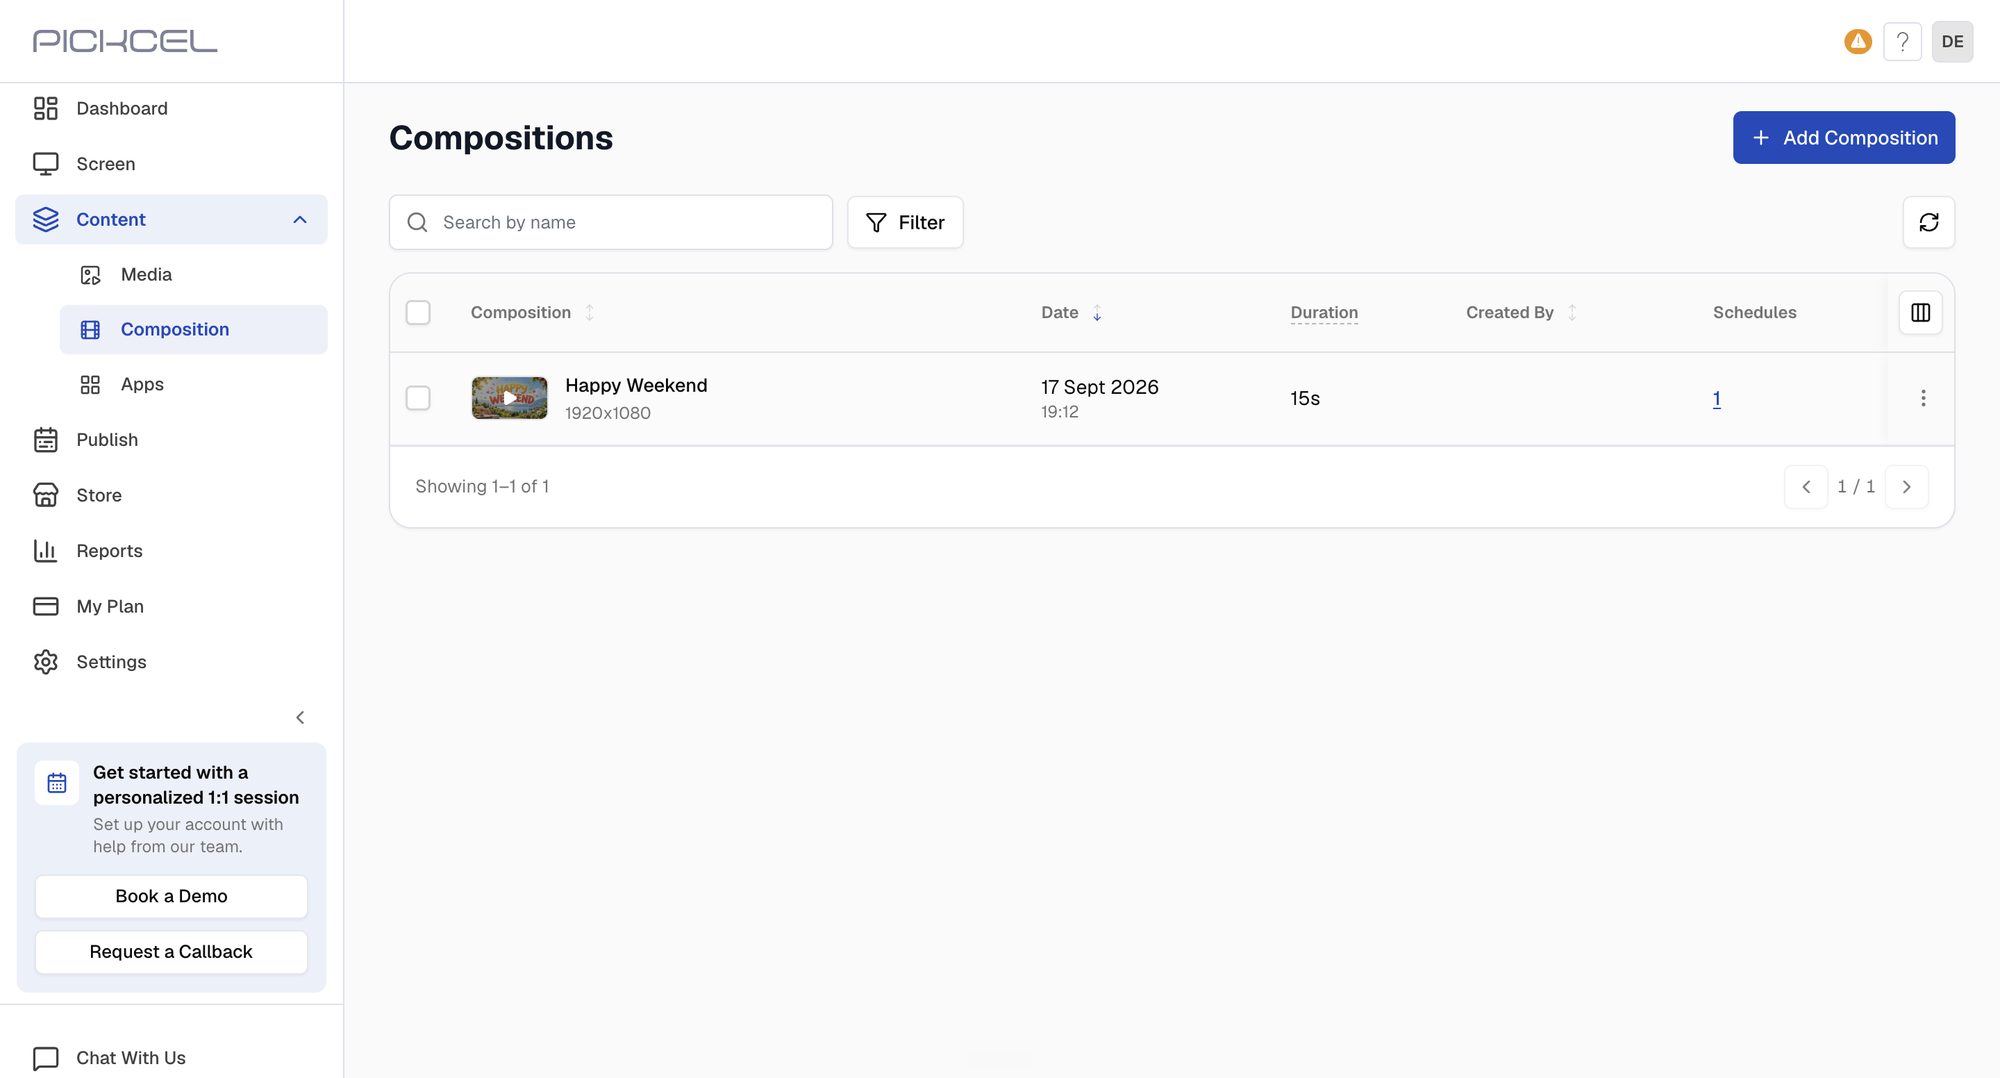
 The new composition in the Pickcel console:
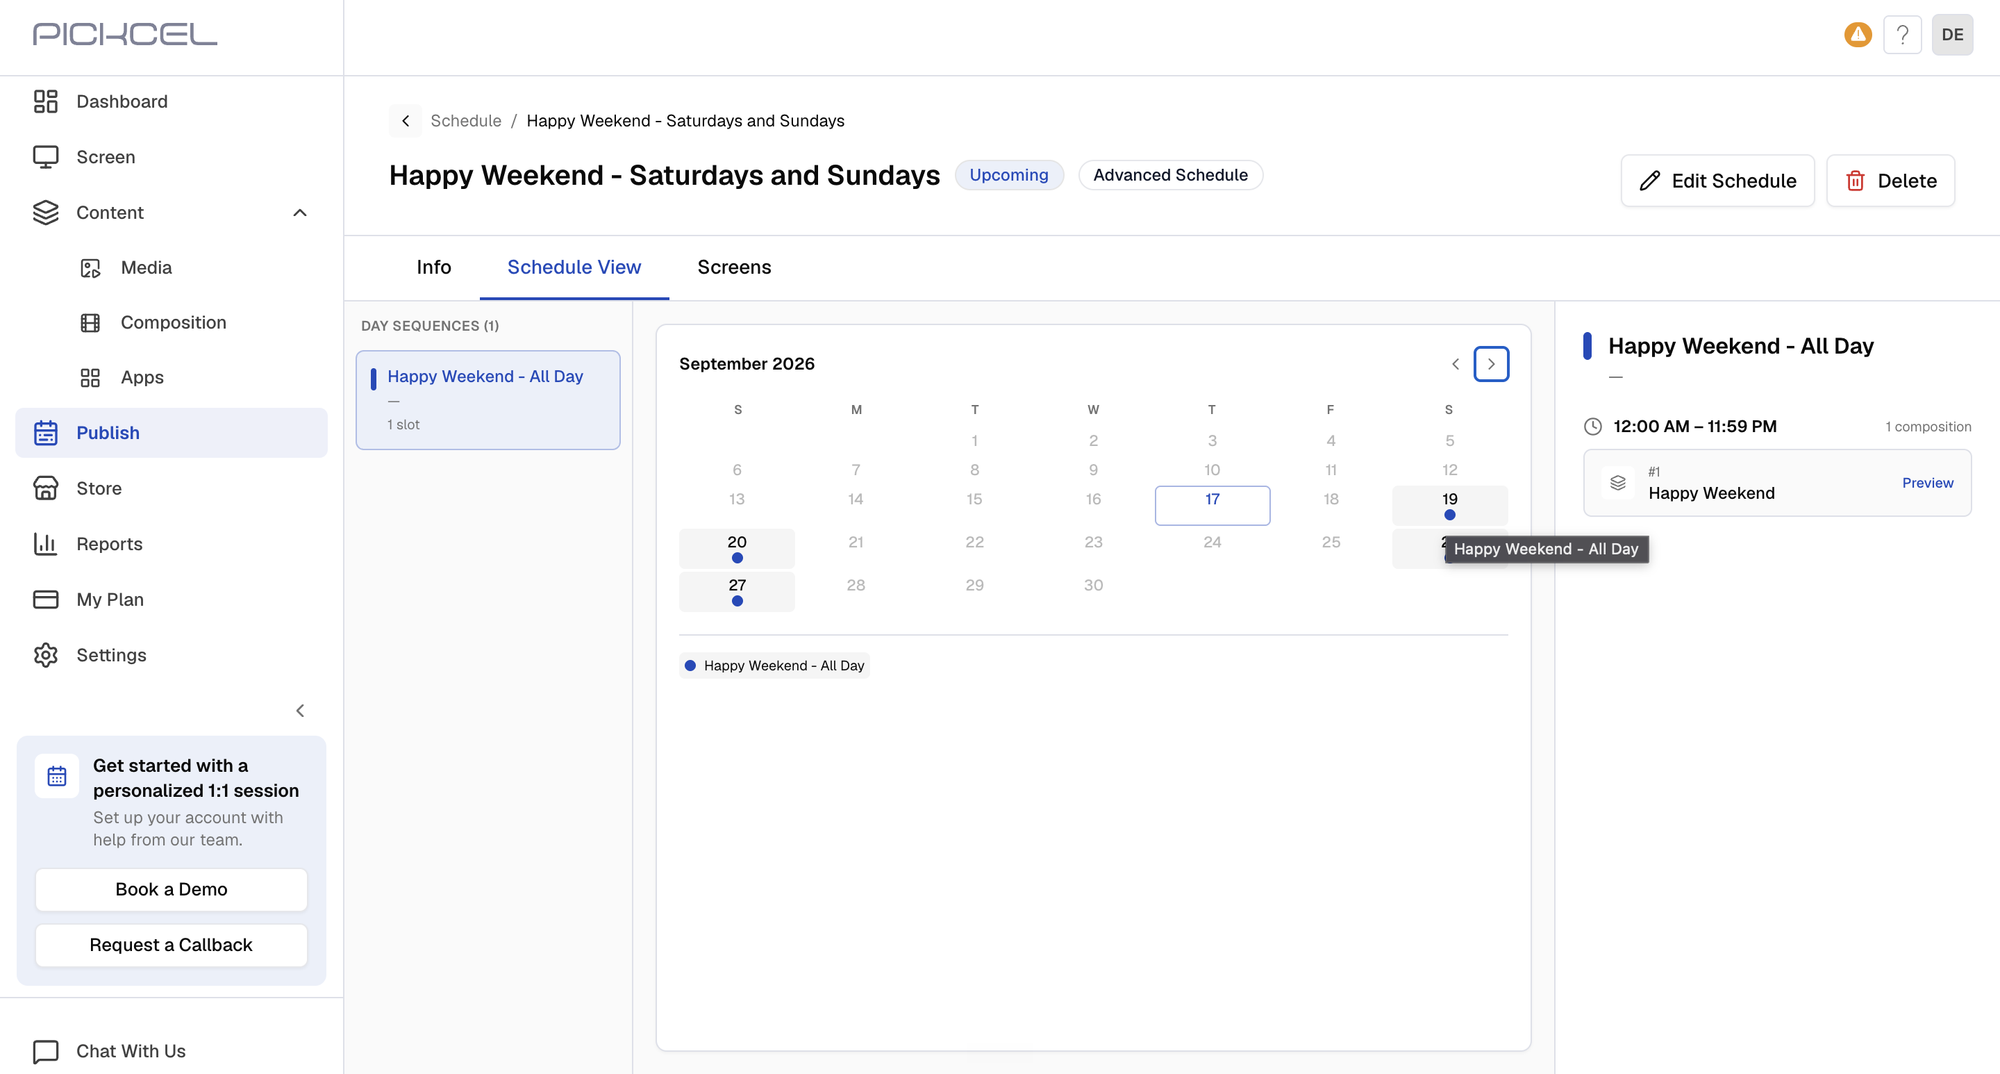
 And its weekend schedule:
 ## Example prompts
Fill in the bracketed values and paste the prompt into your agent.
```text theme={null}
Generate an image of [description], upload it to my media library, build a
composition on the [layout name/orientation] layout using it, and Quickplay
it on [screen name].
```
Needs an agent that can generate images itself. Tested end to end in Codex.
```text theme={null}
List my layouts, then build a composition on the [N]-zone [landscape/portrait]
one. Loop [media names] at [X] seconds each in [zone name], and show
[image name] in [zone name].
```
```text theme={null}
Play composition '[name]' on [screen name] today from [start time] to
[end time].
```
```text theme={null}
Create a daily schedule that plays [content A] from [time]-[time] and
[content B] from [time]-[time], and assign it to [screen name].
```
```text theme={null}
Schedule '[composition name]' to play on [date]-[date] and [date]-[date],
mornings [time]-[time] and evenings [time]-[time].
```
```text theme={null}
Move [screen name] from schedule '[A]' to schedule '[B]'.
```
```text theme={null}
Create a [portrait/landscape] [greeting/promo/announcement] design for
[occasion/offer], brand colour [hex], saying "[exact words]".
```
Give the exact wording up front. The agent won't invent prices, dates, or offers.
```text theme={null}
Upload [file path] to my media library[, in folder '[folder name]'].
```
## Available tools
Your agent picks the right tools on its own. You don't need to name them in your prompts.
| Area | Tool | What it does |
| :------------------------- | :--------------------------- | :------------------------------------------------------- |
| **Screens & media** | `list_screens` | List the screens in your account |
| | `list_media` | Find images, videos, and PDFs in your media library |
| | `begin_media_upload` | Start uploading a new image or video |
| | `save_media` | Finish an upload and add the file to your media library |
| **Layouts & compositions** | `list_layouts` | Browse Pickcel's default layouts and your saved layouts |
| | `get_layout` | Read the zones in a layout |
| | `create_layout` | Save a new layout |
| | `list_compositions` | Find existing compositions |
| | `create_composition` | Build a composition from a layout and your media |
| **Templates & designs** | `list_templates` | Browse published design templates |
| | `get_template` | Get one template |
| | `use_template` | Create a media file from a template |
| | `get_design_guide` | Read the rules for creating a design |
| | `get_design_template` | Read a template's canvas so it can be adapted |
| | `validate_design` | Check a design for problems before saving it |
| | `create_design` | Save a new design and return an editor link |
| | `get_design` | Read a saved design |
| | `update_design` | Save a new version of a design |
| **Scheduling & playback** | `list_day_partitions` | Find Day Sequences (reusable time-slot plans) |
| | `create_day_partition` | Create a Day Sequence |
| | `update_day_partition` | Edit a Day Sequence |
| | `list_schedules` | Find active, upcoming, or expired schedules |
| | `create_schedule` | Schedule Day Sequences over a date range |
| | `update_schedule` | Change a schedule's dates, content, or screens |
| | `assign_schedule_to_screens` | Choose which screens play a schedule |
| | `push_quick_play` | Play a composition on screens right away, for a set time |
## Good to know
* **Your account only.** The agent can only see and change content in the account your token belongs to.
* **One schedule per screen.** Assigning a schedule to a screen replaces the schedule it was playing.
* **Quickplay takes over.** It interrupts whatever the selected screens are playing until its time window ends.
* **Shared Day Sequences.** Editing a Day Sequence changes every schedule that uses it.
* **Uploads need file access.** The agent must be able to read the file, whether it's on your computer or an image it generated. Some hosted agents can't.
* **Designs are text, shapes, and colour.** Generated designs don't include photos. Add images in the editor using the link the agent returns.
## Troubleshooting
* Check the token was copied in full, with no extra spaces.
* Confirm your account is on a **Business plan**.
* In the Claude app, make sure **Authentication** is set to **No sign-in**.
* In ChatGPT, make sure **Type** is set to **Streamable HTTP**, and that you're prompting from **Codex**, not ChatGPT.
* In the Codex CLI, if Codex reports `MCP startup failed`:
* `Environment variable PICKCEL_API_TOKEN ... is not set`: set the variable in the terminal you start `codex` from.
* `Auth required`: the token is wrong, or it includes the `Bearer ` prefix. Set `PICKCEL_API_TOKEN` to the token only.
* Still failing? Generate a new token and reconnect with it. See the next entry.
A new token replaces the old one immediately, so any AI app still using the old token loses its connection. Update each one:
**Claude.ai app:** a connector's saved header can't be edited. Delete the `Pickcel-Digital-Signage` connector in **Settings → Connectors**, then add it again with the new token.
**Claude Code:** `claude mcp add` doesn't overwrite an existing server. Remove it, then add it again:
```bash theme={null}
claude mcp remove pickcel-digital-signage --scope user
claude mcp add --transport http --scope user pickcel-digital-signage \
https://signage.pickcel.com/v5.1/mcp \
--header "Authorization: Bearer "
```
A Claude Code session that's already open keeps the old connection. Run `/mcp` in it, or start a new session.
**Codex CLI:** update `PICKCEL_API_TOKEN` in your shell profile, then open a new terminal and start `codex` again.
Templates is a paid module that isn't enabled on your account. The agent can still create designs from scratch.
Open the schedule in the console's [Advanced Schedule](/schedule-and-publish/v5/advanced-scheduler) calendar to see exactly which dates it covers. If they're wrong, ask the agent to rebuild it as an advanced schedule for those dates.
If it plays black, blank, or at the wrong size, contact Pickcel support instead of asking the agent to recreate it.
The agent can't stop a Quickplay. Delete it from the console under **Publish → Quickplay**, or wait for its time window to end. See [Quickplay](/schedule-and-publish/v5/quick-play#managing-quickplays).
## Related guides
Manage the API token your agent connects with.
Layouts, zones, and compositions in the console.
View or delete Quickplays, including ones your agent started.
Review schedules your agent created in the calendar view.
## Example prompts
Fill in the bracketed values and paste the prompt into your agent.
```text theme={null}
Generate an image of [description], upload it to my media library, build a
composition on the [layout name/orientation] layout using it, and Quickplay
it on [screen name].
```
Needs an agent that can generate images itself. Tested end to end in Codex.
```text theme={null}
List my layouts, then build a composition on the [N]-zone [landscape/portrait]
one. Loop [media names] at [X] seconds each in [zone name], and show
[image name] in [zone name].
```
```text theme={null}
Play composition '[name]' on [screen name] today from [start time] to
[end time].
```
```text theme={null}
Create a daily schedule that plays [content A] from [time]-[time] and
[content B] from [time]-[time], and assign it to [screen name].
```
```text theme={null}
Schedule '[composition name]' to play on [date]-[date] and [date]-[date],
mornings [time]-[time] and evenings [time]-[time].
```
```text theme={null}
Move [screen name] from schedule '[A]' to schedule '[B]'.
```
```text theme={null}
Create a [portrait/landscape] [greeting/promo/announcement] design for
[occasion/offer], brand colour [hex], saying "[exact words]".
```
Give the exact wording up front. The agent won't invent prices, dates, or offers.
```text theme={null}
Upload [file path] to my media library[, in folder '[folder name]'].
```
## Available tools
Your agent picks the right tools on its own. You don't need to name them in your prompts.
| Area | Tool | What it does |
| :------------------------- | :--------------------------- | :------------------------------------------------------- |
| **Screens & media** | `list_screens` | List the screens in your account |
| | `list_media` | Find images, videos, and PDFs in your media library |
| | `begin_media_upload` | Start uploading a new image or video |
| | `save_media` | Finish an upload and add the file to your media library |
| **Layouts & compositions** | `list_layouts` | Browse Pickcel's default layouts and your saved layouts |
| | `get_layout` | Read the zones in a layout |
| | `create_layout` | Save a new layout |
| | `list_compositions` | Find existing compositions |
| | `create_composition` | Build a composition from a layout and your media |
| **Templates & designs** | `list_templates` | Browse published design templates |
| | `get_template` | Get one template |
| | `use_template` | Create a media file from a template |
| | `get_design_guide` | Read the rules for creating a design |
| | `get_design_template` | Read a template's canvas so it can be adapted |
| | `validate_design` | Check a design for problems before saving it |
| | `create_design` | Save a new design and return an editor link |
| | `get_design` | Read a saved design |
| | `update_design` | Save a new version of a design |
| **Scheduling & playback** | `list_day_partitions` | Find Day Sequences (reusable time-slot plans) |
| | `create_day_partition` | Create a Day Sequence |
| | `update_day_partition` | Edit a Day Sequence |
| | `list_schedules` | Find active, upcoming, or expired schedules |
| | `create_schedule` | Schedule Day Sequences over a date range |
| | `update_schedule` | Change a schedule's dates, content, or screens |
| | `assign_schedule_to_screens` | Choose which screens play a schedule |
| | `push_quick_play` | Play a composition on screens right away, for a set time |
## Good to know
* **Your account only.** The agent can only see and change content in the account your token belongs to.
* **One schedule per screen.** Assigning a schedule to a screen replaces the schedule it was playing.
* **Quickplay takes over.** It interrupts whatever the selected screens are playing until its time window ends.
* **Shared Day Sequences.** Editing a Day Sequence changes every schedule that uses it.
* **Uploads need file access.** The agent must be able to read the file, whether it's on your computer or an image it generated. Some hosted agents can't.
* **Designs are text, shapes, and colour.** Generated designs don't include photos. Add images in the editor using the link the agent returns.
## Troubleshooting
* Check the token was copied in full, with no extra spaces.
* Confirm your account is on a **Business plan**.
* In the Claude app, make sure **Authentication** is set to **No sign-in**.
* In ChatGPT, make sure **Type** is set to **Streamable HTTP**, and that you're prompting from **Codex**, not ChatGPT.
* In the Codex CLI, if Codex reports `MCP startup failed`:
* `Environment variable PICKCEL_API_TOKEN ... is not set`: set the variable in the terminal you start `codex` from.
* `Auth required`: the token is wrong, or it includes the `Bearer ` prefix. Set `PICKCEL_API_TOKEN` to the token only.
* Still failing? Generate a new token and reconnect with it. See the next entry.
A new token replaces the old one immediately, so any AI app still using the old token loses its connection. Update each one:
**Claude.ai app:** a connector's saved header can't be edited. Delete the `Pickcel-Digital-Signage` connector in **Settings → Connectors**, then add it again with the new token.
**Claude Code:** `claude mcp add` doesn't overwrite an existing server. Remove it, then add it again:
```bash theme={null}
claude mcp remove pickcel-digital-signage --scope user
claude mcp add --transport http --scope user pickcel-digital-signage \
https://signage.pickcel.com/v5.1/mcp \
--header "Authorization: Bearer "
```
A Claude Code session that's already open keeps the old connection. Run `/mcp` in it, or start a new session.
**Codex CLI:** update `PICKCEL_API_TOKEN` in your shell profile, then open a new terminal and start `codex` again.
Templates is a paid module that isn't enabled on your account. The agent can still create designs from scratch.
Open the schedule in the console's [Advanced Schedule](/schedule-and-publish/v5/advanced-scheduler) calendar to see exactly which dates it covers. If they're wrong, ask the agent to rebuild it as an advanced schedule for those dates.
If it plays black, blank, or at the wrong size, contact Pickcel support instead of asking the agent to recreate it.
The agent can't stop a Quickplay. Delete it from the console under **Publish → Quickplay**, or wait for its time window to end. See [Quickplay](/schedule-and-publish/v5/quick-play#managing-quickplays).
## Related guides
Manage the API token your agent connects with.
Layouts, zones, and compositions in the console.
View or delete Quickplays, including ones your agent started.
Review schedules your agent created in the calendar view.