> ## Documentation Index
> Fetch the complete documentation index at: https://docs.pickcel.com/llms.txt
> Use this file to discover all available pages before exploring further.
# Advanced Schedule: build a multi-day content calendar for digital signage
> Build a content calendar for digital signage using Day Sequences. Control exactly what plays at different hours and on different days, with weekday filters, forever ranges, and manual date overrides.
The **Advanced Schedule** gives you a full content calendar. Instead of one fixed time window, you build **Day Sequences**, named programs that define what plays at different hours, and assign those sequences to specific dates on a calendar.
There are three building blocks:
* **Day Sequence**: a named program made up of time slots
* **Time Slot**: a block of hours within a sequence (e.g. 9 AM–12 PM); assign compositions that loop for the duration
* **Calendar assignment**: paint sequences onto dates using date ranges, weekday filters, or manual overrides
Make sure your compositions are created before building your Advanced Schedule. For a simpler fixed window, use the regular [Schedule](/schedule-and-publish/v5/schedule) instead.
Use Advanced Schedule when you need any of the following:
* Different content on weekdays vs. weekends
* Multiple programs rotating across different weeks or months
* Precise time-slot control (e.g. morning 9 AM–12 PM, afternoon 12 PM–6 PM)
* A schedule that runs indefinitely with no end date
* Manual control over individual calendar dates
***
## How to open the Advanced Schedule builder
Click **Publish** in the left navigation, click the **Publish** button, select **Schedule** on the Configure Publish page, then scroll to **Advanced options** and click **Advanced Schedule**. Confirm the dialog to proceed.
You are now in the Advanced Schedule builder. The page has two areas:
* **Left panel**: your Day Sequences
* **Right side**: the calendar for the current month
The progress bar at the top shows the three steps: **Configure Schedule → Select Screens → Publish Schedule**.
***
## Step 1: Build your Day Sequences
A Day Sequence defines what plays on a given day. Each sequence is made up of **time slots**, blocks of the day assigned to specific compositions.
Click **+ Add Day Sequence** at the top of the left panel. Two options appear:
* **New**: creates a blank sequence from scratch
* **Copy existing**: only available once you have at least one Day Sequence already created. Select a sequence from the list and click **Copy Sequence** to duplicate it as a starting point.
The copy is fully independent, changes to it do not affect the original, and vice versa. Useful when two sequences share a similar structure, such as a Weekday and Weekend version of the same program.
Enter a name in the **Sequence Name** field.
A default time slot (9:00 AM → 10:00 AM) is created for you. Adjust the start and end times.
* Click **+ Add Slot** to add more time blocks for different parts of the day
* Click the trash icon on any slot to remove it
A 24-hour timeline at the top gives a visual overview. At the bottom: **Day covered** (total hours your slots cover) and **Default content** (remaining hours that fall back to the default composition).
Click **+ Add Composition** and select the compositions to play in that time window. Multiple compositions loop in sequence within the slot.
Every time slot must have at least one composition before you can save the sequence.
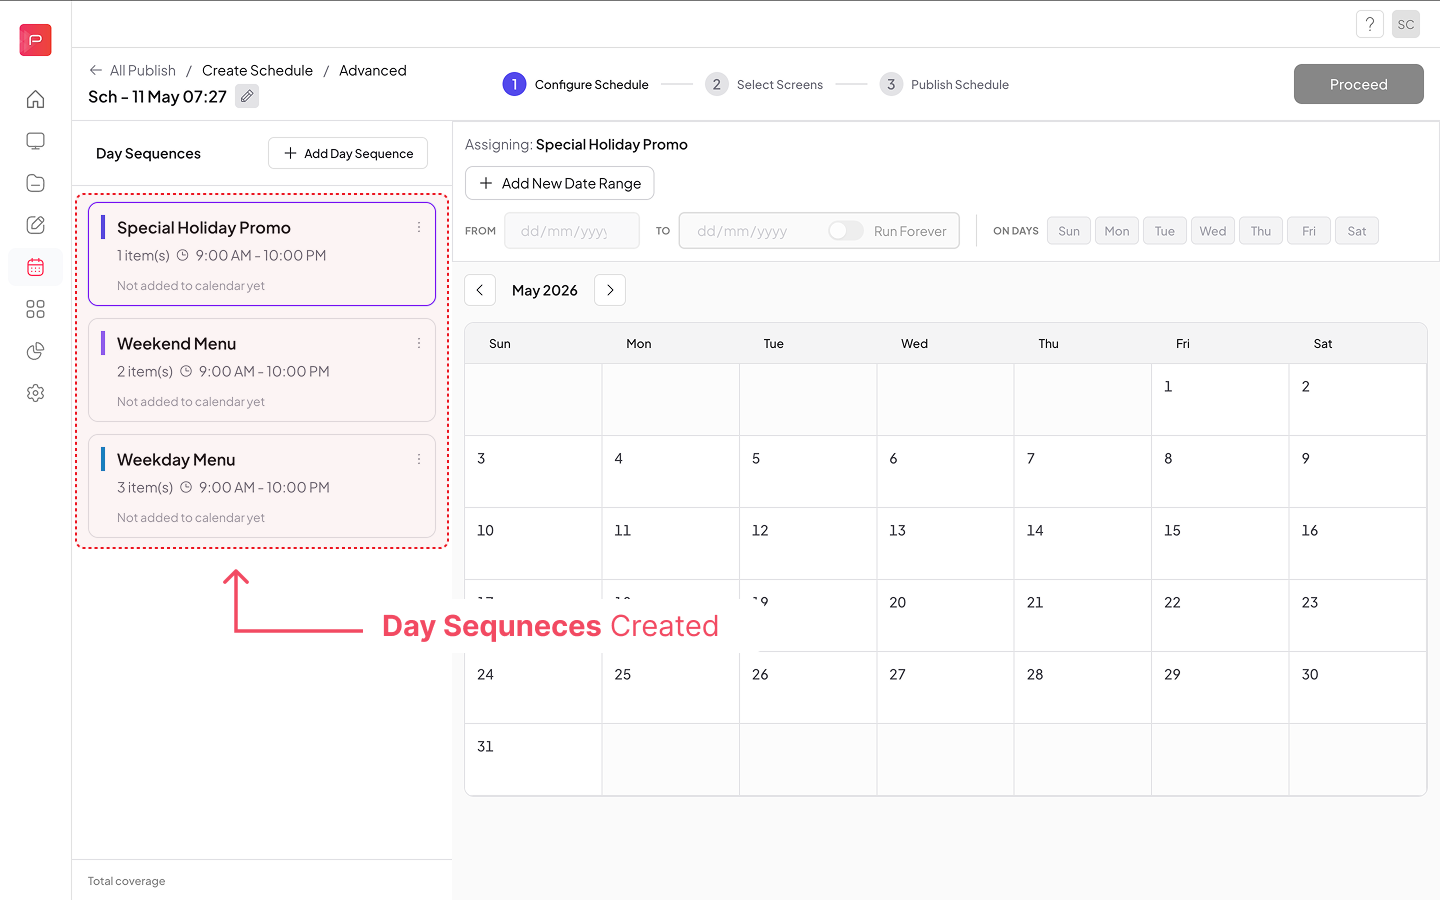
Click **Create Sequence**. The sequence appears as a card in the left panel.
Each card shows the sequence name, the time window, and how many calendar dates are assigned. Repeat to create as many sequences as you need.
 ***
## Step 2: Assign sequences to the calendar
Click a sequence card in the left panel, the card highlights with a left border. All calendar interactions now apply to that sequence.
Pick a start date and an end date to cover a specific period. Turn on **Run Forever** if the sequence should play from that start date with no end.
Use the **ON DAYS** toggles to limit the sequence to certain days of the week, for example, deselect Sat and Sun to skip weekends. Deselecting a day removes those calendar assignments immediately; toggling it back on re-adds them.
Each range you configure appears as a chip, for example, *"2026-05-11 → 2026-05-31 · 21 dates"*. Click **+ Add New Date Range** to add another range to the same sequence, useful when you need to cover non-contiguous periods like two separate months. Click a chip to select and adjust it, or click **×** to remove it.
### How to assign individual dates manually
Calendar cells behave differently depending on whether a date is already assigned:
* **Empty cell**: clicking it immediately assigns the currently active sequence to that date. No confirmation is needed.
* **Assigned chip**: clicking it opens a popup titled with the date (for example, *"Aug 1, 2026"*). Under **CHOOSE SEQUENCE**, all your sequences are listed with a checkmark on the current one. Click a different sequence to reassign, or click **× Clear this date (play default)** to remove the assignment.
***
## Step 2: Assign sequences to the calendar
Click a sequence card in the left panel, the card highlights with a left border. All calendar interactions now apply to that sequence.
Pick a start date and an end date to cover a specific period. Turn on **Run Forever** if the sequence should play from that start date with no end.
Use the **ON DAYS** toggles to limit the sequence to certain days of the week, for example, deselect Sat and Sun to skip weekends. Deselecting a day removes those calendar assignments immediately; toggling it back on re-adds them.
Each range you configure appears as a chip, for example, *"2026-05-11 → 2026-05-31 · 21 dates"*. Click **+ Add New Date Range** to add another range to the same sequence, useful when you need to cover non-contiguous periods like two separate months. Click a chip to select and adjust it, or click **×** to remove it.
### How to assign individual dates manually
Calendar cells behave differently depending on whether a date is already assigned:
* **Empty cell**: clicking it immediately assigns the currently active sequence to that date. No confirmation is needed.
* **Assigned chip**: clicking it opens a popup titled with the date (for example, *"Aug 1, 2026"*). Under **CHOOSE SEQUENCE**, all your sequences are listed with a checkmark on the current one. Click a different sequence to reassign, or click **× Clear this date (play default)** to remove the assignment.
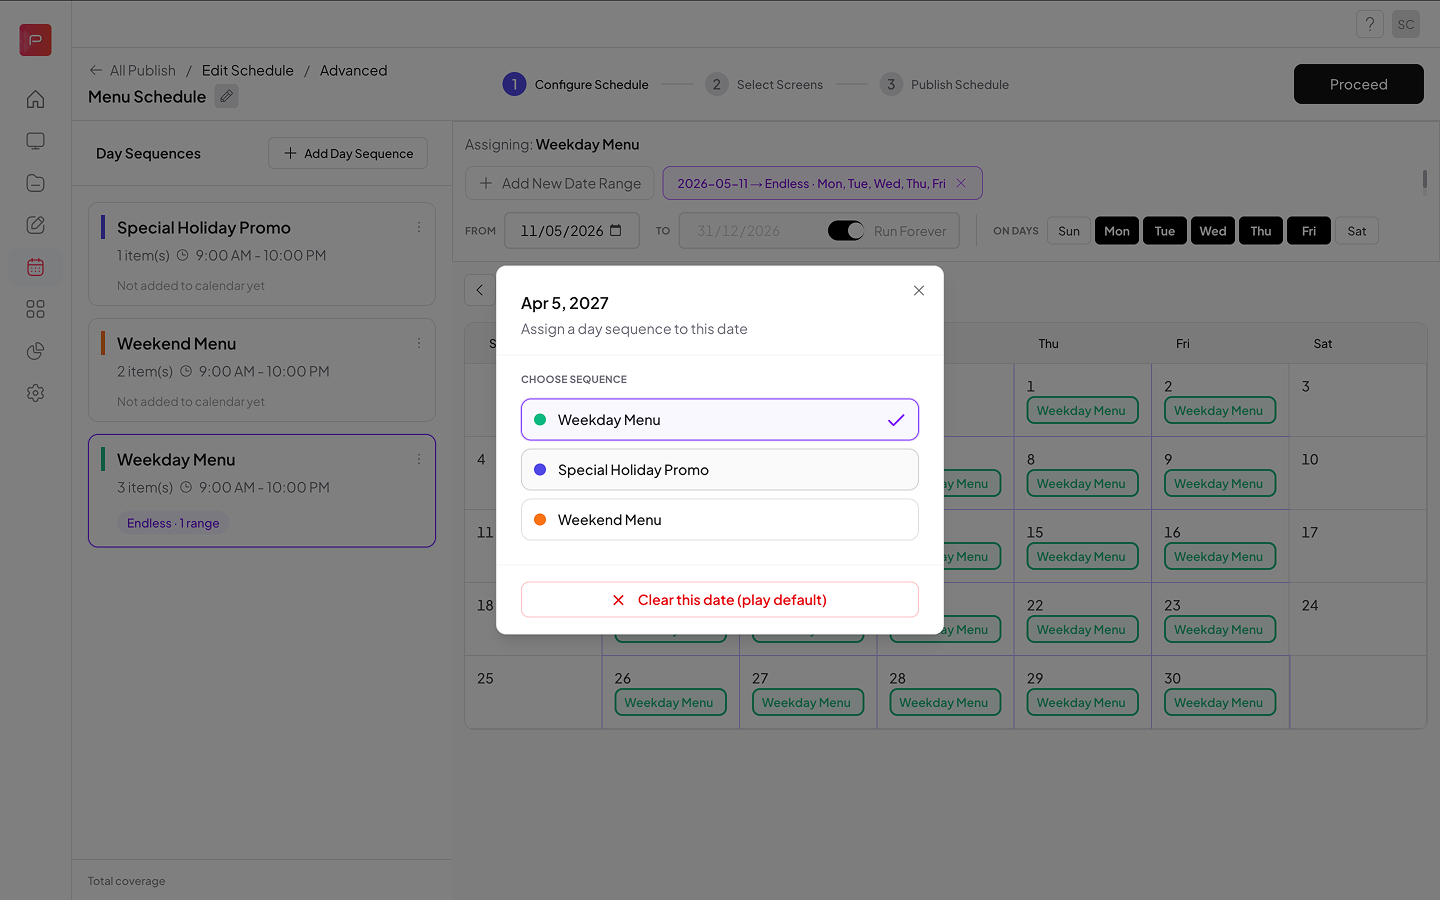 Manual single-date assignments always take priority over date-range rules.
| What you see | What it means |
| ----------------------- | ----------------------------------------------------- |
| Empty cell | Nothing assigned; click to assign the active sequence |
| Chip with sequence name | That sequence is assigned; click to reassign or clear |
| Dimmed cell | Past date, cannot be assigned |
Each card shows its own coverage count:
| Card shows | Meaning |
| ----------------------------- | ---------------------------------- |
| *"31 dates · 1 range"* | 31 calendar days from 1 date range |
| *"31 dates · 2 ranges"* | 31 days across 2 date ranges |
| *"Endless · 1 range"* | Run Forever is on, no end date |
| *"Not added to calendar yet"* | No dates assigned yet |
The count reflects actual calendar cells. If your range covers 30 days but 10 are already taken by another sequence, the card shows 20 dates.
The bottom of the left panel shows **Total coverage**, the number of unique dates with at least one sequence assigned.
If two ranges compete for the same date, the most recent action wins. Manual date clicks always take priority over range rules.
***
## Step 3: Select screens
When your calendar is ready, click **Proceed** to go to **Select Screens**.
Check the screens you want to assign. Each row shows **Last Seen**, **Current Schedule**, and **Download Status** for a quick sanity check.
If a screen already has an active schedule, this new one will replace it.
To save without assigning screens, click **Skip Screen Selection**; the schedule saves as a **Draft**.
Click **Update Schedule** (or **Publish Schedule** for a new one).
***
## Step 4: Publish
The schedule goes live on the selected screens and appears in the **Schedule** tab with a **Published** status. Schedules with no screens assigned show **Draft**.
***
## Editing an existing Advanced Schedule
From the Schedule list, click **⋯** (Actions) on any row and select **Edit**. This reopens the three-step flow: Configure Schedule → Select Screens → Publish Schedule.
You can add or remove sequences, adjust date ranges, reassign calendar dates, and update screen assignments. Changes apply immediately to all assigned screens once you publish.
***
## Common scenarios
Create two sequences, for example `Weekday` and `Weekend`. Activate `Weekday`, set your date range, and in **ON DAYS** select Mon–Fri only. Then activate `Weekend` and select the same date range with Sat–Sun only.
Activate the sequence, set your **FROM** date, and turn on the **Run Forever** toggle. The **TO** field disables and the sequence runs from that date indefinitely.
Click any calendar cell directly. If it's empty, the active sequence is assigned immediately. If a chip is already there, a popup opens; choose a different sequence from the list, or click **× Clear this date (play default)** to remove it. Manual overrides stay in place regardless of date-range rules.
***
## Related
* [Schedule](/schedule-and-publish/v5/schedule), simpler option for a fixed start and end window
* [Quick Play](/schedule-and-publish/v5/quick-play), push content live immediately without calendar setup
* [Schedule & Publish (v4)](/schedule-and-publish/publish-v4), previous workflow
Manual single-date assignments always take priority over date-range rules.
| What you see | What it means |
| ----------------------- | ----------------------------------------------------- |
| Empty cell | Nothing assigned; click to assign the active sequence |
| Chip with sequence name | That sequence is assigned; click to reassign or clear |
| Dimmed cell | Past date, cannot be assigned |
Each card shows its own coverage count:
| Card shows | Meaning |
| ----------------------------- | ---------------------------------- |
| *"31 dates · 1 range"* | 31 calendar days from 1 date range |
| *"31 dates · 2 ranges"* | 31 days across 2 date ranges |
| *"Endless · 1 range"* | Run Forever is on, no end date |
| *"Not added to calendar yet"* | No dates assigned yet |
The count reflects actual calendar cells. If your range covers 30 days but 10 are already taken by another sequence, the card shows 20 dates.
The bottom of the left panel shows **Total coverage**, the number of unique dates with at least one sequence assigned.
If two ranges compete for the same date, the most recent action wins. Manual date clicks always take priority over range rules.
***
## Step 3: Select screens
When your calendar is ready, click **Proceed** to go to **Select Screens**.
Check the screens you want to assign. Each row shows **Last Seen**, **Current Schedule**, and **Download Status** for a quick sanity check.
If a screen already has an active schedule, this new one will replace it.
To save without assigning screens, click **Skip Screen Selection**; the schedule saves as a **Draft**.
Click **Update Schedule** (or **Publish Schedule** for a new one).
***
## Step 4: Publish
The schedule goes live on the selected screens and appears in the **Schedule** tab with a **Published** status. Schedules with no screens assigned show **Draft**.
***
## Editing an existing Advanced Schedule
From the Schedule list, click **⋯** (Actions) on any row and select **Edit**. This reopens the three-step flow: Configure Schedule → Select Screens → Publish Schedule.
You can add or remove sequences, adjust date ranges, reassign calendar dates, and update screen assignments. Changes apply immediately to all assigned screens once you publish.
***
## Common scenarios
Create two sequences, for example `Weekday` and `Weekend`. Activate `Weekday`, set your date range, and in **ON DAYS** select Mon–Fri only. Then activate `Weekend` and select the same date range with Sat–Sun only.
Activate the sequence, set your **FROM** date, and turn on the **Run Forever** toggle. The **TO** field disables and the sequence runs from that date indefinitely.
Click any calendar cell directly. If it's empty, the active sequence is assigned immediately. If a chip is already there, a popup opens; choose a different sequence from the list, or click **× Clear this date (play default)** to remove it. Manual overrides stay in place regardless of date-range rules.
***
## Related
* [Schedule](/schedule-and-publish/v5/schedule), simpler option for a fixed start and end window
* [Quick Play](/schedule-and-publish/v5/quick-play), push content live immediately without calendar setup
* [Schedule & Publish (v4)](/schedule-and-publish/publish-v4), previous workflow