> ## Documentation Index
> Fetch the complete documentation index at: https://docs.pickcel.com/llms.txt
> Use this file to discover all available pages before exploring further.
# How to Set Up Your BrightSign Player for Pickcel Digital Signage?
> Follow this step-by-step guide to configure your BrightSign player with Pickcel's digital signage platform.
**Prerequisites:** Ensure you have the following ready before you begin:
* BrightSign hardware (player)
* MicroSD card (formatted as FAT32 or exFAT)
* BrightAuthor:connected software or access to bsn.cloud
* Access to a wired or wireless network (with SSID and password, if using wireless)
* HDMI cable
* Ethernet cable (required for wired setup while setting up for the first time)
* Power adapter
## Initial Hardware Connections
Follow these initial hardware connection steps before starting the configuration:
### 1. HDMI Connection
* Connect one end of the HDMI cable to the **HDMI OUT** port on your BrightSign player.
* Connect the other end to the **HDMI IN** port on your display or TV.
### 2. Network Connection
* **For wired networks:** Connect an Ethernet cable from your BrightSign player's Ethernet port to your network router or switch.
* **For wireless networks:** Ensure your Wi-Fi network details (SSID and password) are available for later configuration.
### 3. Power Connection
* Plug the provided power adapter into the BrightSign player.
* Connect the adapter to a power outlet.
### 4. Insert Storage Device
Insert the formatted MicroSD card into the corresponding slot on your BrightSign player.
## Step-by-Step Setup Process
Download the BrightAuthor:connected software from the [official website](https://www.brightsign.biz/resources/software-downloads/) or log in directly to [bsn.cloud](https://bsn.cloud/).
If you don't have a BSN.cloud account, click [Register](https://auth.bsn.cloud/realms/bsncloud/login-actions/registration?client_id=baconnected\&tab_id=TjVLaiq4rWU\&client_data=eyJydSI6Imh0dHBzOi8vYnNuLmNsb3VkLyIsInJ0IjoiY29kZSIsInJtIjoicXVlcnkiLCJzdCI6IjhmMzBlZDc1LTRkMDEtNGZjNS05YjQwLTk4MjhhOGVhYjNkZCJ9) or Sign Up in BrightAuthor:connected or on the BSN.cloud website.
For more details refer: [Create a BSN.Cloud Account and Network](https://docs.brightsign.biz/how-tos/create-a-bsncloud-account-and-network)
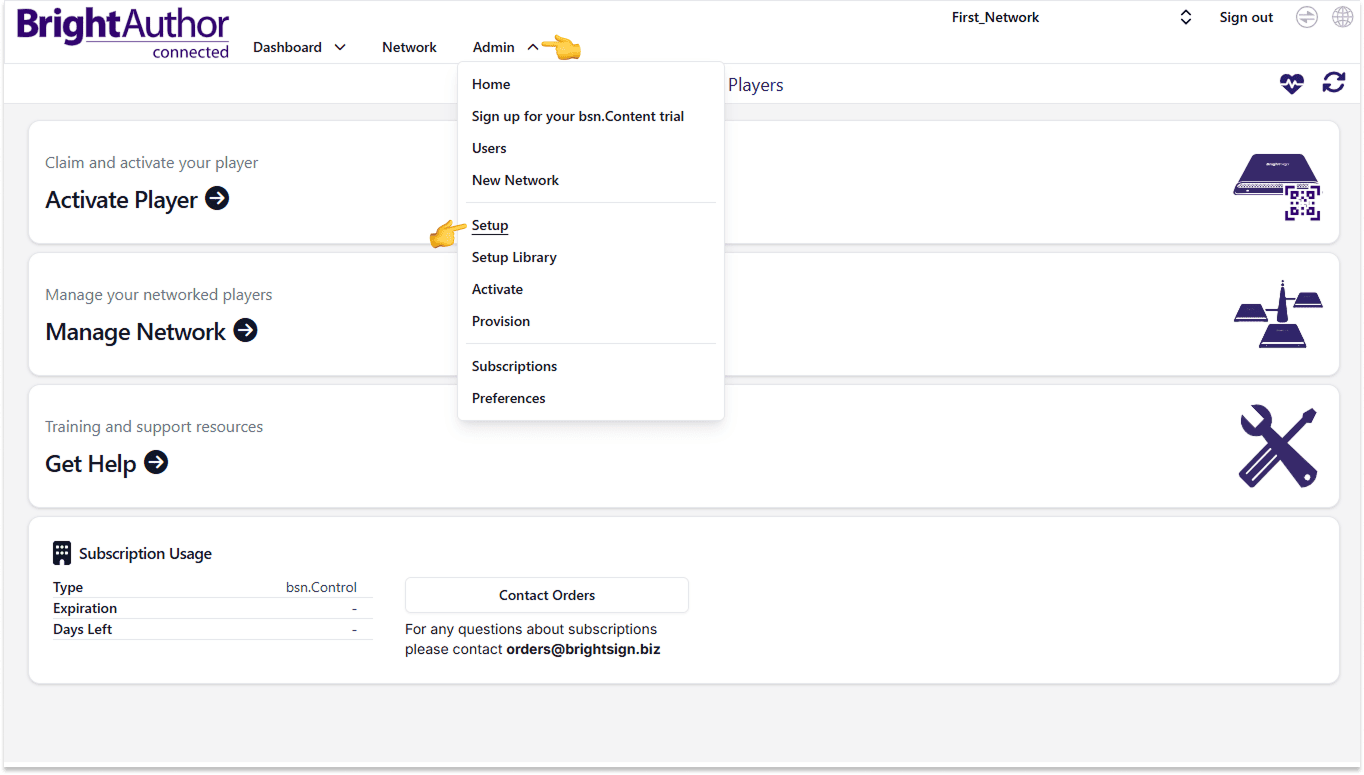
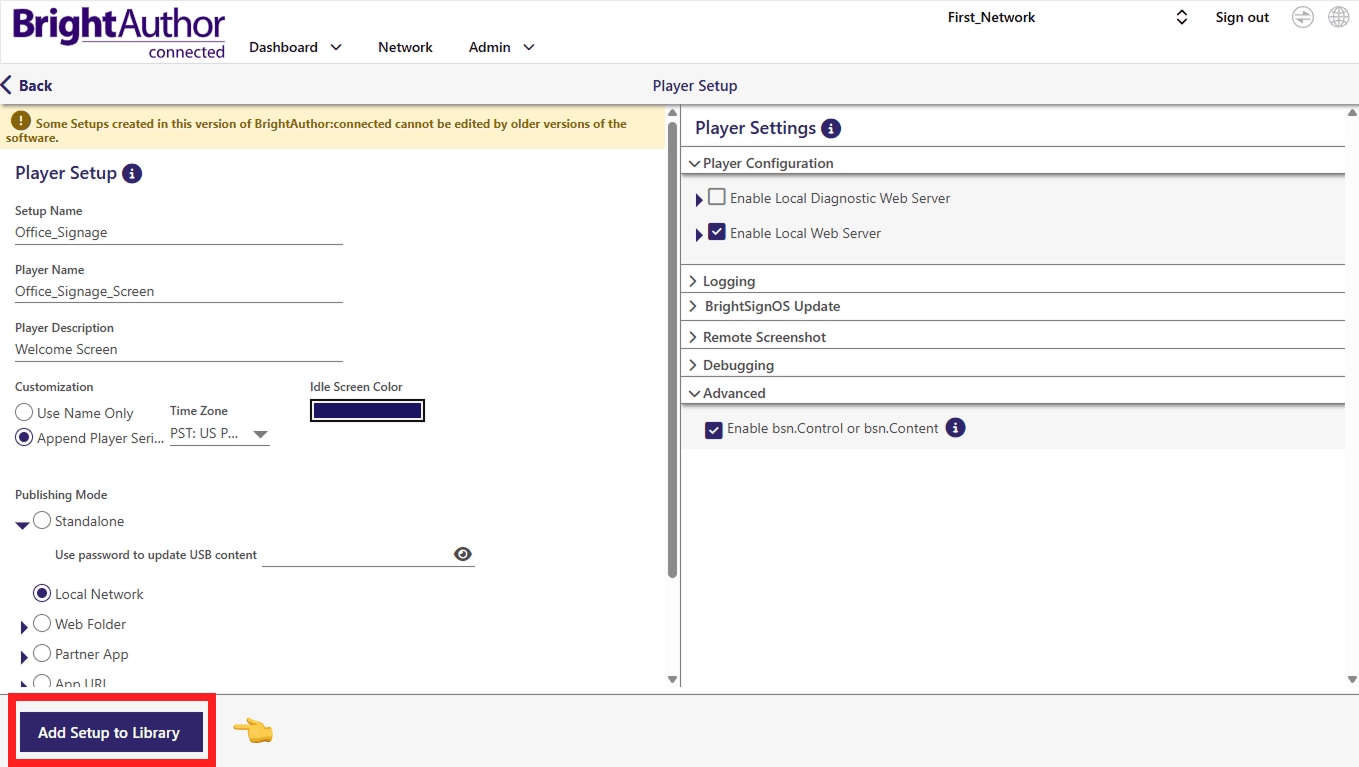
Click on Admin dropdown and select **Setup**.
 * **Setup Name:** Enter a unique name for your BrightSign setup.
* **Player Name:** Enter a unique name for your BrightSign player.
* **Player Description (optional):** Provide a brief description for easier identification.
* **Setup Name:** Enter a unique name for your BrightSign setup.
* **Player Name:** Enter a unique name for your BrightSign player.
* **Player Description (optional):** Provide a brief description for easier identification.
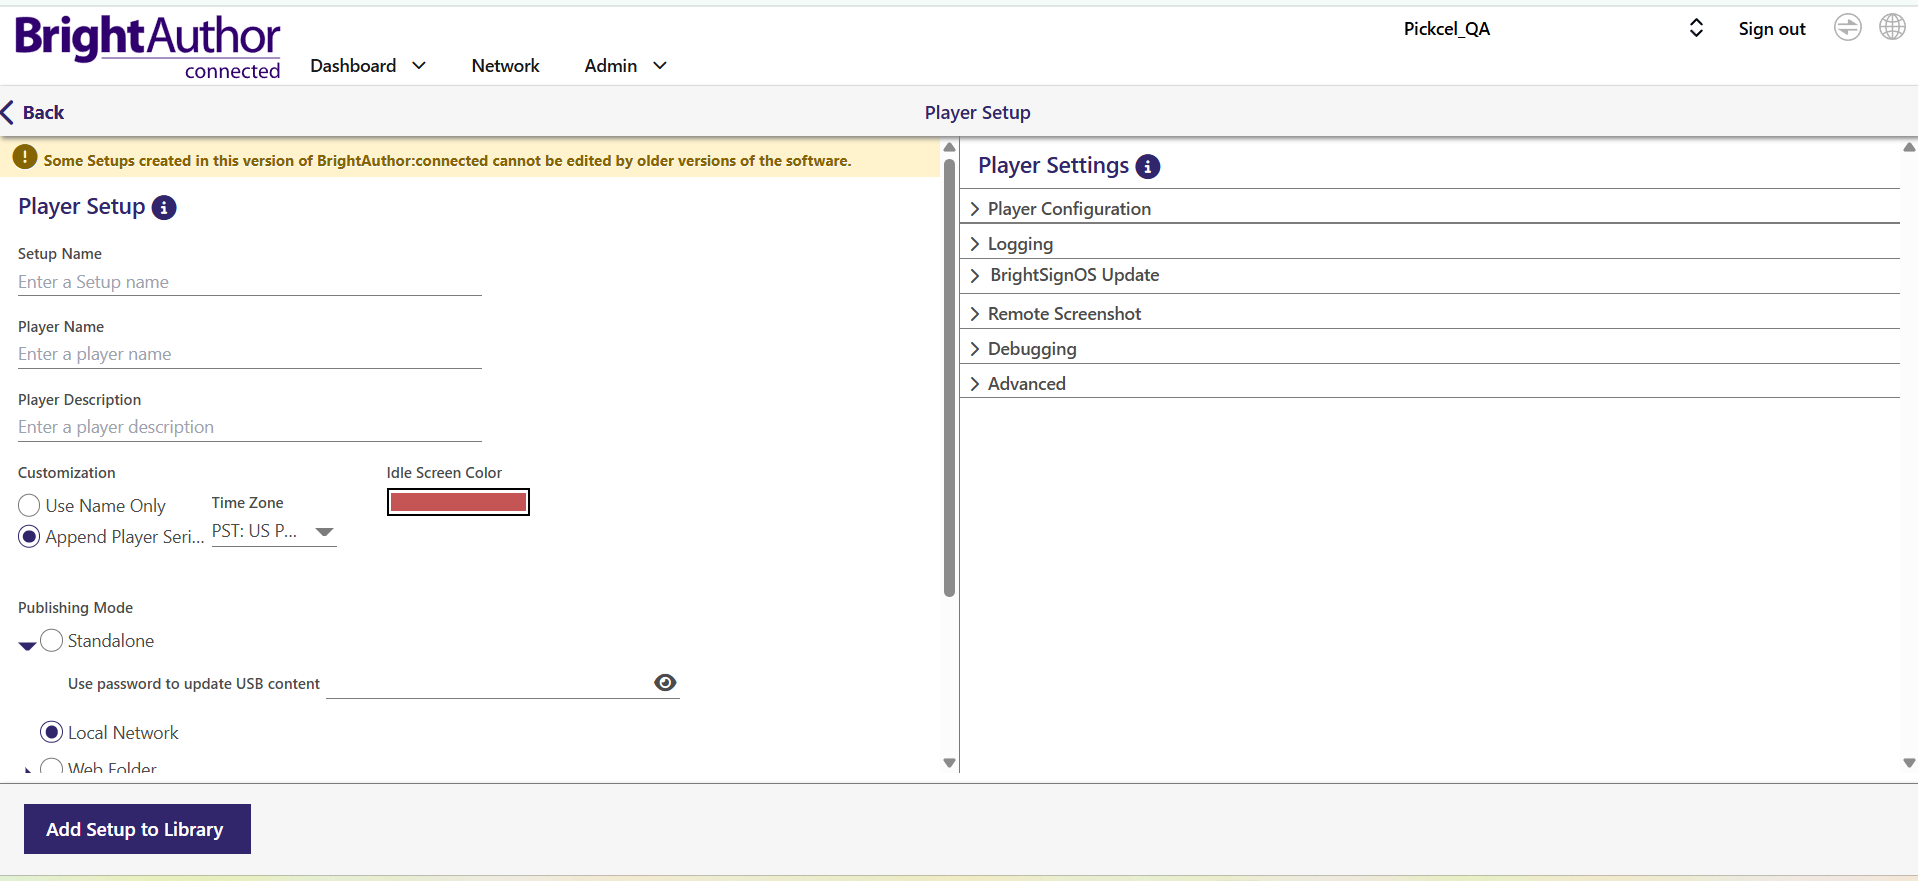 **Customization Options:**
* **Append Player Serial No.:** When enabled, the player adds its serial number to BSN cloud communications. This helps identify the device in BrightSign's management system.
* **Time Zone:** Set the local timezone for accurate time-based operations and scheduling.
* **Idle Screen Color:** Choose a visible color other than black to indicate when the screen is active but idle.
Under **Publishing Mode**, select **Local Network**.
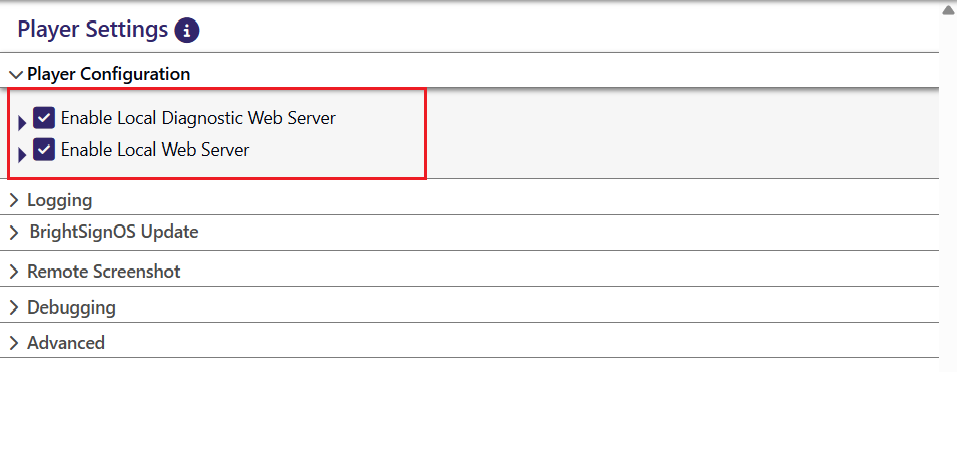
In the Player Settings section, click the **Player Configuration** dropdown and select **Enable Local Web Server** and **Enable Local Diagnostic Web Server** to facilitate local content updates.
**Customization Options:**
* **Append Player Serial No.:** When enabled, the player adds its serial number to BSN cloud communications. This helps identify the device in BrightSign's management system.
* **Time Zone:** Set the local timezone for accurate time-based operations and scheduling.
* **Idle Screen Color:** Choose a visible color other than black to indicate when the screen is active but idle.
Under **Publishing Mode**, select **Local Network**.
In the Player Settings section, click the **Player Configuration** dropdown and select **Enable Local Web Server** and **Enable Local Diagnostic Web Server** to facilitate local content updates.
 Under **Advanced**, confirm the following settings are enabled:
**Enable bsn.Control or bsn.Content:** Enable the persistent WebSockets connection between the player and BSN.cloud servers. This allows players to access bsn.Control or bsn.Content.
Under **Advanced**, confirm the following settings are enabled:
**Enable bsn.Control or bsn.Content:** Enable the persistent WebSockets connection between the player and BSN.cloud servers. This allows players to access bsn.Control or bsn.Content.
 If you disable the WebSockets connection, there is no way to enable it again remotely. You will need to perform player setup locally via a storage device to re-enable this feature.
Check the box for **Include network configuration**.
If you disable the WebSockets connection, there is no way to enable it again remotely. You will need to perform player setup locally via a storage device to re-enable this feature.
Check the box for **Include network configuration**.
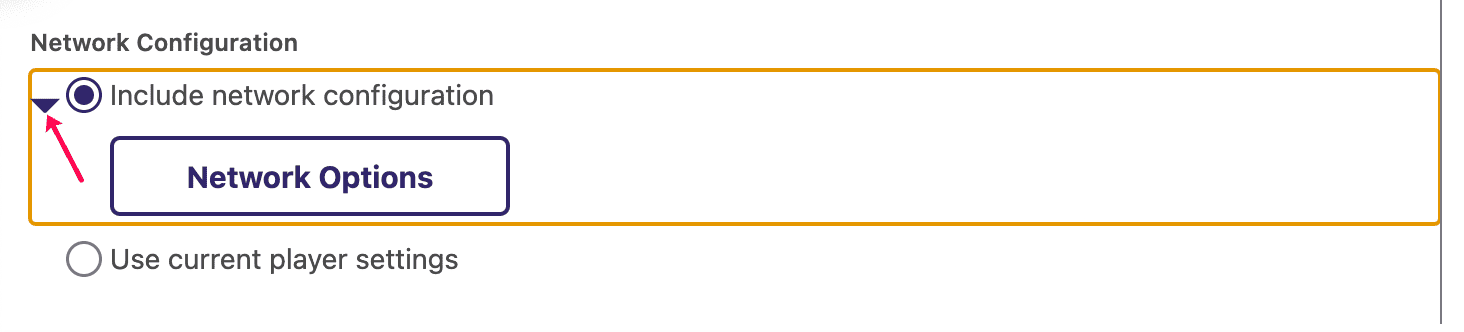 Click **Network Options** and choose your network type. Select the **Wireless** tab, check **Enable Wireless Networking**, and open the **Network Settings** dropdown.
 Fill in your wireless network details:
* **SSID:** Enter your Wi-Fi network name.
* **Password:** Enter your Wi-Fi password.
Click **Add Setup to Library** to save your configuration for future use.
Fill in your wireless network details:
* **SSID:** Enter your Wi-Fi network name.
* **Password:** Enter your Wi-Fi password.
Click **Add Setup to Library** to save your configuration for future use.
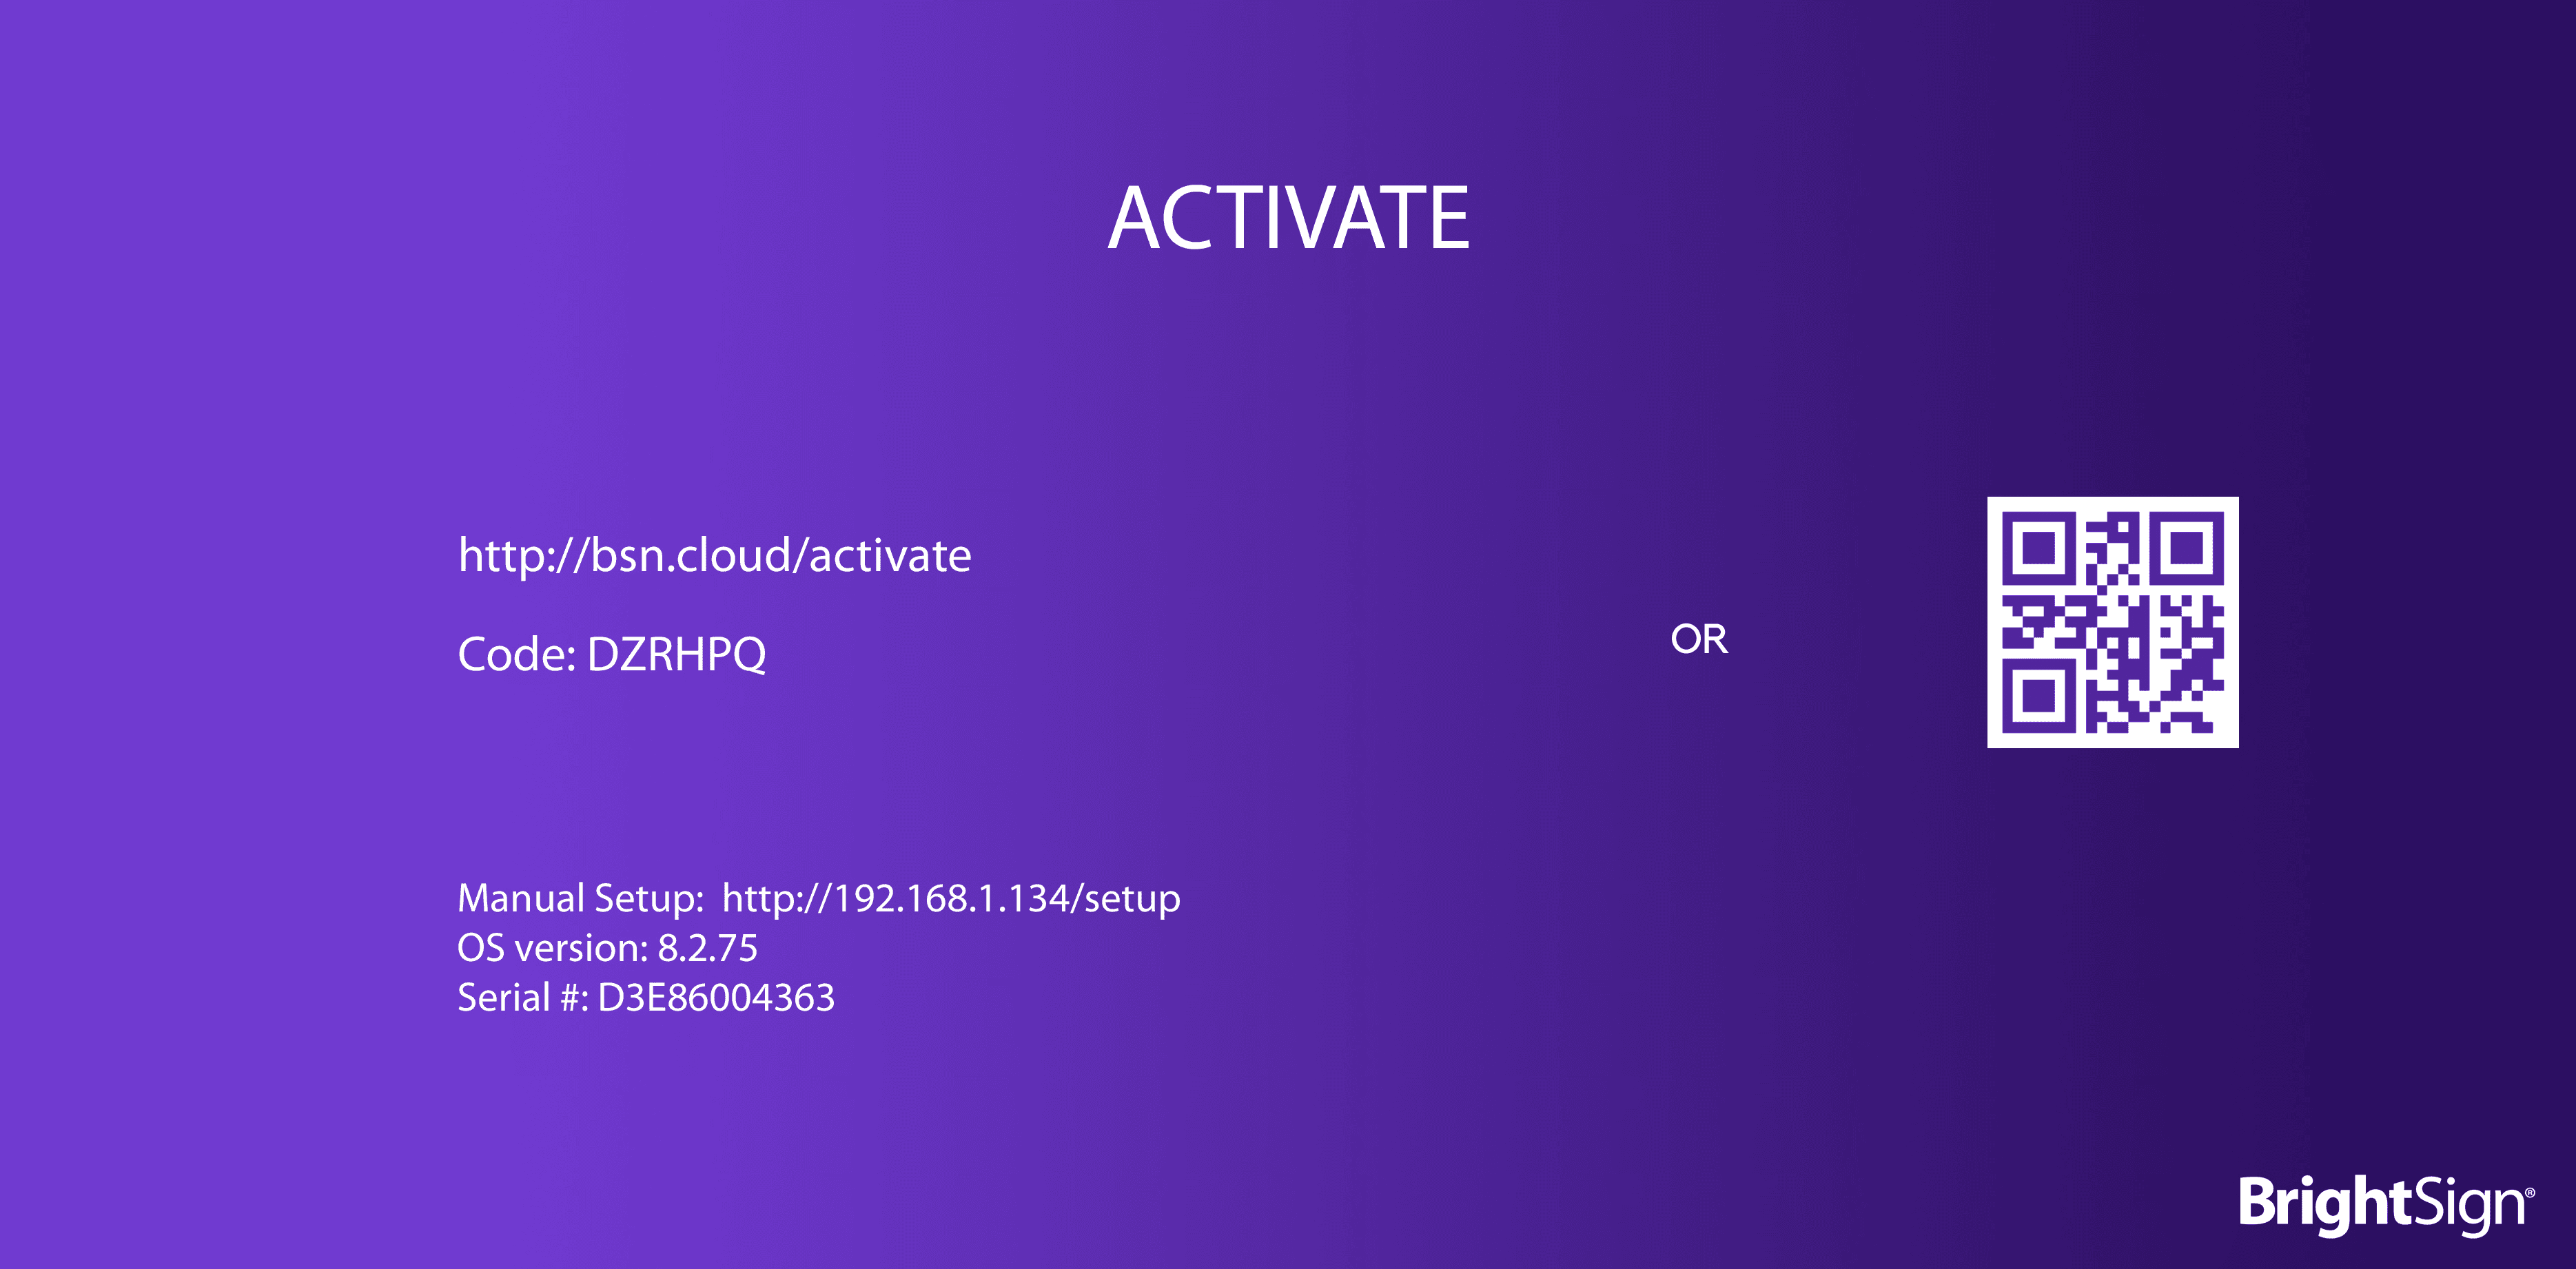
 You will see the activation screen with a code on your player.
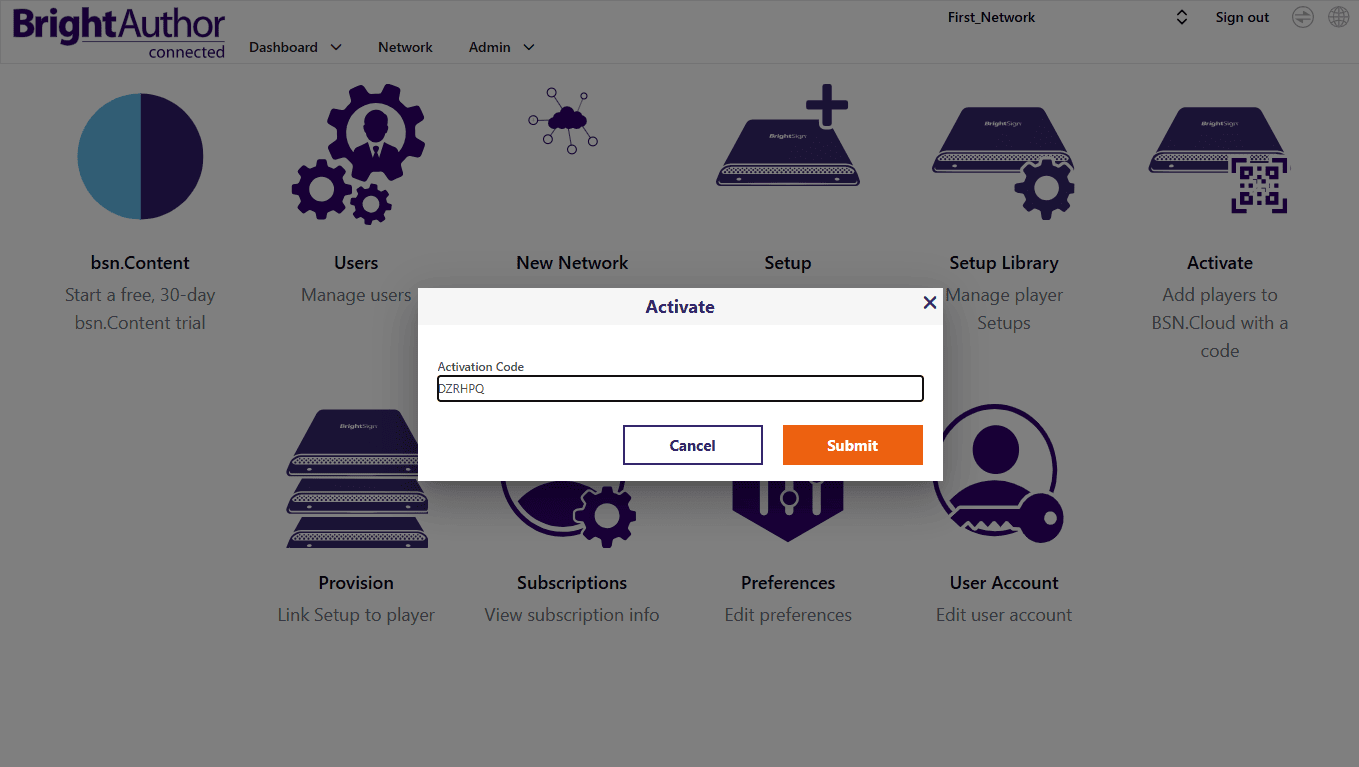
 Navigate to **Admin > Activate** and enter the activation code displayed on your BrightSign device.
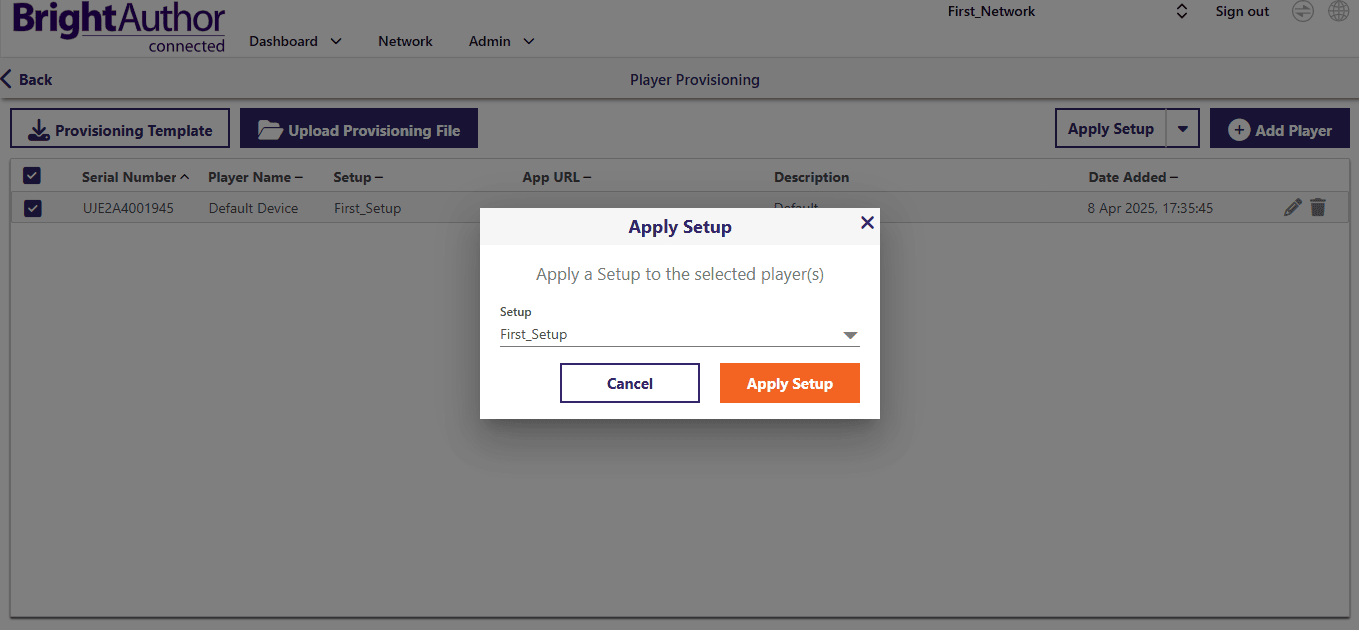
 1. Navigate to **Admin > Provision**.
2. Select the checkbox next to your device and click **Apply Setup**.
3. Choose your saved setup from the dropdown menu.
4. Click **Apply Setup** again in the pop-up window to confirm.
1. Navigate to **Admin > Provision**.
2. Select the checkbox next to your device and click **Apply Setup**.
3. Choose your saved setup from the dropdown menu.
4. Click **Apply Setup** again in the pop-up window to confirm.
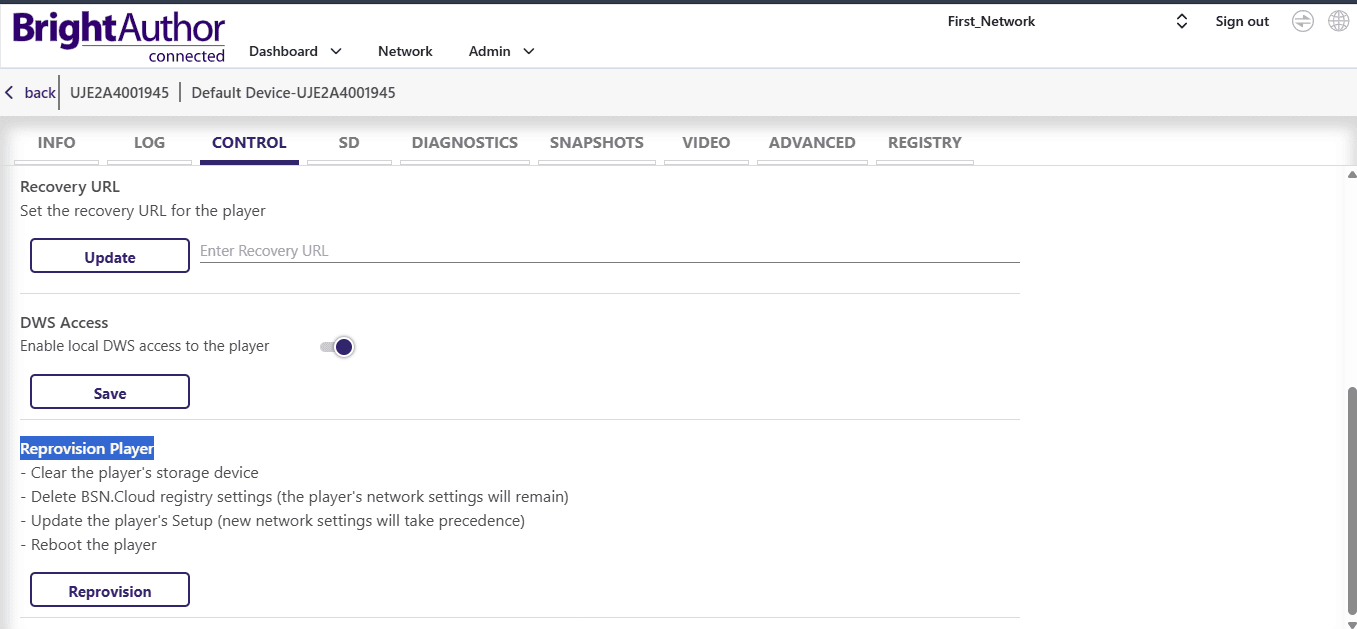
 1. Go to the **Network** tab, locate your player, and click the **gear icon**.
2. Select **Control**, then scroll down and click **Reprovision**.
3. The player restarts and applies the previously configured setup automatically.
1. Go to the **Network** tab, locate your player, and click the **gear icon**.
2. Select **Control**, then scroll down and click **Reprovision**.
3. The player restarts and applies the previously configured setup automatically.
 Wait for the device to reboot. A success message with the assigned Wi-Fi IP address will display.
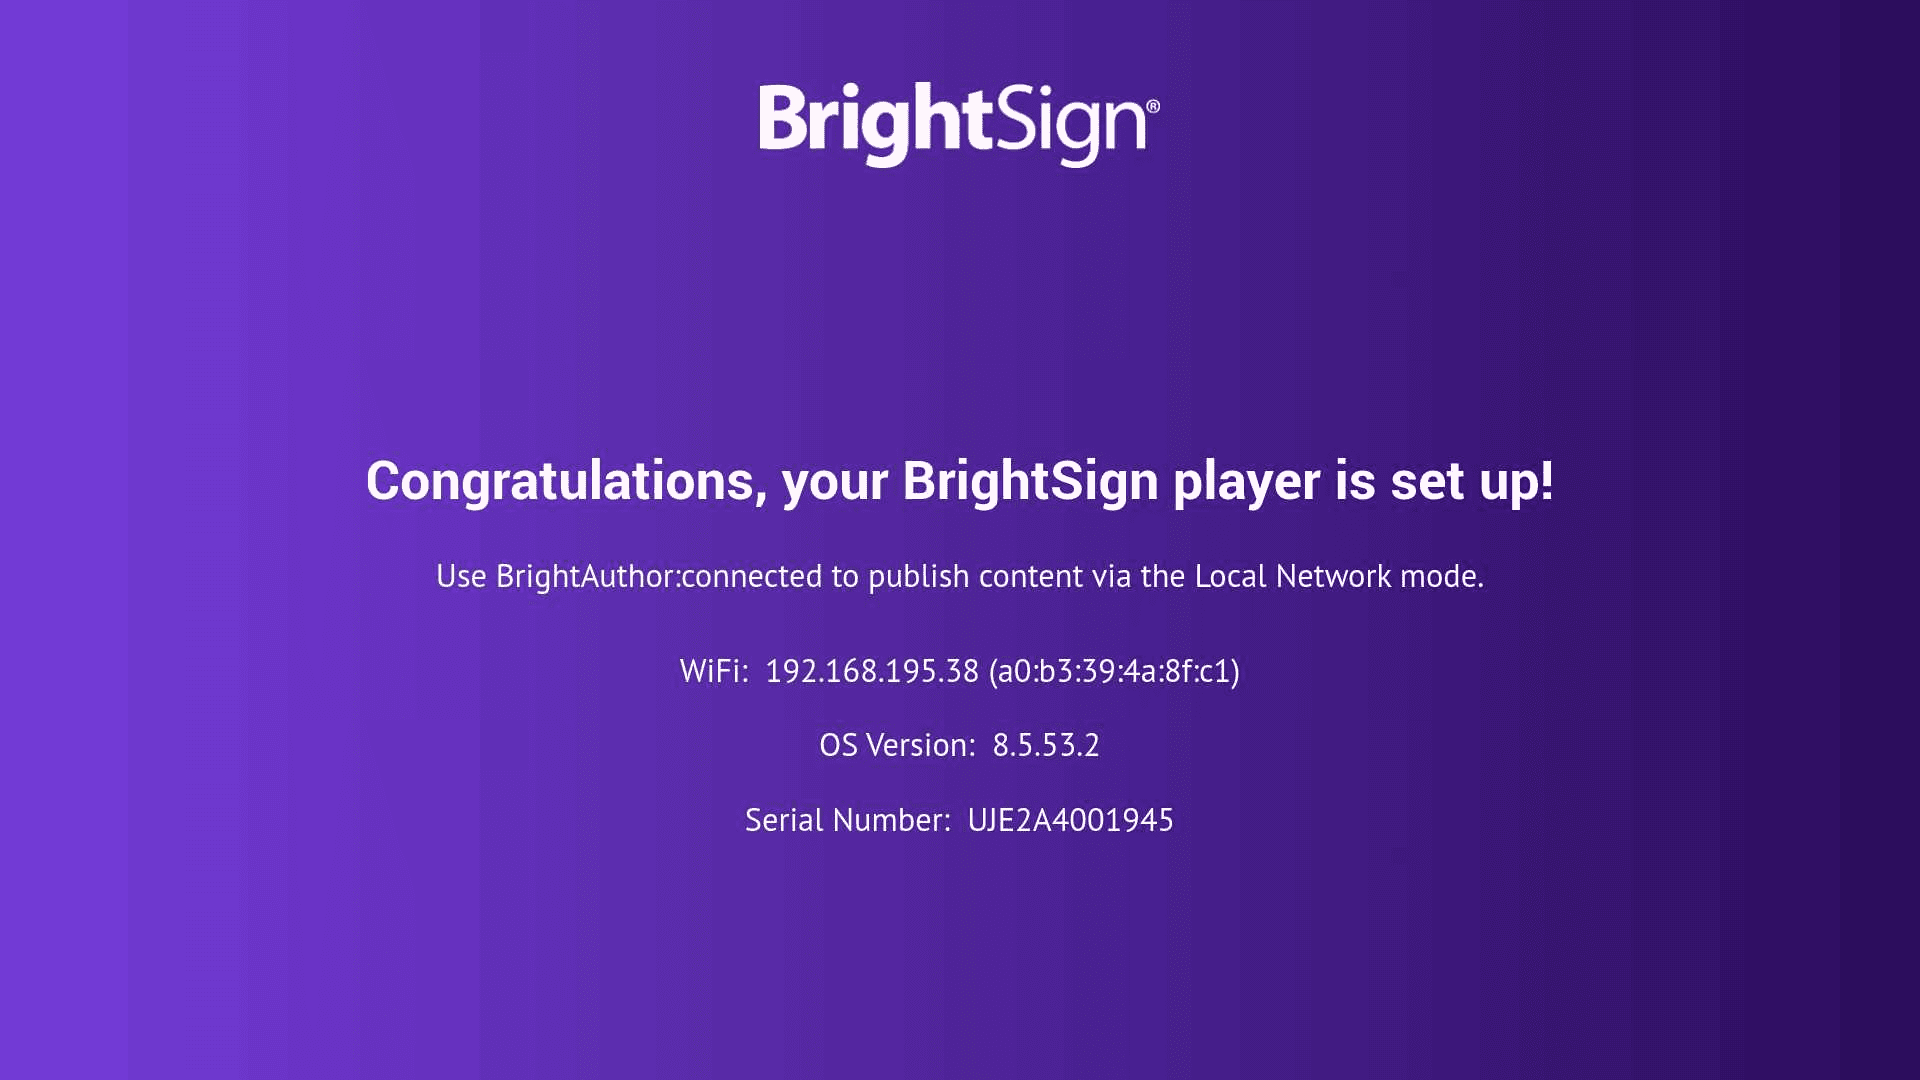 This means that you have successfully configured your Wi-Fi setup with your device. Now you can remove the Ethernet cable from the device.
## Managing content with Pickcel
Go to the **Network** tab. In the player list find your player by its serial number, click the **gear icon**, and review the dashboard.
This means that you have successfully configured your Wi-Fi setup with your device. Now you can remove the Ethernet cable from the device.
## Managing content with Pickcel
Go to the **Network** tab. In the player list find your player by its serial number, click the **gear icon**, and review the dashboard.
 1. Go to the **SD** tab and click **Format SD Card**.
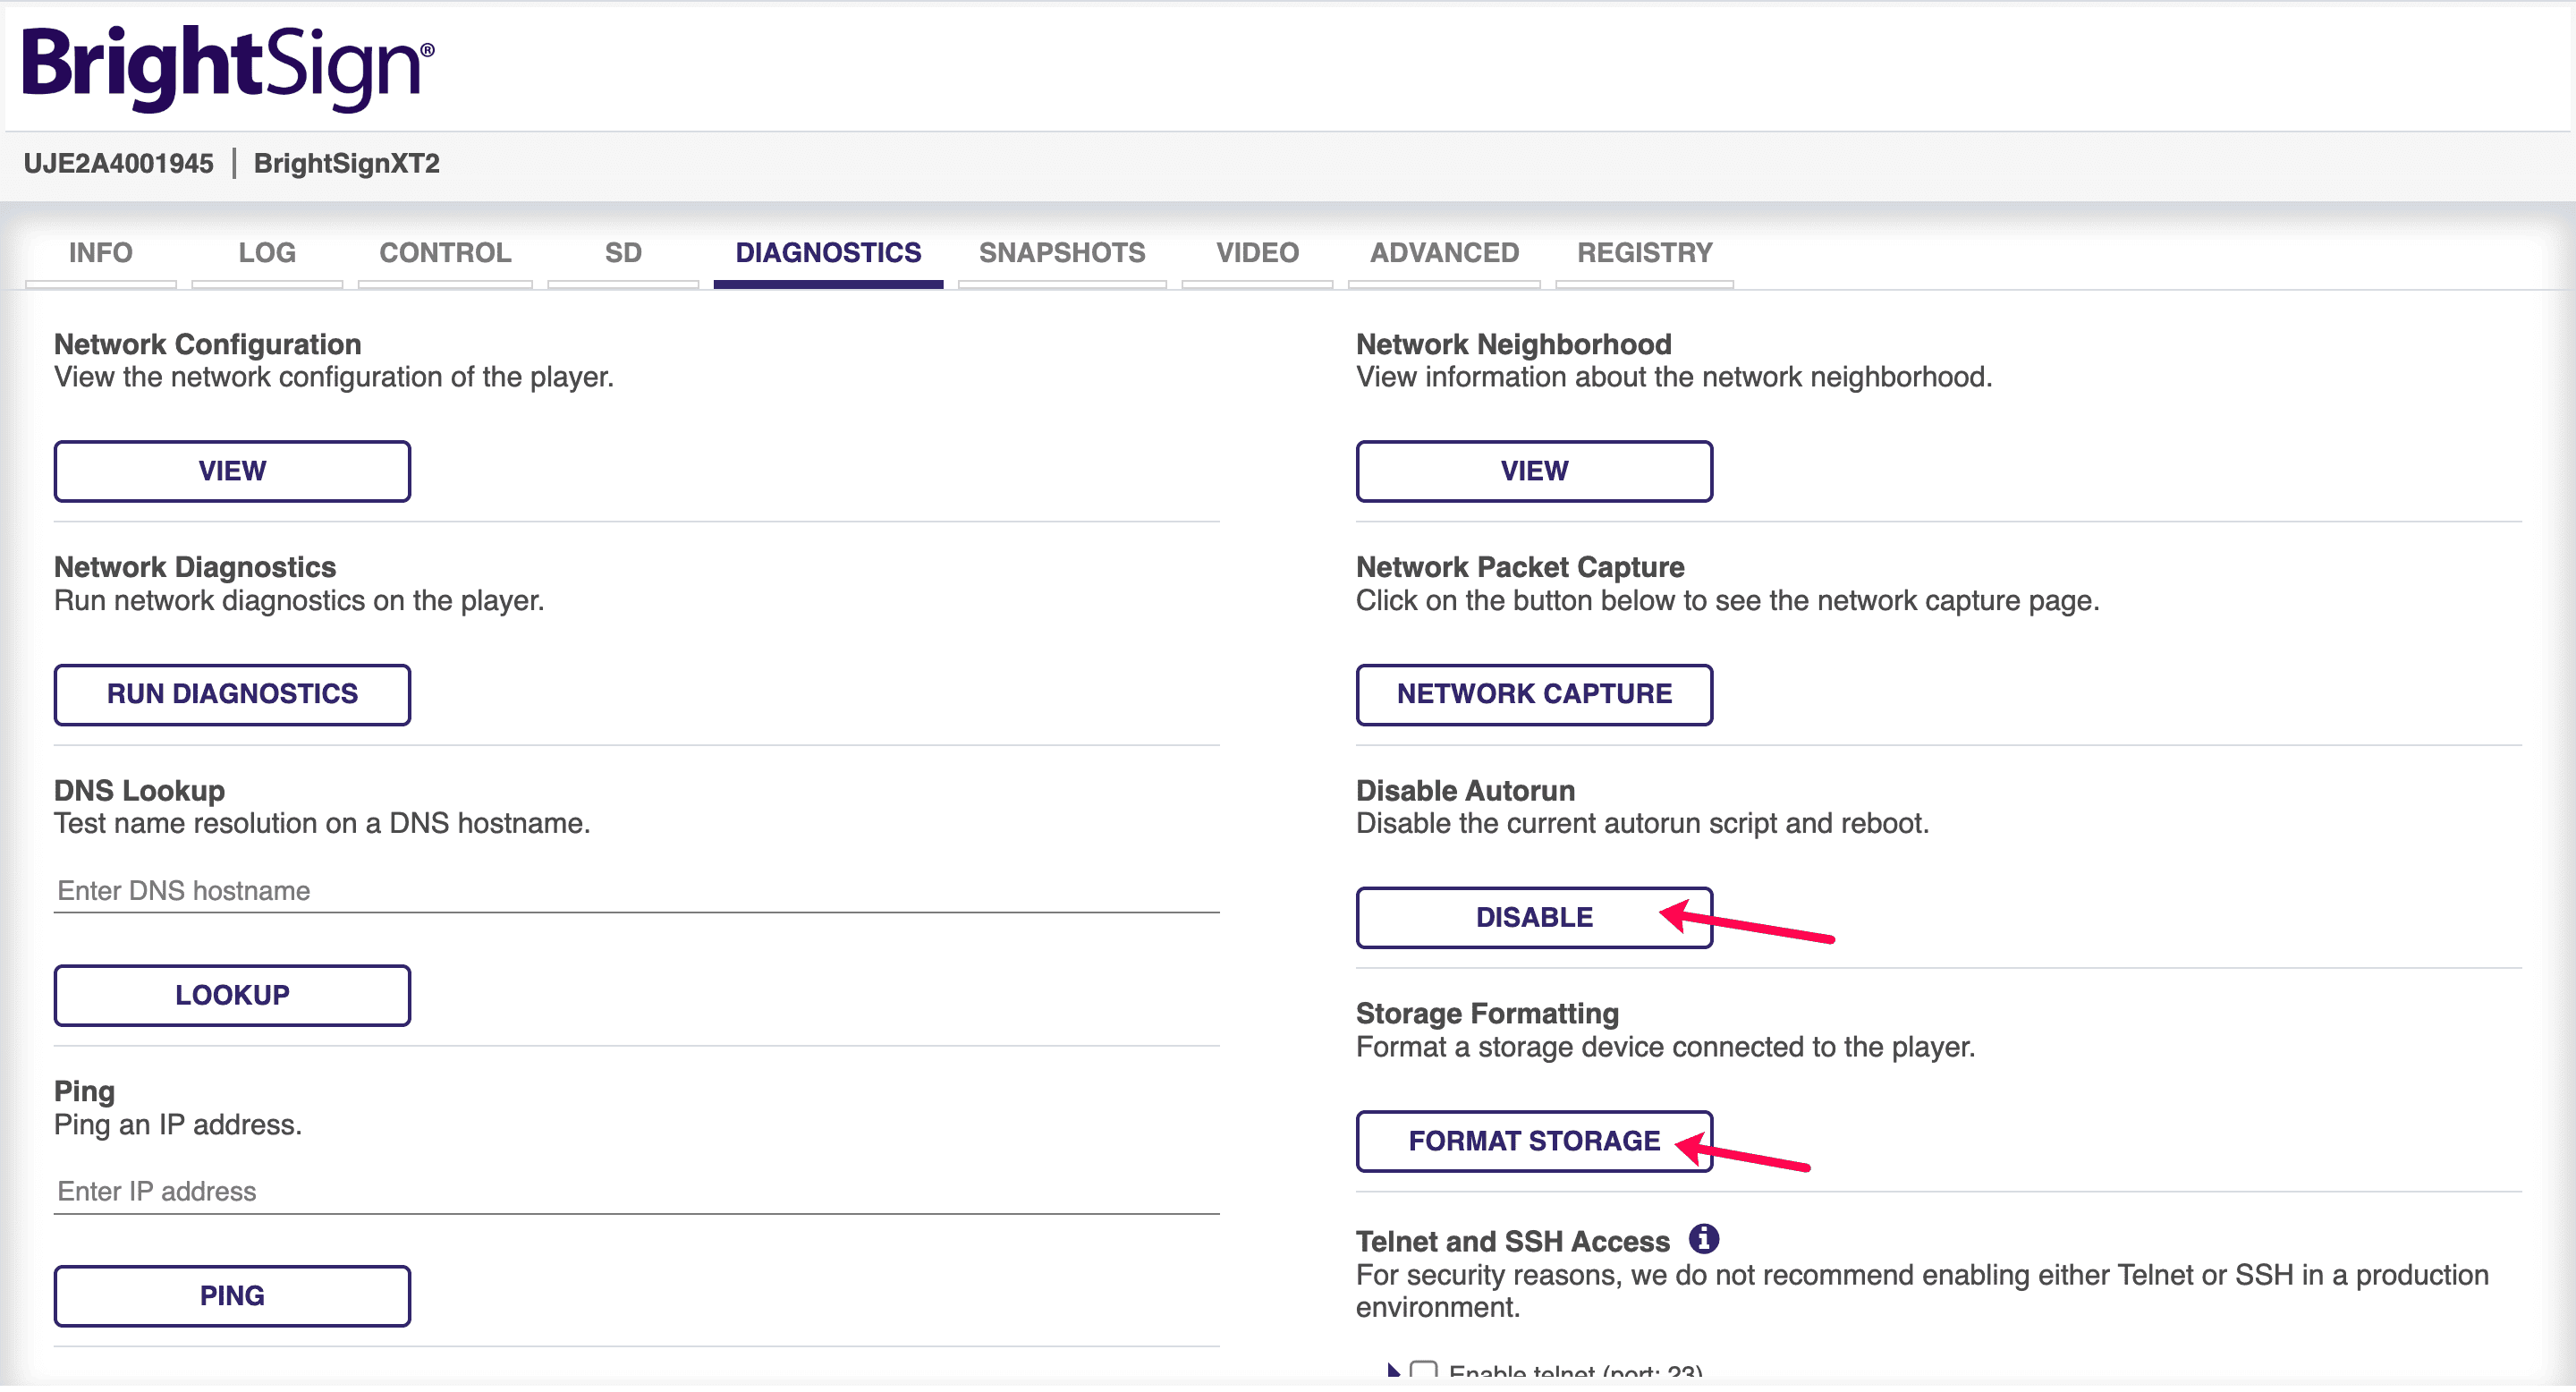 Once formatted, navigate to the **SD** tab:
* Download the [autorun.zip file](https://console.pickcel.com/players/brightsign/autorun.zip).
You can get the latest version from the [Pickcel website](https://www.pickcel.com/digital-signage-player/brightsign.html).
* Use the **Browse** button to select the autorun.zip file.
* Click **Upload Files** to upload the file.
We recommend not changing the autorun zip file name before uploading as it is case sensitive.
Once formatted, navigate to the **SD** tab:
* Download the [autorun.zip file](https://console.pickcel.com/players/brightsign/autorun.zip).
You can get the latest version from the [Pickcel website](https://www.pickcel.com/digital-signage-player/brightsign.html).
* Use the **Browse** button to select the autorun.zip file.
* Click **Upload Files** to upload the file.
We recommend not changing the autorun zip file name before uploading as it is case sensitive.
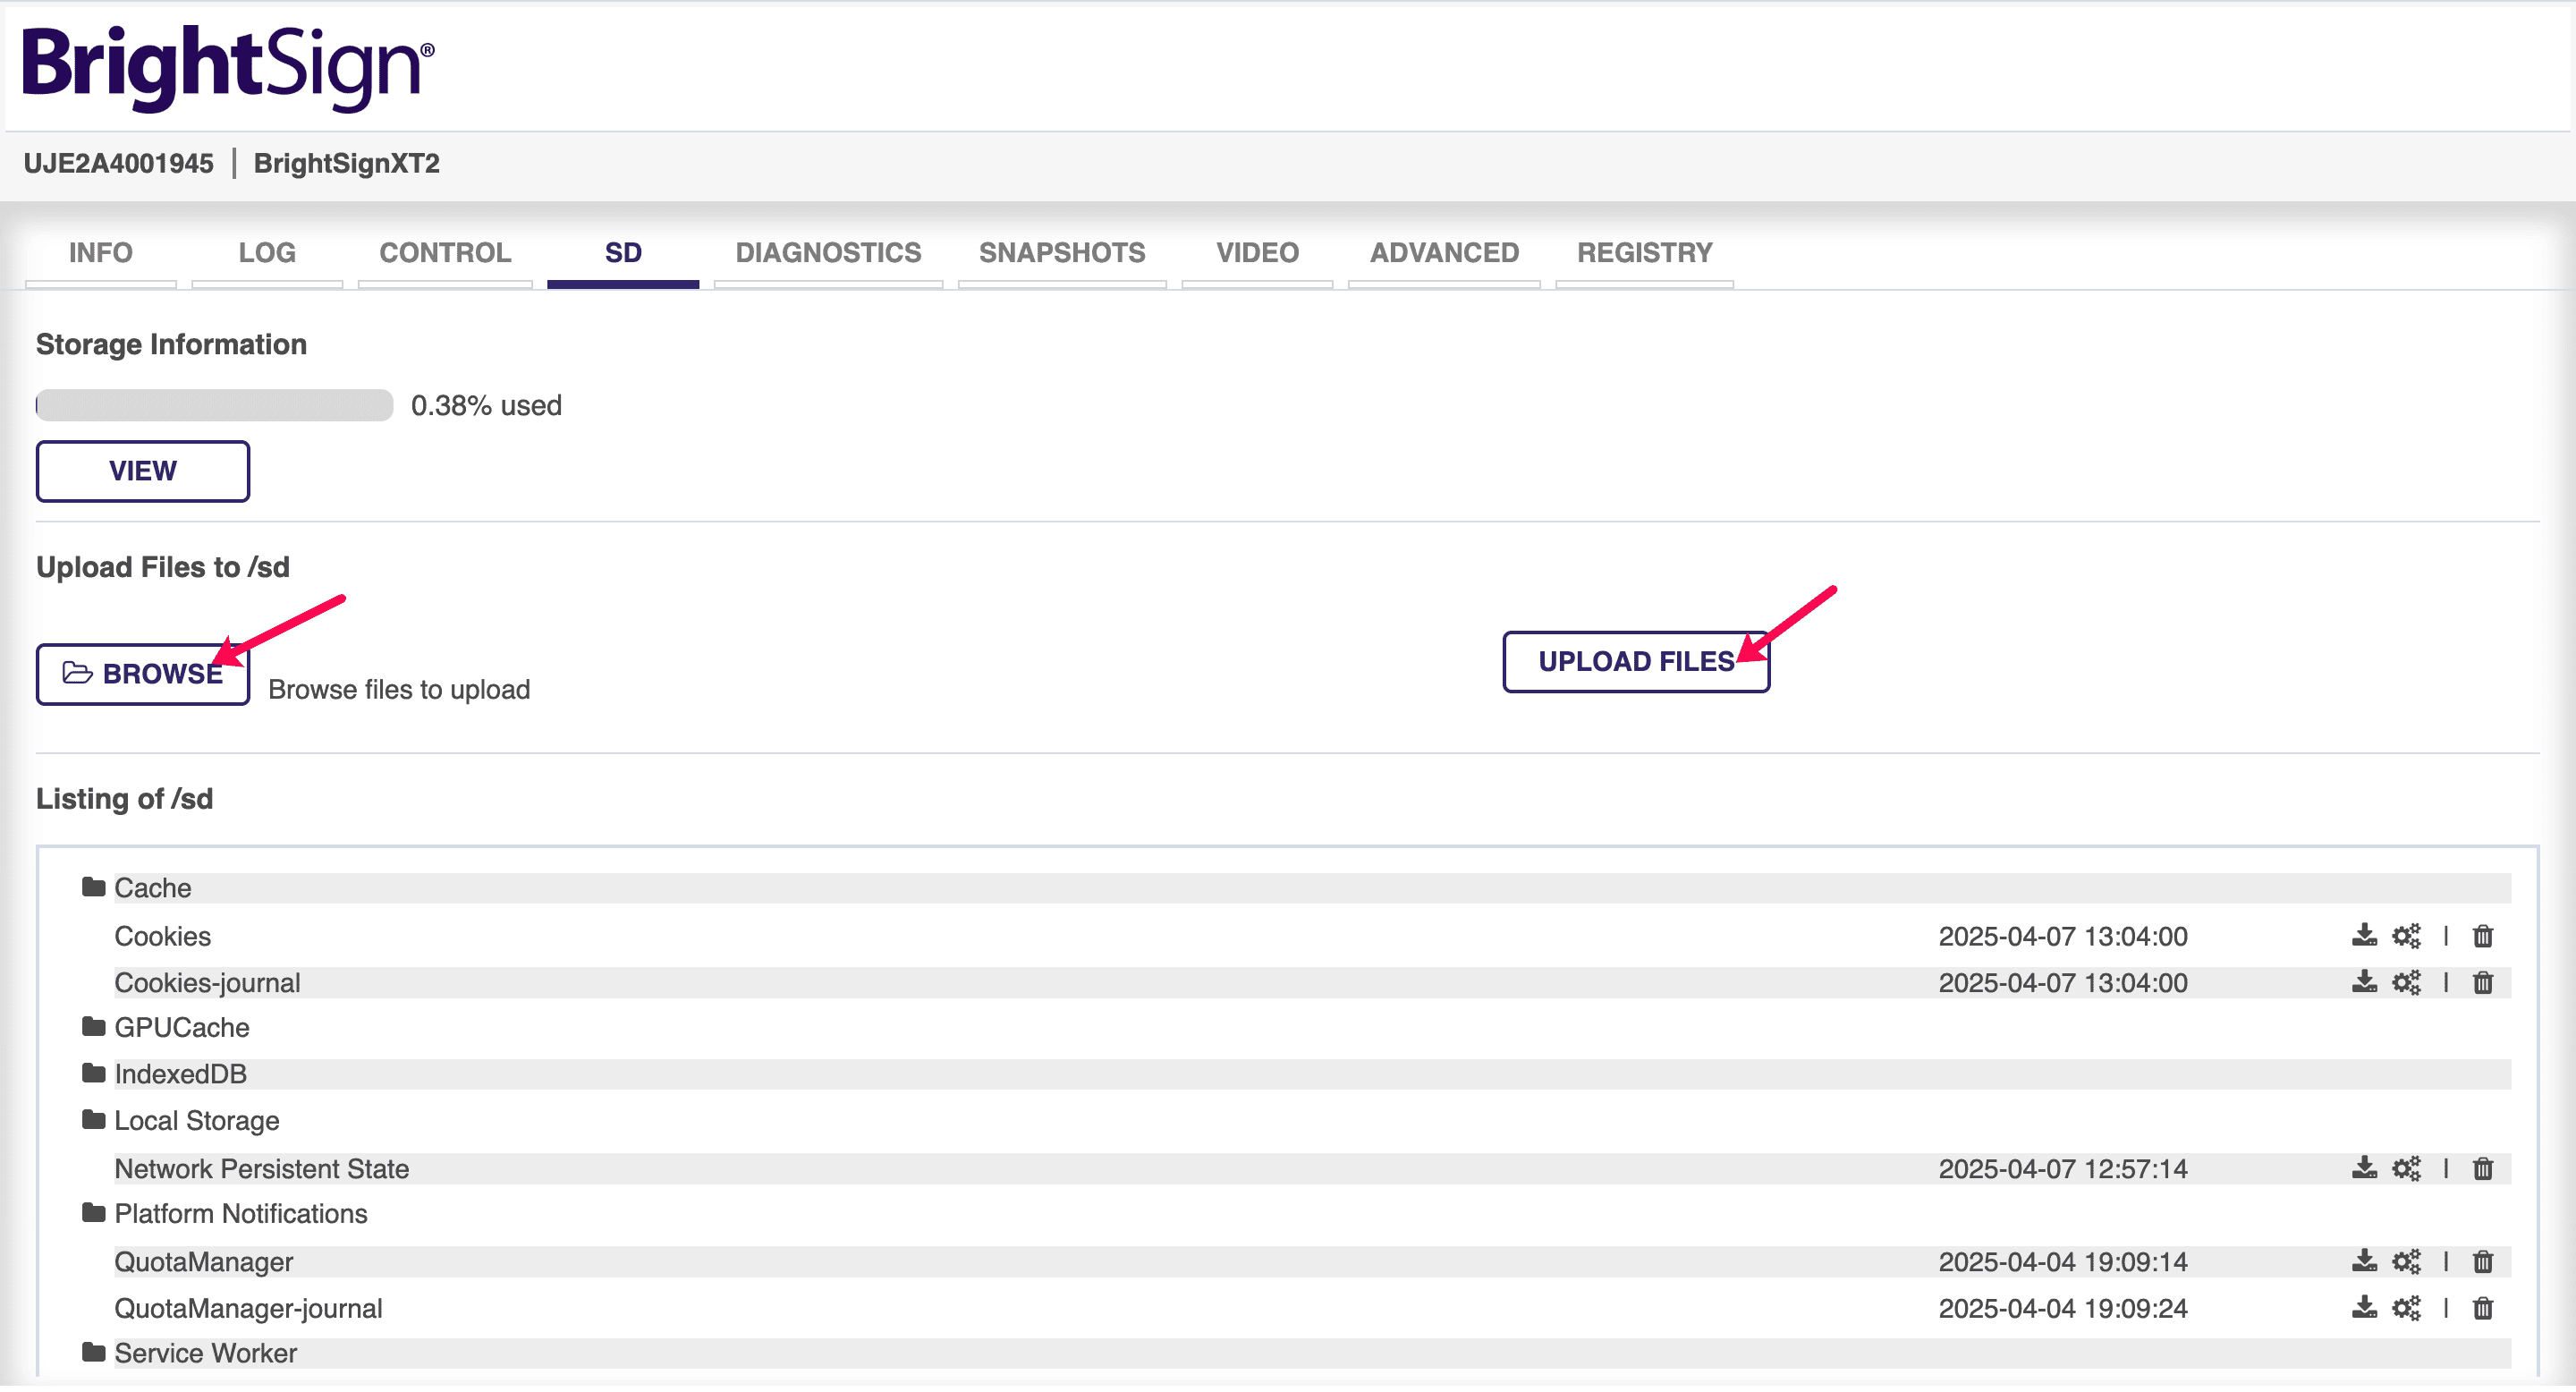 After successfully uploading the autorun.zip file, navigate to the **Control** tab and click **Reboot**.
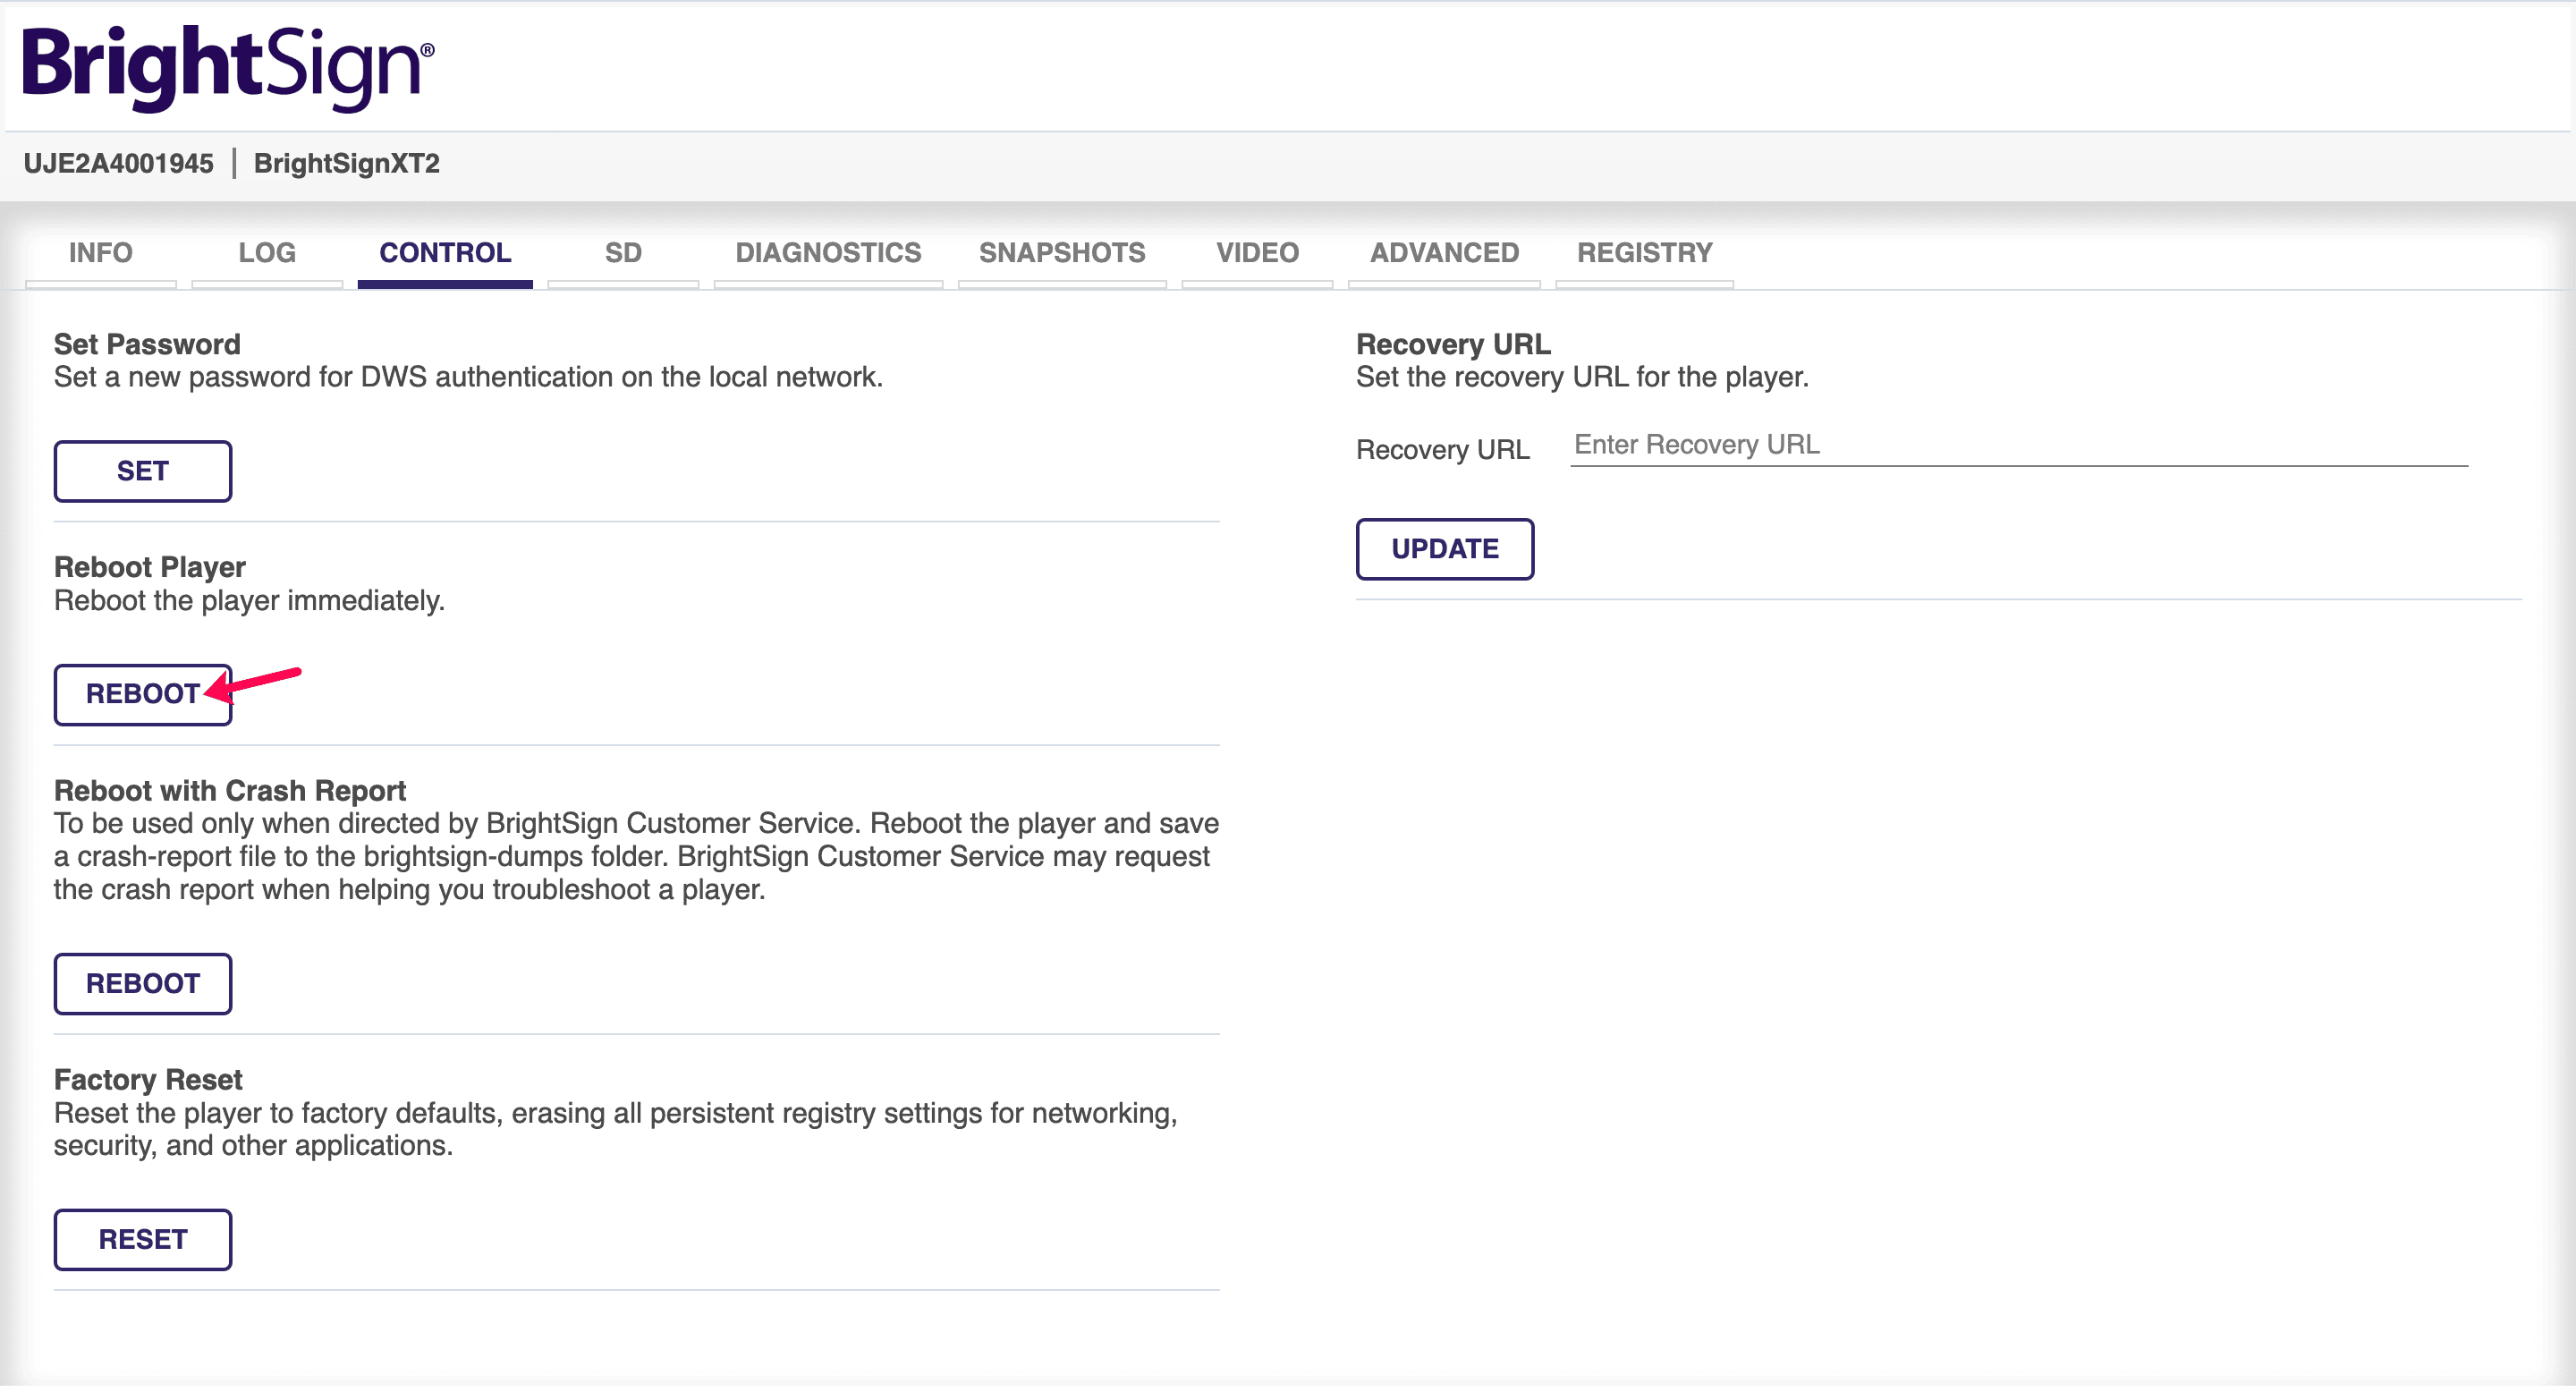 The BrightSign device restarts and displays the screen registration code. Enter this code on your [Pickcel console](https://console.pickcel.com/) to complete the pairing of your screen.
## Updating Configurations (Timezone, Screen Rotation)
If you want to update configurations like time zone or screen orientation, follow the steps below:
1. Go to the **Network Tab** and click on **All Players** drop-down.
2. Find your player by its serial number, click the **gear icon**, and navigate to the **SD** tab.
3. Download the **config.json** file
4. Edit the config.json file with your desired settings
Example:
```json title="Sample config.json" theme={null}
{
"timezone": "EST",
"server": "signage.pickcel.com",
"updateUrl": "console.pickcel.com",
"screenRotation": "0",
"protocol": "https",
"allowSelfSigned": false,
"isDocker": false,
"dualHdmi": true
}
```
5. Upload the modified config.json file back to the player
6. Reboot the player to apply the changes
You have successfully configured BrightSign Player for Pickcel Digital Signage 🎉. Now you are ready to deliver engaging, high-quality digital signage experiences that captivate your audience and drive your business objectives.
* Ensure your SD/microSD card remains inserted in the player at all times for seamless operation.
* If facing network or activation issues, refer to the official BrightSign documentation:
* [Setup Documentation](https://docs.brightsign.biz/user-guides/setup)
* [Network Options](https://docs.brightsign.biz/user-guides/network-options)
**What's Next?**
Now that your BrightSign player is online, complete your setup:
* Start [**Uploading Media**](/media/add-media) to your library
* Create your first [**Composition**](/compositions/compositions) and publish content
The BrightSign device restarts and displays the screen registration code. Enter this code on your [Pickcel console](https://console.pickcel.com/) to complete the pairing of your screen.
## Updating Configurations (Timezone, Screen Rotation)
If you want to update configurations like time zone or screen orientation, follow the steps below:
1. Go to the **Network Tab** and click on **All Players** drop-down.
2. Find your player by its serial number, click the **gear icon**, and navigate to the **SD** tab.
3. Download the **config.json** file
4. Edit the config.json file with your desired settings
Example:
```json title="Sample config.json" theme={null}
{
"timezone": "EST",
"server": "signage.pickcel.com",
"updateUrl": "console.pickcel.com",
"screenRotation": "0",
"protocol": "https",
"allowSelfSigned": false,
"isDocker": false,
"dualHdmi": true
}
```
5. Upload the modified config.json file back to the player
6. Reboot the player to apply the changes
You have successfully configured BrightSign Player for Pickcel Digital Signage 🎉. Now you are ready to deliver engaging, high-quality digital signage experiences that captivate your audience and drive your business objectives.
* Ensure your SD/microSD card remains inserted in the player at all times for seamless operation.
* If facing network or activation issues, refer to the official BrightSign documentation:
* [Setup Documentation](https://docs.brightsign.biz/user-guides/setup)
* [Network Options](https://docs.brightsign.biz/user-guides/network-options)
**What's Next?**
Now that your BrightSign player is online, complete your setup:
* Start [**Uploading Media**](/media/add-media) to your library
* Create your first [**Composition**](/compositions/compositions) and publish content