> ## Documentation Index
> Fetch the complete documentation index at: https://docs.pickcel.com/llms.txt
> Use this file to discover all available pages before exploring further.
# Groups, tags, and screen organization FAQs
> Organize Pickcel screens and content, the difference between Groups, Tags, and Custom Attributes, how to add tags, device profiles, and user logins.
How to organize and segment your screens, media, compositions, and users in Pickcel.
### What's the difference between Groups, Tags, and Custom Attributes?
All three help you organize an account, but they solve different problems. **Groups** control *who can see what*, **Tags** help you *find and filter* your own items, and **Custom Attributes** control *what content a screen pulls* from a live dataset.
**Groups, who can access what**
A group is a collection of users with access to specific modules (Screens, Media, Compositions, and Schedules) and their details. Visibility is filtered by group, so users in one group can't see another group's screens, media, compositions, or schedules. This keeps each team's data private and separate.
*Example:* you run a company with branches in Mumbai and Bangalore, and you appoint a manager for each. Inside your main admin account, you create a sub-user group per branch and assign each manager (as manager, editor, or operator) to their branch's group. Each manager then sees and works only with their own branch's content, never the other's. See [Groups](/settings/groups) and [User Roles](/settings/user-roles).
**Tags, label and filter your items**
A tag is a keyword you attach to screens, media, compositions, or schedules so you can identify and group related items with the same label. It's especially useful with long lists, where you need to act on just a subset.
*Example:* you have 100 screens on one account, 50 in Bangalore and 50 in Chennai. Tag the first 50 `Bangalore` and the rest `Chennai`. Now click the **filter** icon and choose a location to show only those screens, for instance to apply a Quick Play to just the Bangalore set. The filter stays active until you clear it, so you can work with one location's screens at a time.
**Custom Attributes, drive dynamic, screen-specific content**
A custom attribute is a predefined, unique identifier that filters specific data from a large, continuously updated dataset, based on triggers such as time. It lets each screen automatically display only the slice of live data meant for it.
*Example:* at a bus station, every platform has its own screen and should show only the buses arriving at that platform. With hundreds of buses in the feed but only a few per platform, you assign each screen a **Platform number** custom attribute. Each screen then filters the live bus feed by its platform number and shows just the relevant arrivals, updating automatically as the data changes.
### What are tags, and how do I add one?
A **tag** is a keyword you attach to a screen, media item, composition, or schedule so you can identify and filter a batch of items out of a long list. You can add a tag right from any module's listing:
1. Open the **Screens**, **Media**, **Compositions**, or **Publish** module.
2. Hover over the row you want to tag and find the **+ Add tag** option in the **Tags** column.
3. Click **+ Add tag** and type the keyword.
4. Click **Save**: the tag is added to that item.
In the Screens module, you can also add tags while **adding a screen** and from the **screen details** page.
### What is a device profile, and how do I create one?
A **device profile** is a set of device-level parameters you define once and assign to one or many screens, things like the screen health indicator, an on-screen logo, sleep schedules, brightness, and app installs. Instead of configuring each device by hand, you build a profile and apply it everywhere.
Go to the **Settings** module and open the **Device Profile** tab. Click **Add Profile** in the top-right corner.
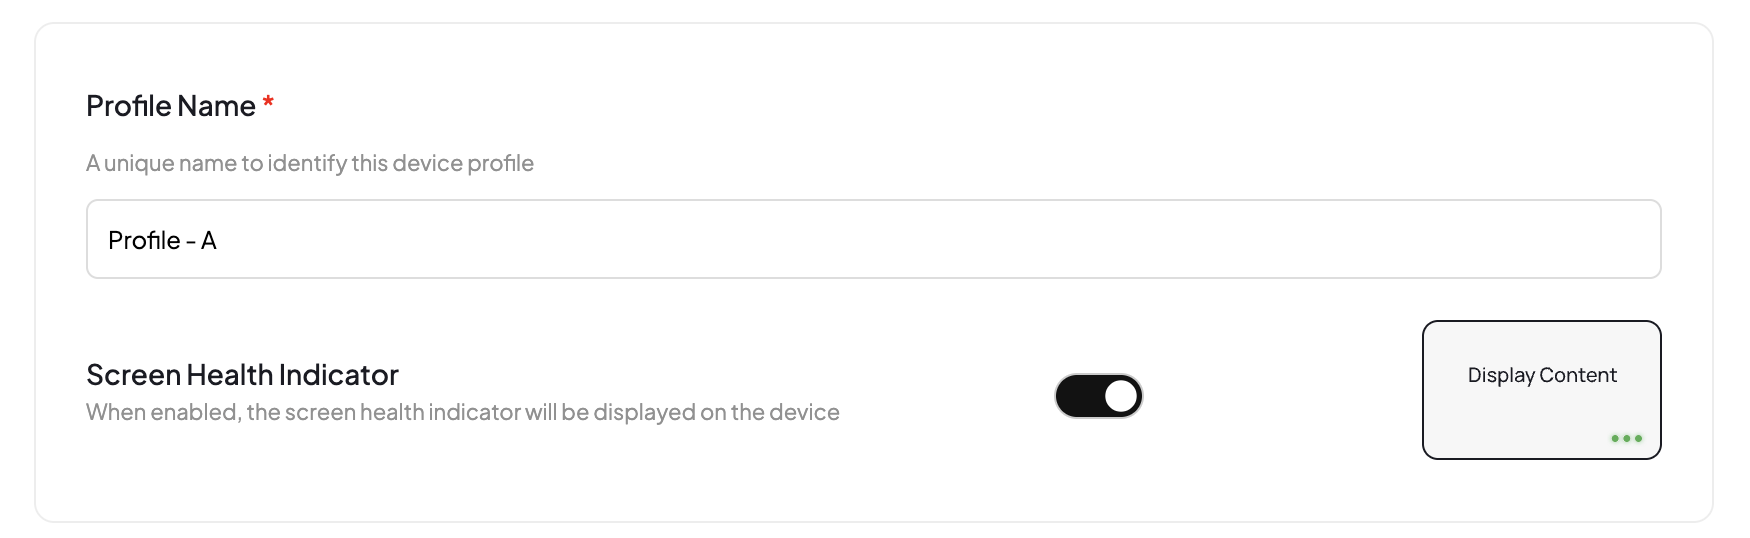
 Enter a unique **Profile Name** to identify the profile. Then toggle **Screen Health Indicator** on or off, when enabled, the three status dots appear on the device's screen.
Enable the health indicator when you need to debug a screen. To learn what each of the three dots means, see [Health Indicators](/faqs/health-indicators).
Enter a unique **Profile Name** to identify the profile. Then toggle **Screen Health Indicator** on or off, when enabled, the three status dots appear on the device's screen.
Enable the health indicator when you need to debug a screen. To learn what each of the three dots means, see [Health Indicators](/faqs/health-indicators).
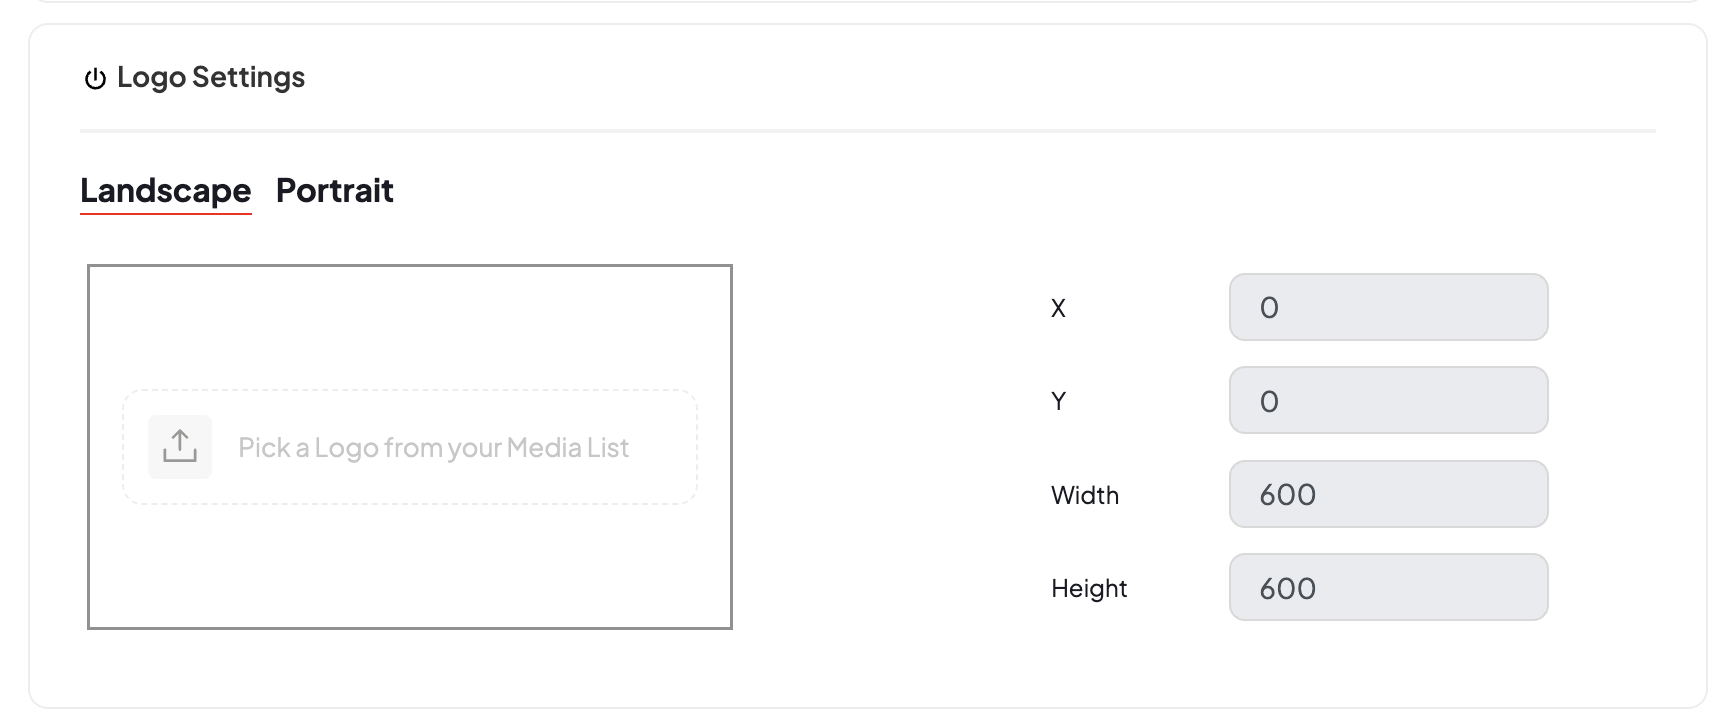
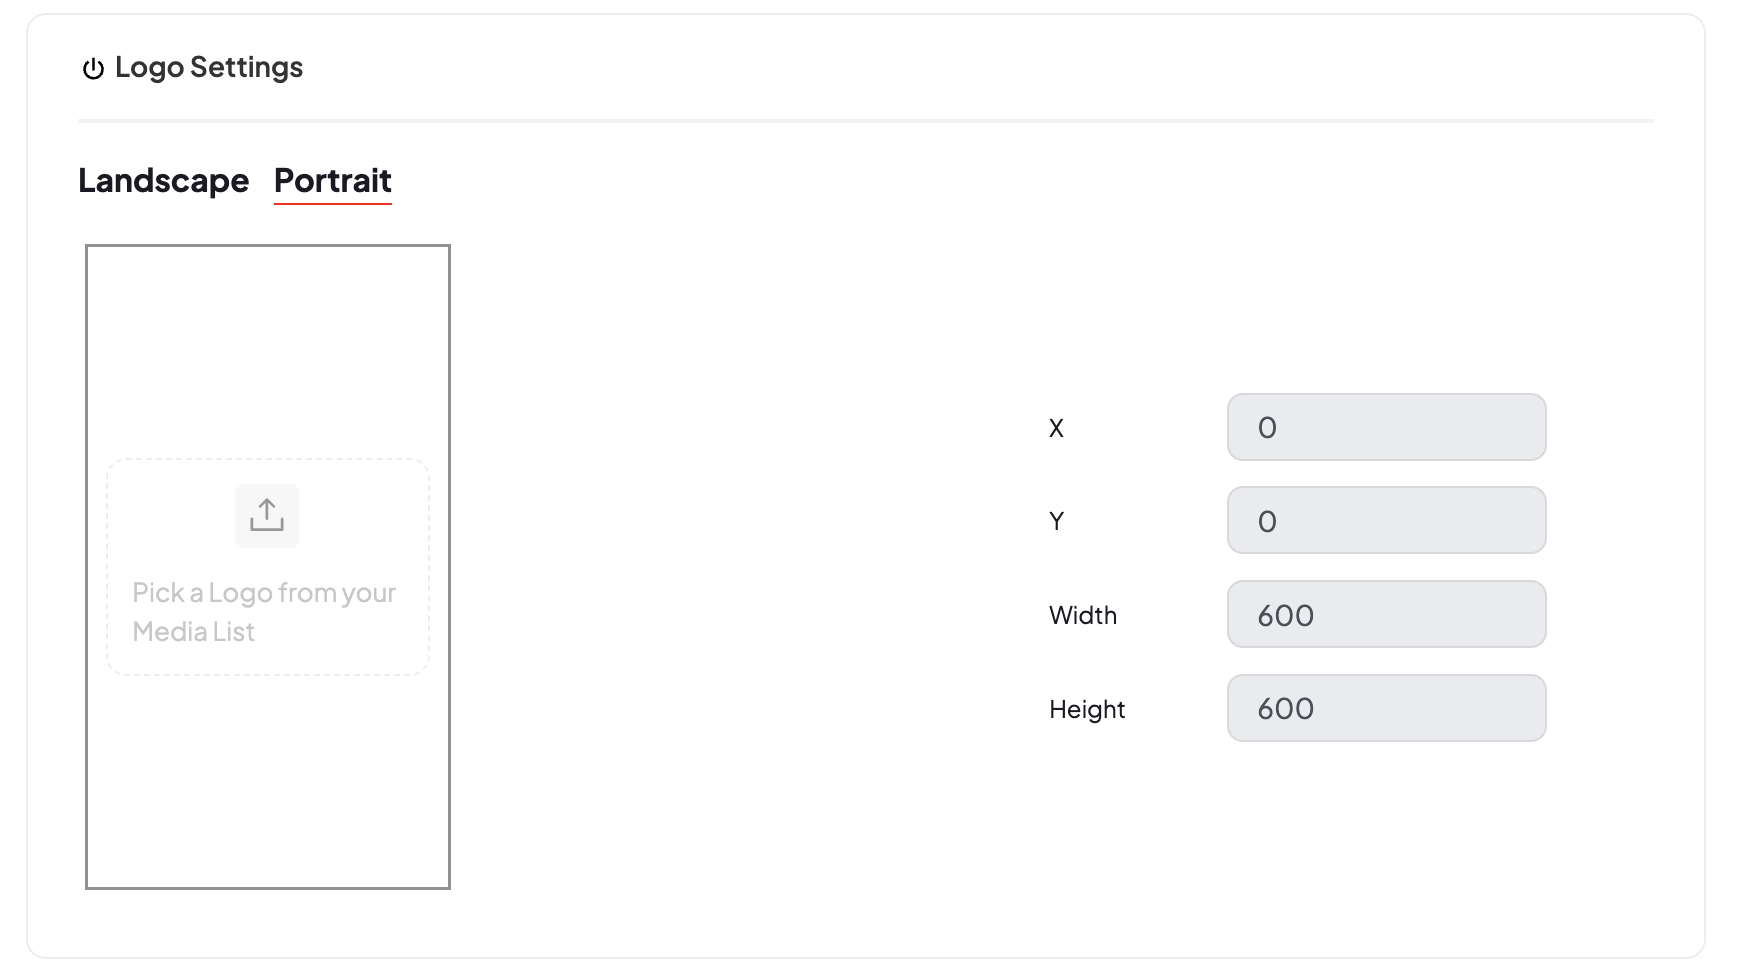
 Under **Logo Settings**, pick a logo from your media list for the **Landscape** and **Portrait** orientations separately. For each, set the **X** and **Y** position and the **Width** and **Height** to place and size the logo on screen.
 The **Other Settings** panel gives you fine-grained device control:
* **Device Lock Passcode**: a numeric passcode to lock/unlock the device.
* **Enable Screen Sleep Schedule**: put the screen to sleep during specific hours.
* **Restart Pickcel App**: schedule automatic restarts of the player app.
* **Install Apps**: configure and push app updates across devices.
* **Custom App**: add custom applications to run on the device.
* **Trim Memory**: automatically clear unused memory to optimize performance.
* **Hard Sleep**: force full system sleep for maximum power savings.
* **Allow Pause**: enable manual pause of content playback.
* **Brightness Control**: set the device brightness.
The **Other Settings** panel gives you fine-grained device control:
* **Device Lock Passcode**: a numeric passcode to lock/unlock the device.
* **Enable Screen Sleep Schedule**: put the screen to sleep during specific hours.
* **Restart Pickcel App**: schedule automatic restarts of the player app.
* **Install Apps**: configure and push app updates across devices.
* **Custom App**: add custom applications to run on the device.
* **Trim Memory**: automatically clear unused memory to optimize performance.
* **Hard Sleep**: force full system sleep for maximum power savings.
* **Allow Pause**: enable manual pause of content playback.
* **Brightness Control**: set the device brightness.
 Click **Add Profile** to save. The new profile appears in the Device Profile list.
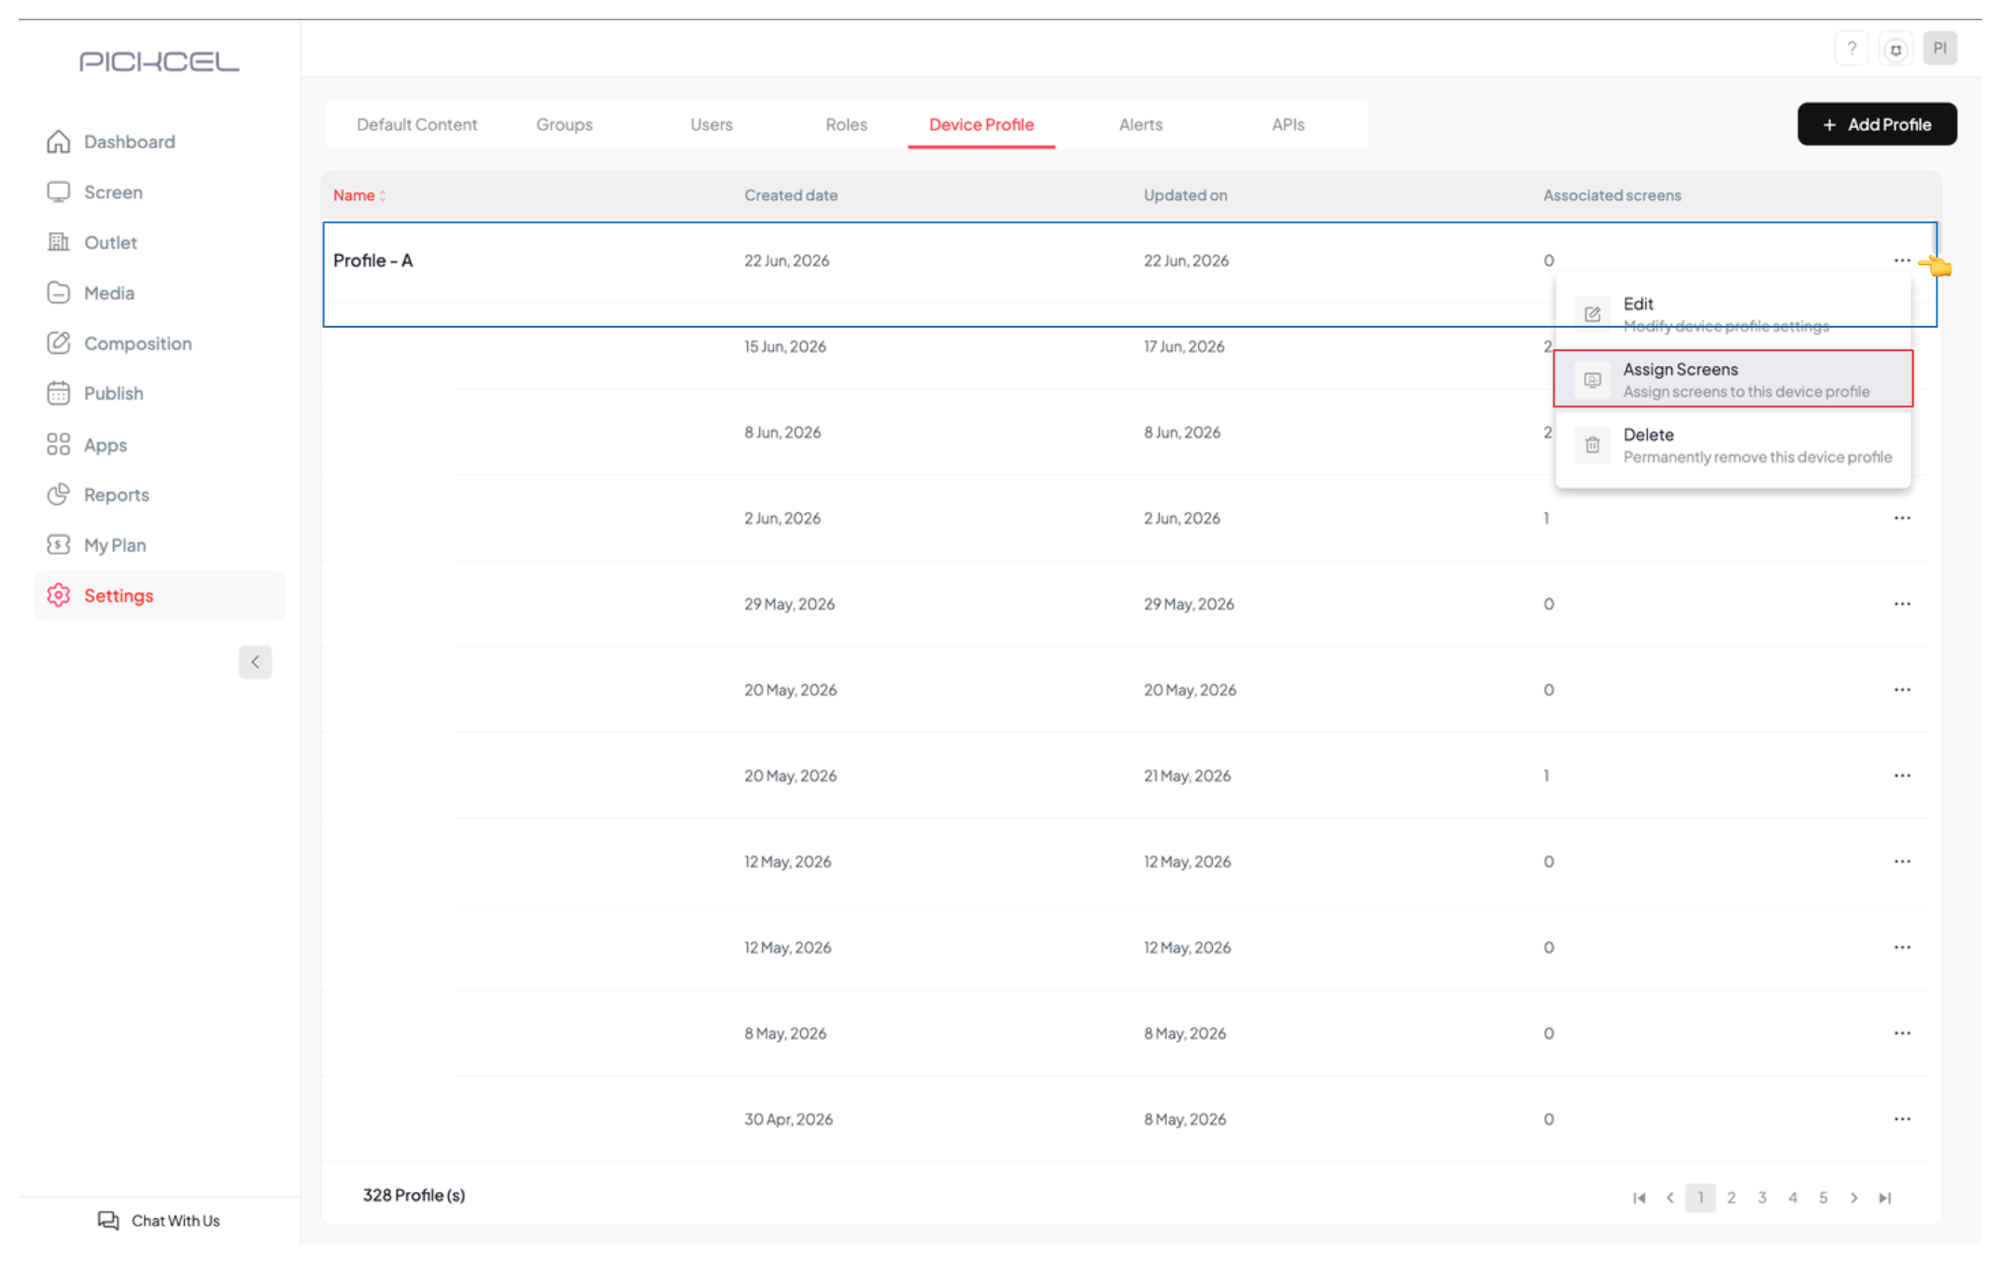
Find the profile in the list, click its **three dots**, and choose **Assign Screens**. Select the screens you want, then click **Assign**. (The same menu has **Edit** and **Delete**.)
Click **Add Profile** to save. The new profile appears in the Device Profile list.
Find the profile in the list, click its **three dots**, and choose **Assign Screens**. Select the screens you want, then click **Assign**. (The same menu has **Edit** and **Delete**.)
 After assigning, restart or reload the screen and allow about 2–3 minutes for the profile to take effect. You can edit or delete a profile anytime from its **three dots** menu.
### How many user logins do I get with one account?
The **Trial** and **Professional** plans currently include a **single** user login per account. **Enterprise** users can request the **multi-user login** feature for multiple accounts with varying permissions. Contact [support](mailto:support@pickcel.com) to enable it.
To learn how to set up additional users and what each can access, see [User Roles](/settings/user-roles).
## Related guides
Set up groups to segment screens and content by team.
Add sub-users and assign them to groups.
Control what each user can see and do.
Browse all Pickcel FAQ articles.
After assigning, restart or reload the screen and allow about 2–3 minutes for the profile to take effect. You can edit or delete a profile anytime from its **three dots** menu.
### How many user logins do I get with one account?
The **Trial** and **Professional** plans currently include a **single** user login per account. **Enterprise** users can request the **multi-user login** feature for multiple accounts with varying permissions. Contact [support](mailto:support@pickcel.com) to enable it.
To learn how to set up additional users and what each can access, see [User Roles](/settings/user-roles).
## Related guides
Set up groups to segment screens and content by team.
Add sub-users and assign them to groups.
Control what each user can see and do.
Browse all Pickcel FAQ articles.