> ## Documentation Index
> Fetch the complete documentation index at: https://docs.pickcel.com/llms.txt
> Use this file to discover all available pages before exploring further.
# How to Set Up Microsoft Teams Rooms for Digital Signage with Pickcel?
> Turn idle Microsoft Teams Rooms displays into digital signage with Pickcel: stream announcements and branded content when the room is not in a meeting.
Transform your idle Microsoft Teams Rooms screens into digital signage. When a meeting isn't in session, you can automatically display corporate communications, important announcements, or branded content directly from your Pickcel account.
This guide walks you through integrating Pickcel with your Microsoft Teams Rooms environment.
This is different from the [Microsoft Teams app](/apps/microsoft-teams), which displays your Teams channel messages on a Pickcel screen. This guide does the reverse: it turns a **Teams Rooms display** into a Pickcel signage screen.
## Prerequisites
Before you begin, make sure you have:
* An active Pickcel Digital Signage account
* A **Microsoft Teams Rooms Pro license** (this feature is exclusive to the Pro plan)
* Administrator access to the **Microsoft Teams Rooms Pro Management Portal**
* Teams Rooms devices running **version 5.1 or later**
***
## Part 1: Get Your Pickcel Screen URL
The first step is to retrieve a unique URL from your Pickcel account that will stream content to your Teams Room screen. You can do this for a brand-new virtual screen or an existing one you already use.
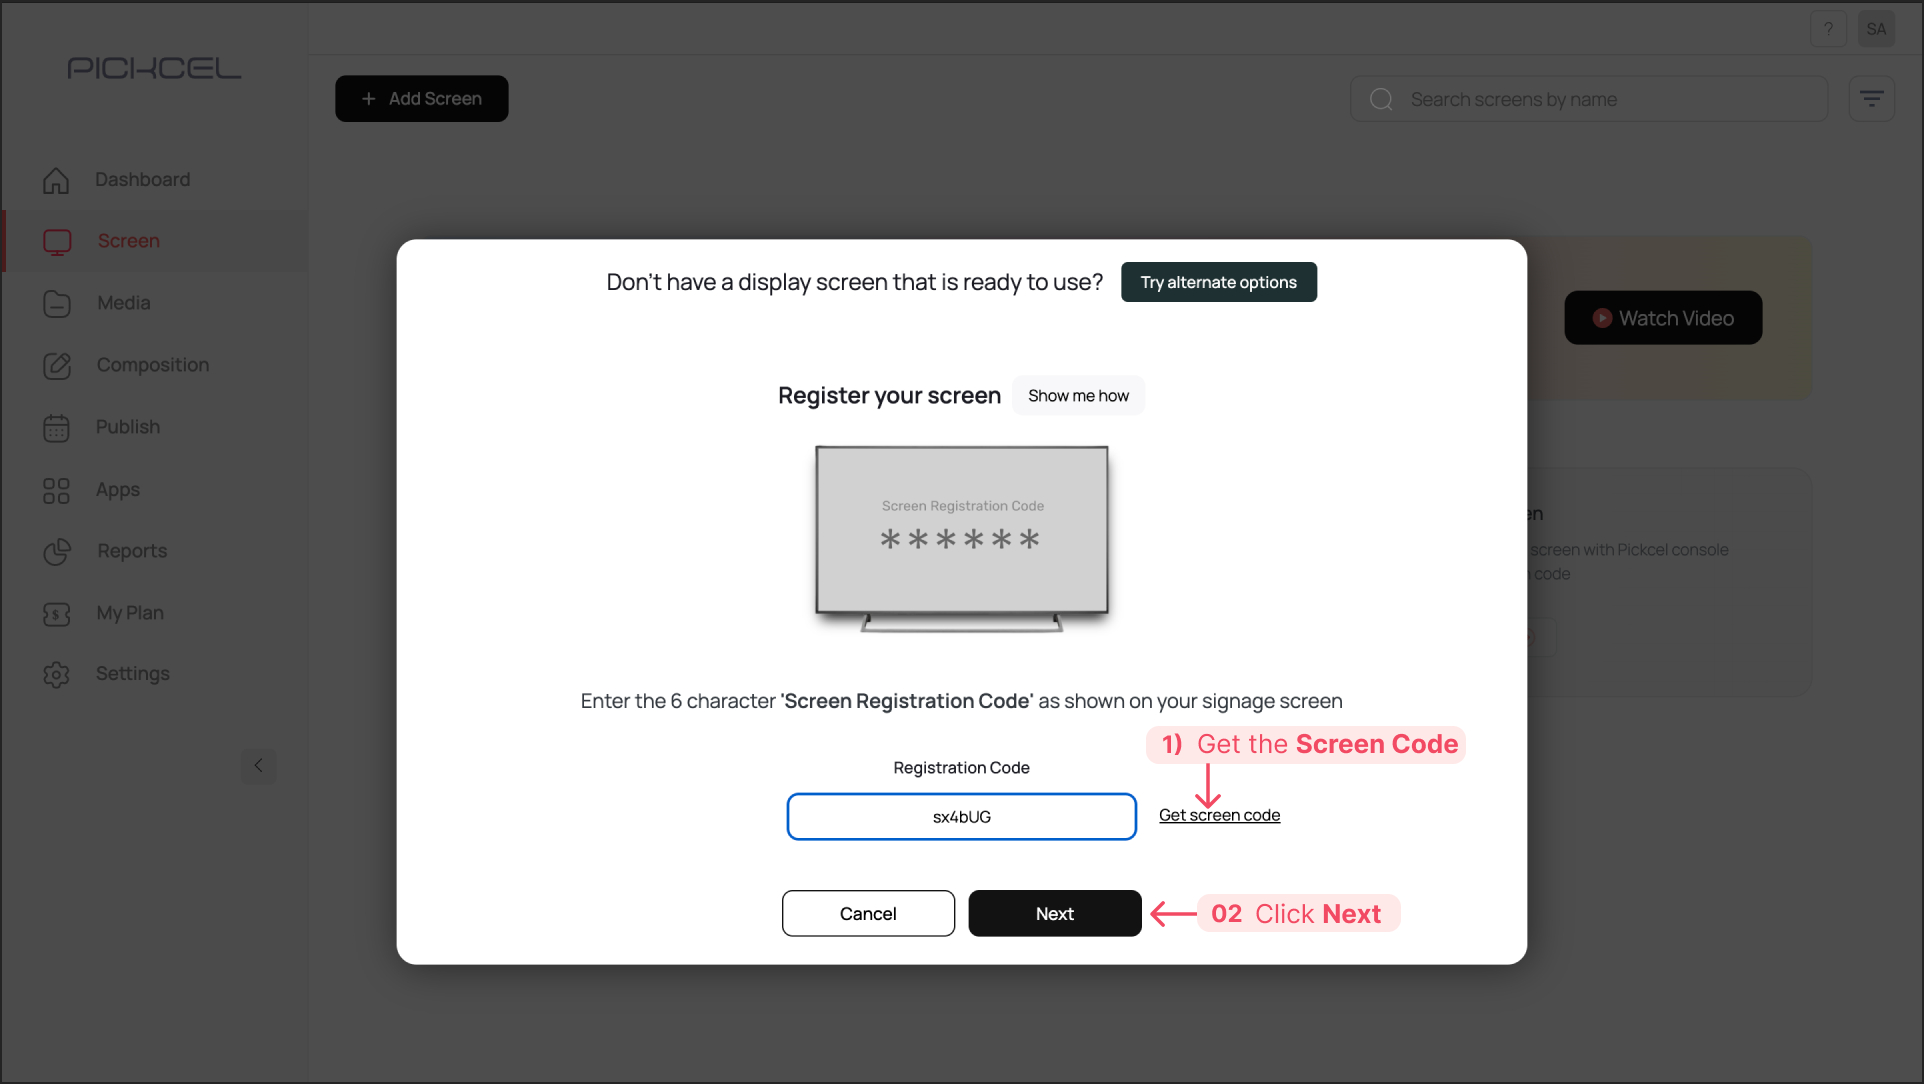
Log in to your Pickcel Console and navigate to the **Screens** module from the left-hand menu. Click **+ Add Screen**.
From the pop-up, click **Get Screen Code**. A 6-digit alphanumeric code will be generated. Click **Next**, then enter a name for your screen (e.g., "Microsoft Team Rooms") and provide its location.
 Publish the specific composition or playlist you want to display on your Microsoft Teams Room screen.
New to publishing? See [How to Add Media](/media/add-media), [How to Create Compositions](/compositions/compositions), and [How to Publish Content to Screens](/schedule-and-publish/publish-overview).
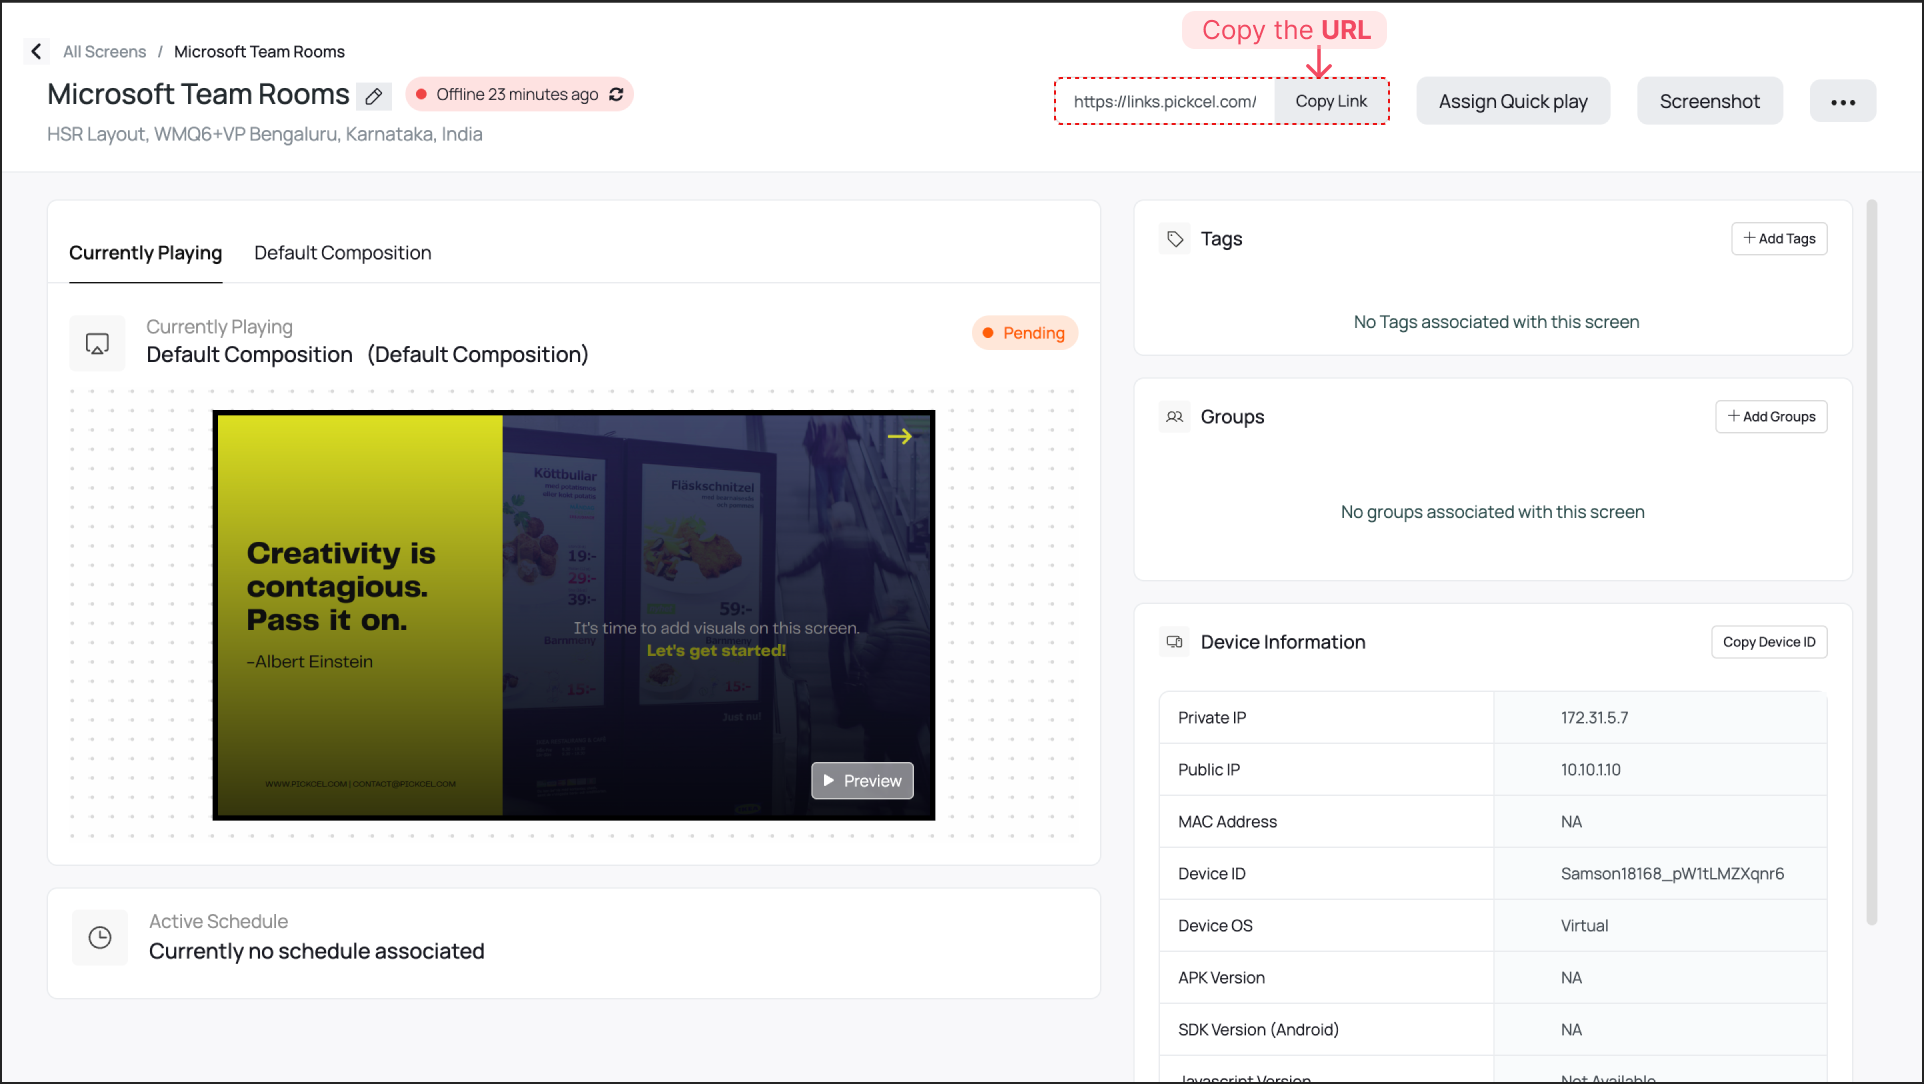
After publishing content, click your newly configured screen's name in the **Screens** module. From the screen details panel that appears, find and copy the unique **URL**.
Publish the specific composition or playlist you want to display on your Microsoft Teams Room screen.
New to publishing? See [How to Add Media](/media/add-media), [How to Create Compositions](/compositions/compositions), and [How to Publish Content to Screens](/schedule-and-publish/publish-overview).
After publishing content, click your newly configured screen's name in the **Screens** module. From the screen details panel that appears, find and copy the unique **URL**.
 ***
## Part 2: Configure Microsoft Teams Rooms
Now use the copied Pickcel URL to configure the digital signage settings within the Microsoft Teams environment.
### Add Pickcel as a Digital Signage Source
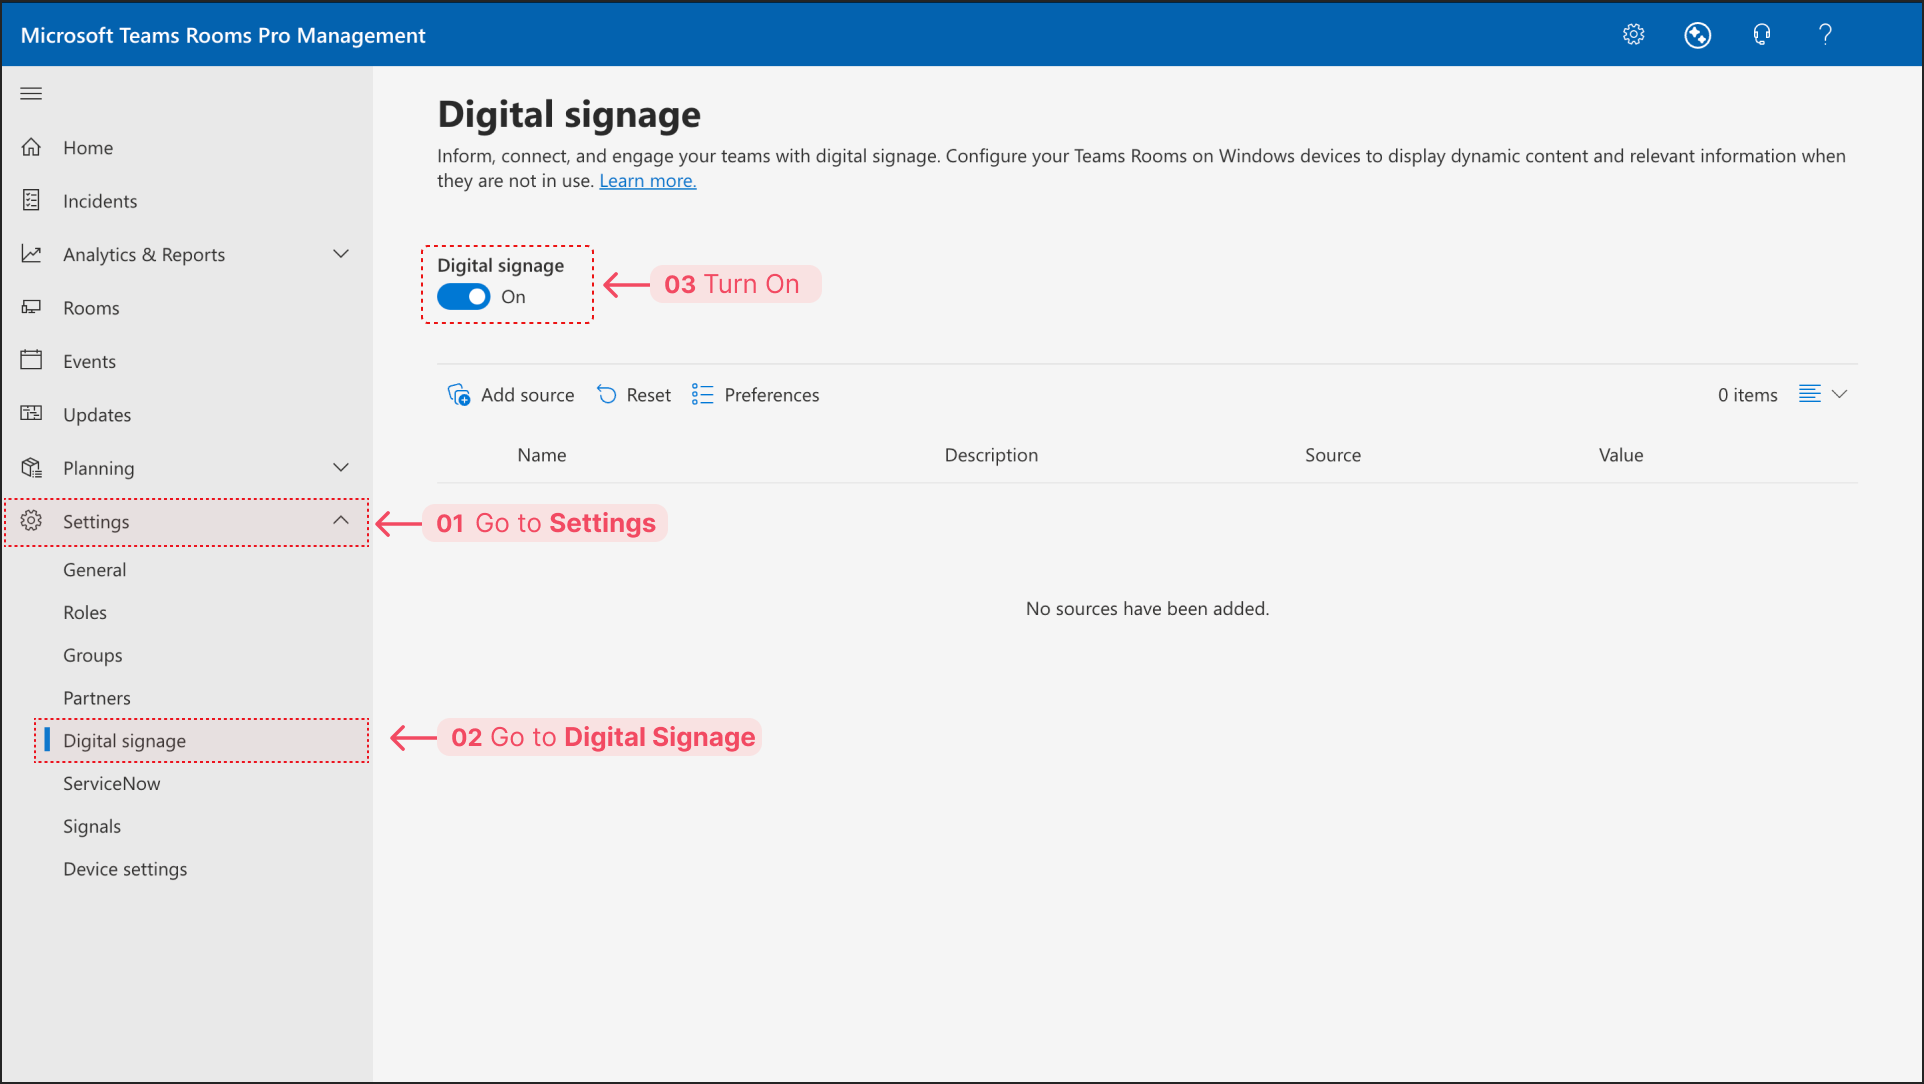
Sign in to the **Teams Rooms Pro Management Portal** with your administrator credentials. From the left-hand navigation menu, go to **Settings > Digital signage** and turn on **Digital Signage**.
***
## Part 2: Configure Microsoft Teams Rooms
Now use the copied Pickcel URL to configure the digital signage settings within the Microsoft Teams environment.
### Add Pickcel as a Digital Signage Source
Sign in to the **Teams Rooms Pro Management Portal** with your administrator credentials. From the left-hand navigation menu, go to **Settings > Digital signage** and turn on **Digital Signage**.
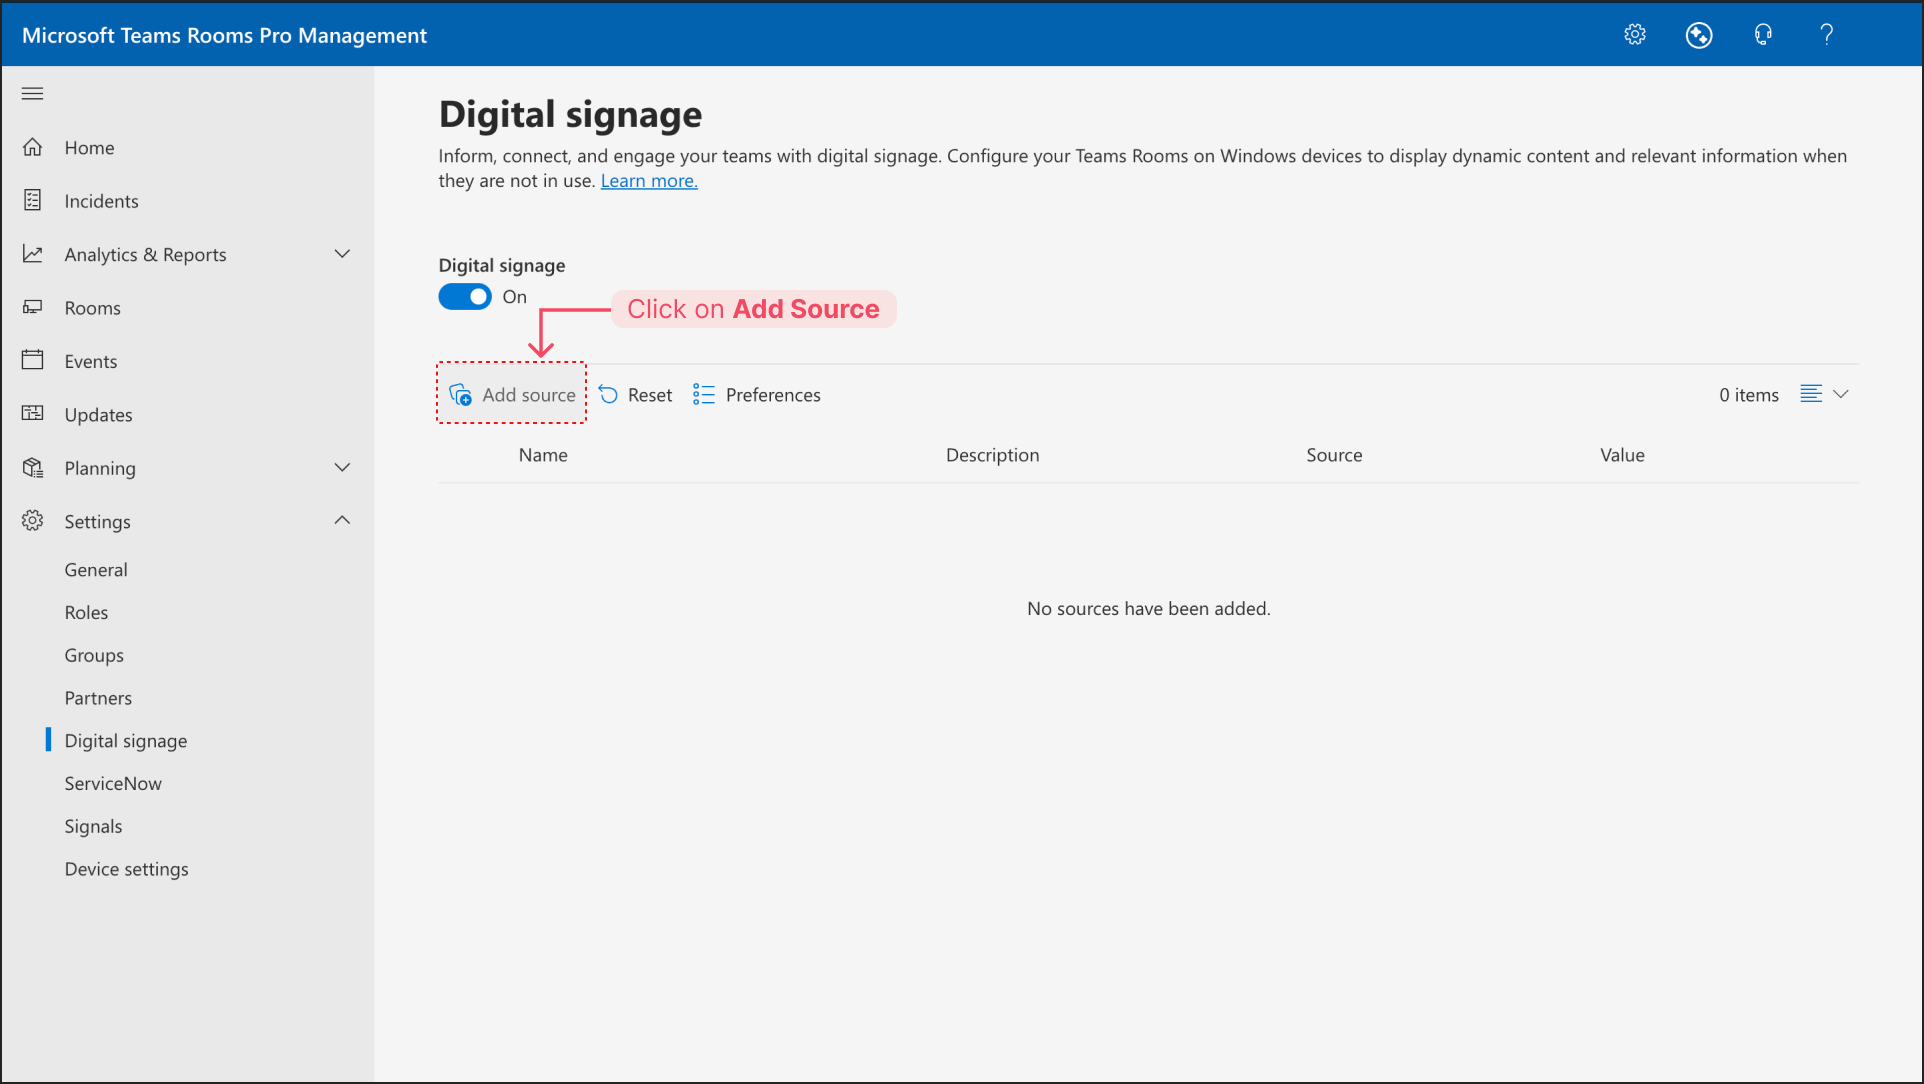
 Click **Add source**.
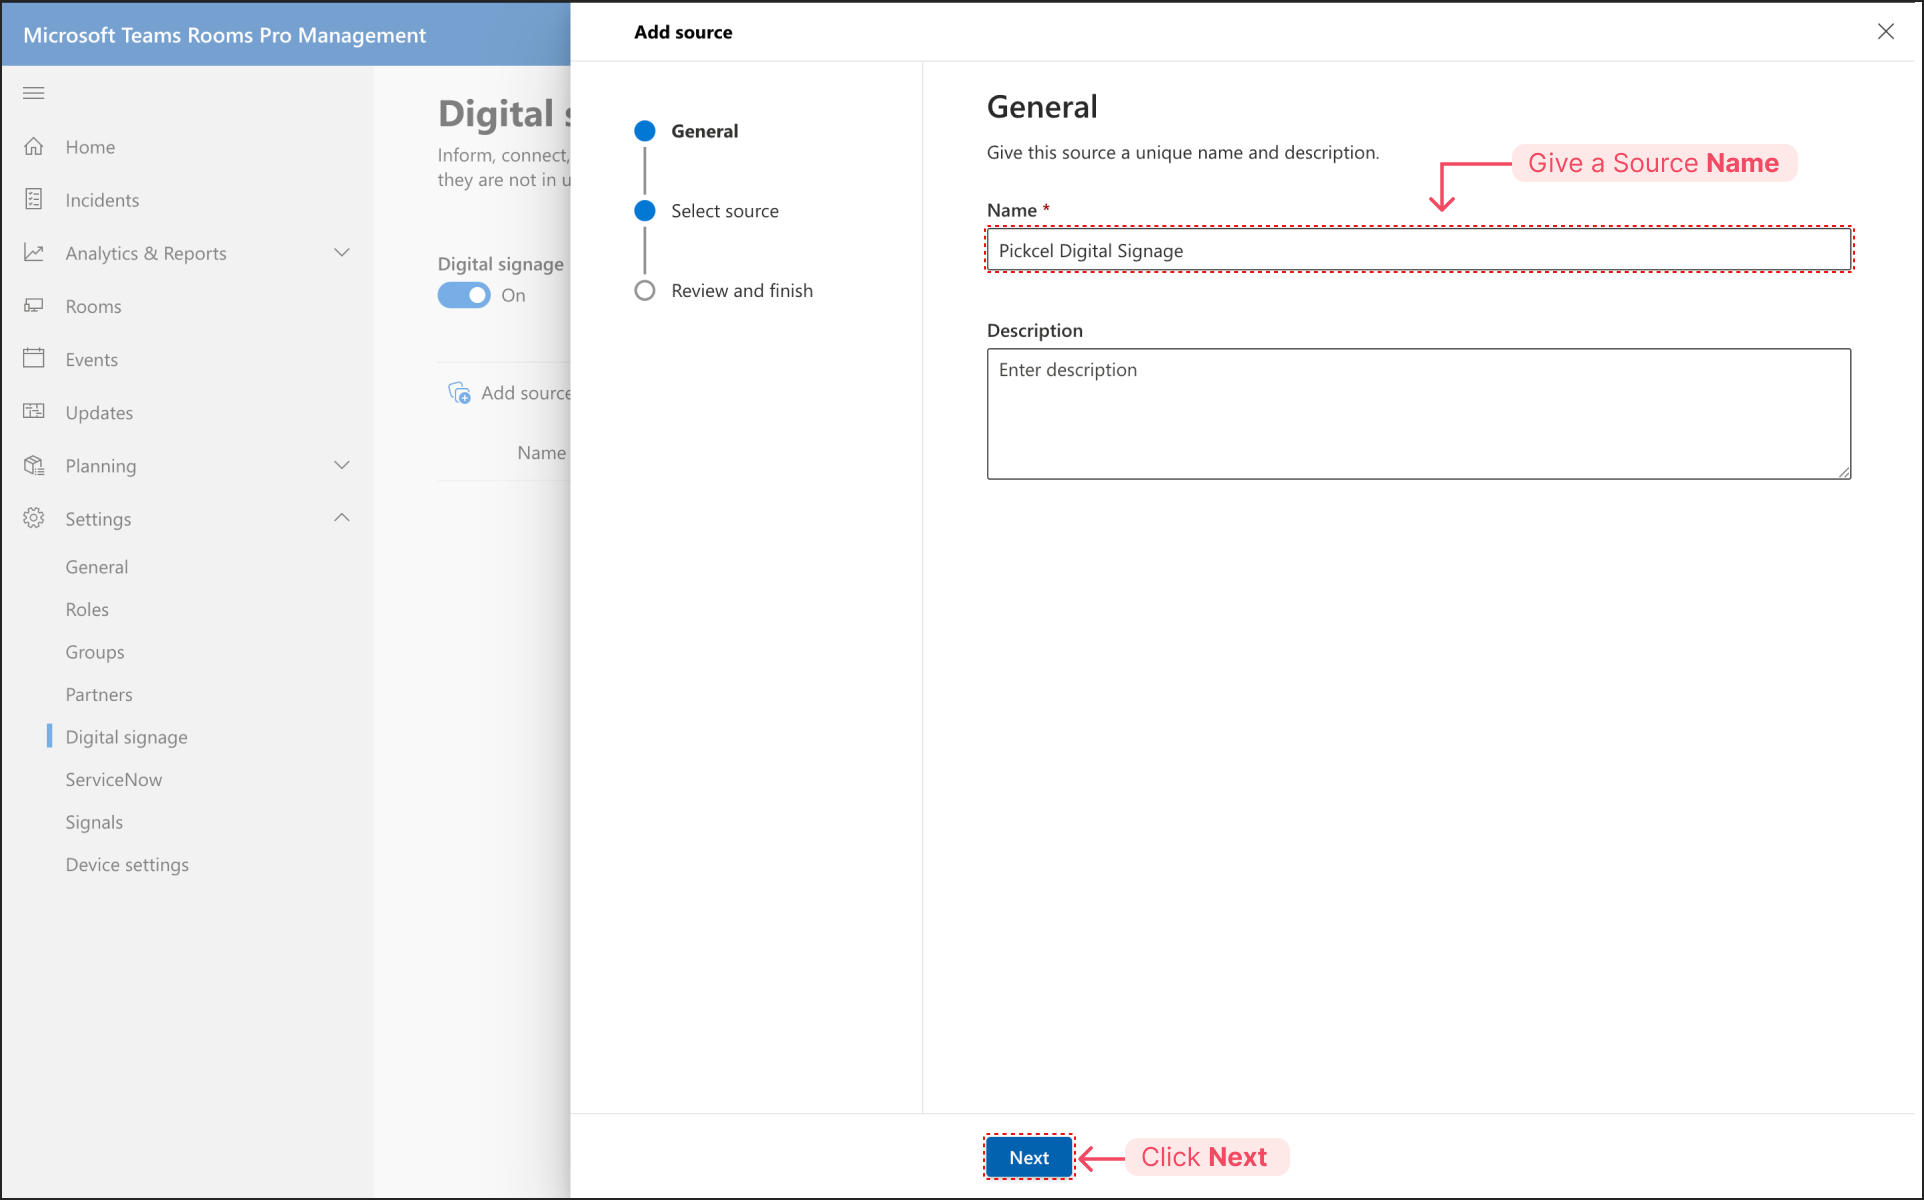
 In the **General** section, enter a unique **Name** for this source (e.g., "Pickcel Digital Signage") and click **Next**.
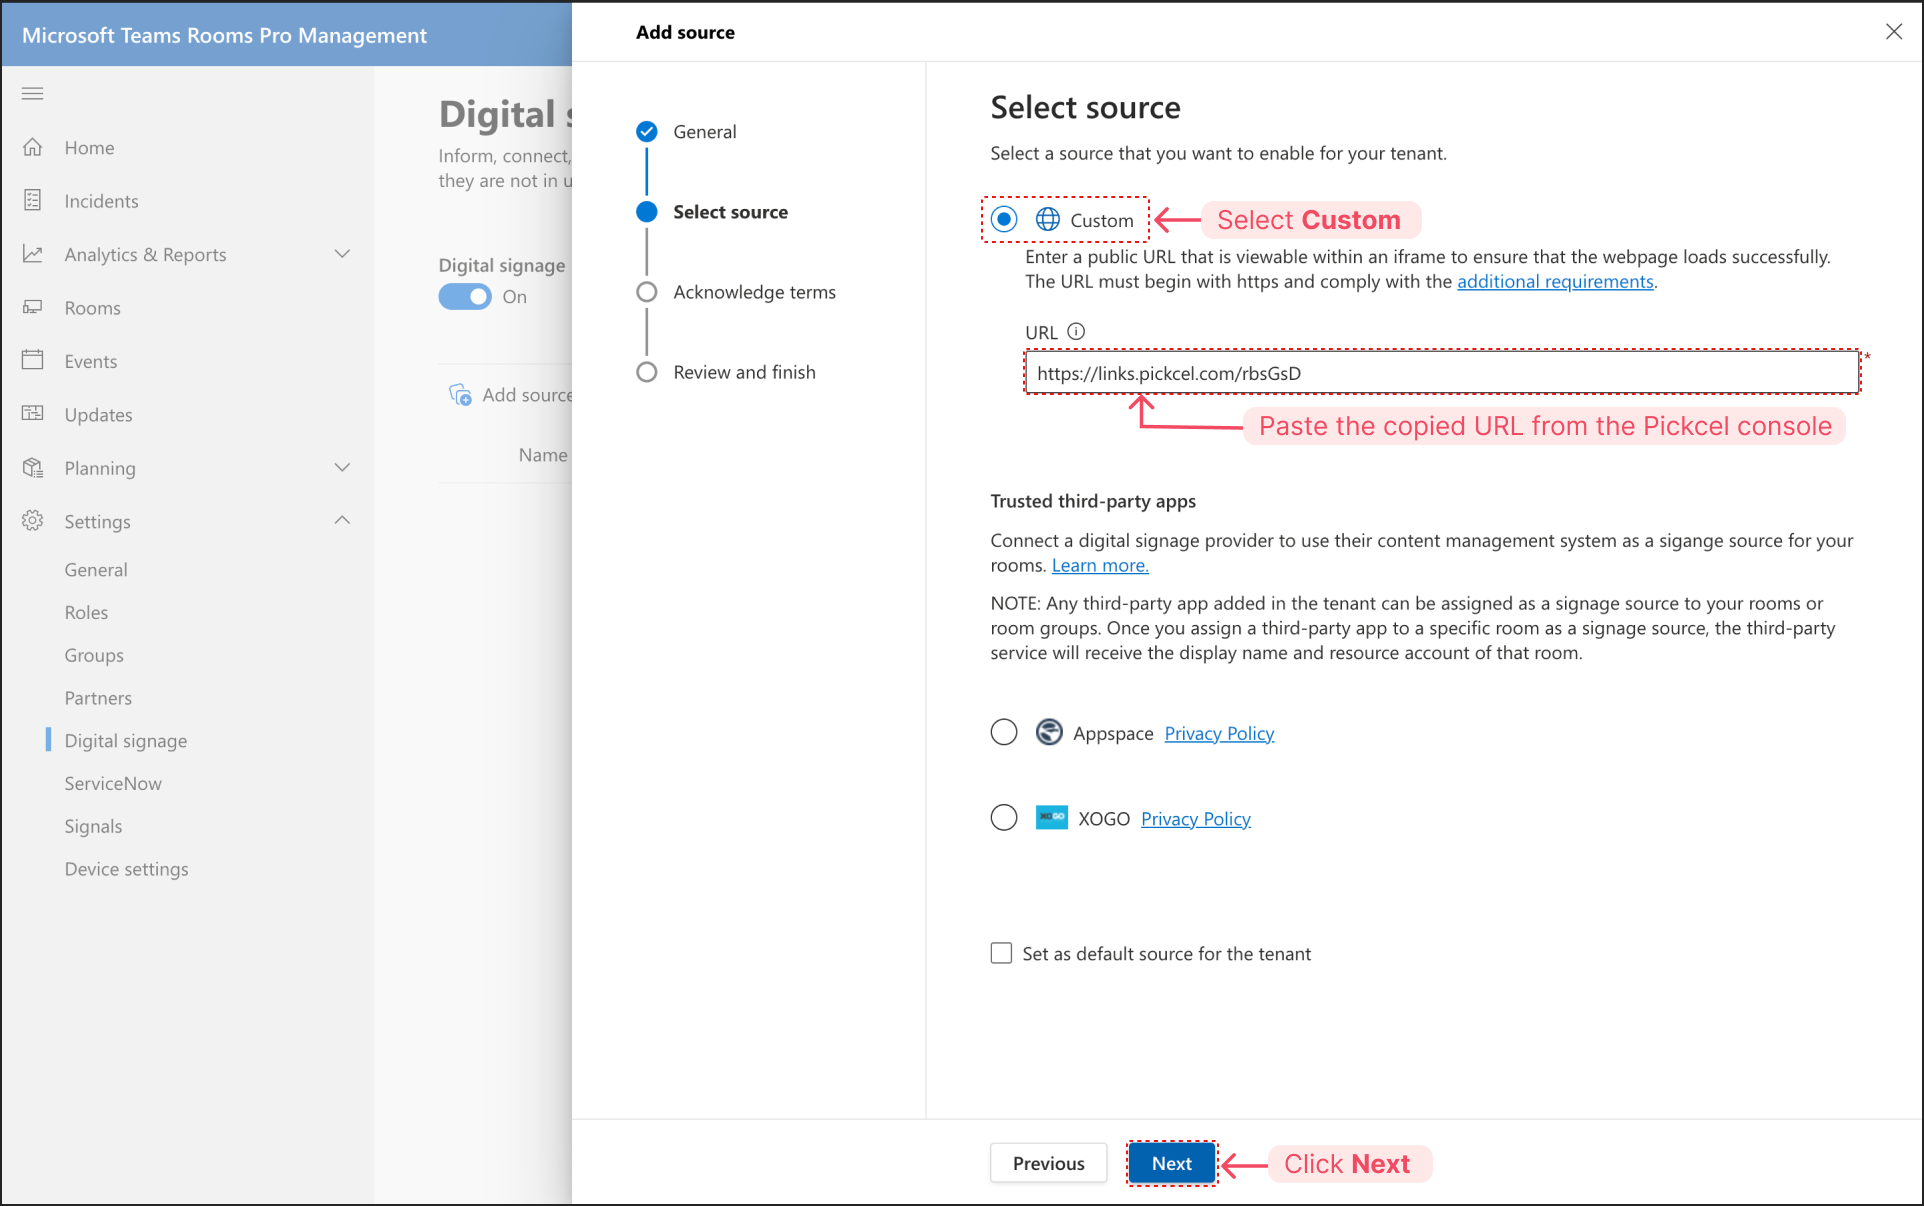
 For the source type, select **Custom**. Paste the Pickcel Screen URL you copied into the **URL** field, then click **Next**.
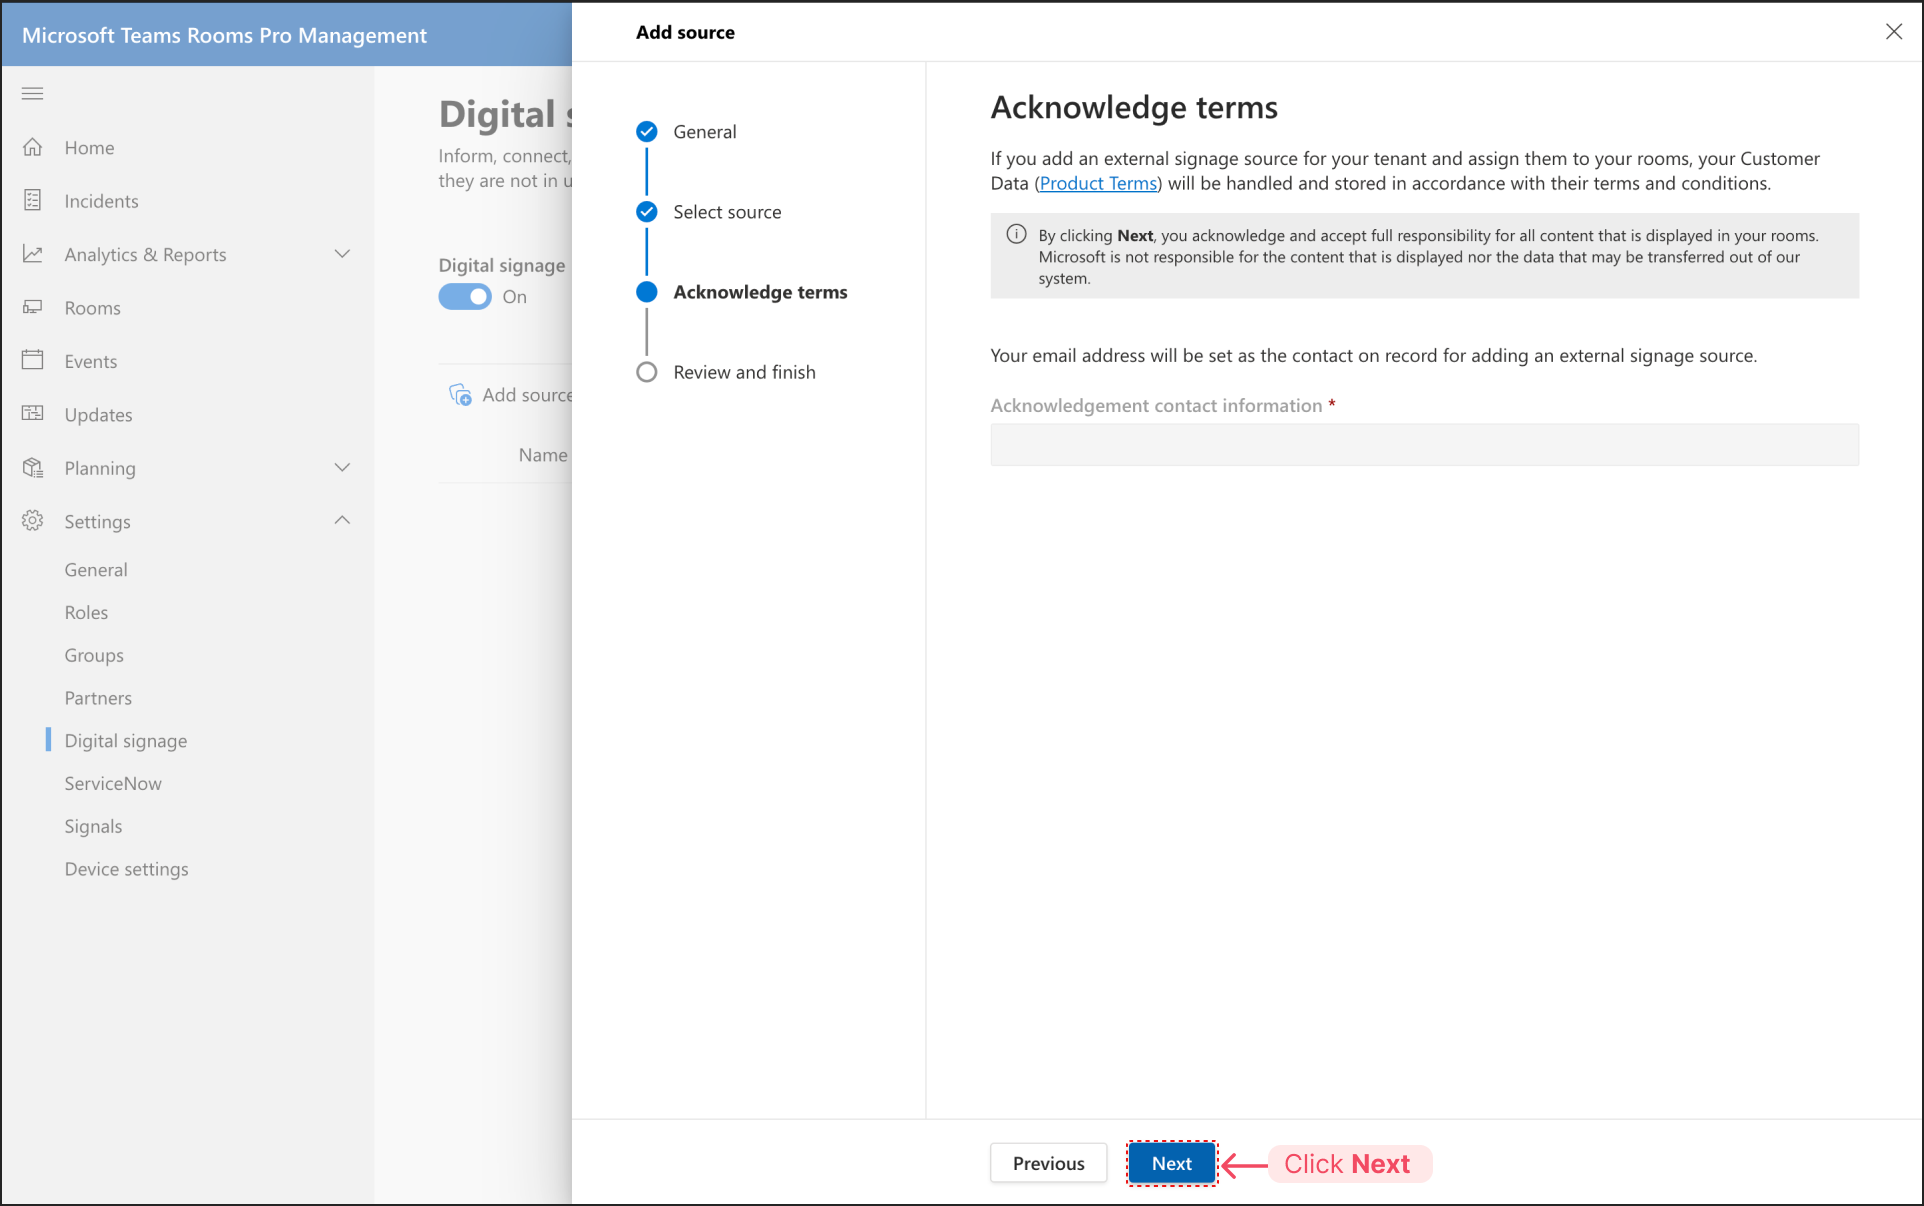
 Acknowledge the terms by clicking **Next**.
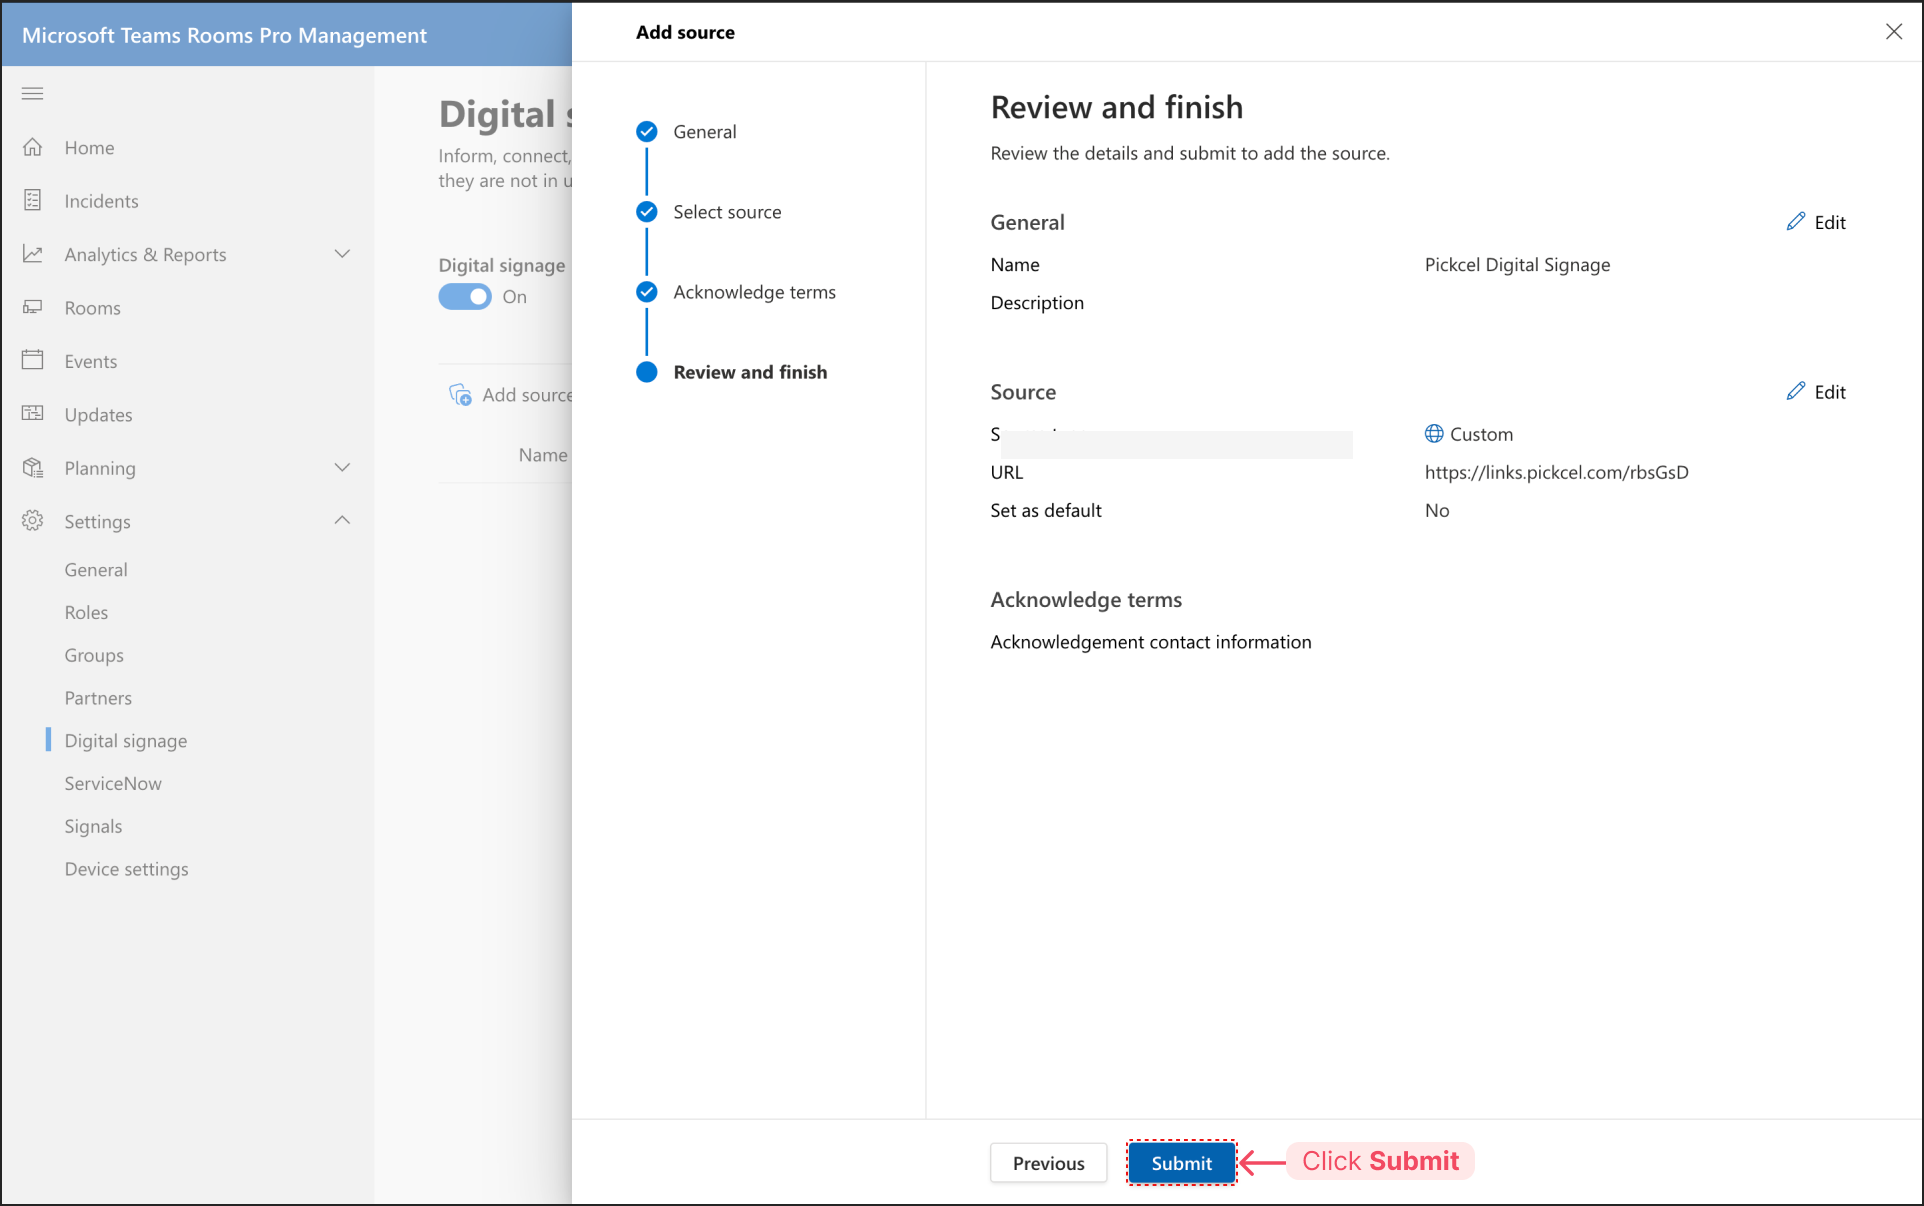
 Review the details and click **Submit**. Your Pickcel source has now been added.
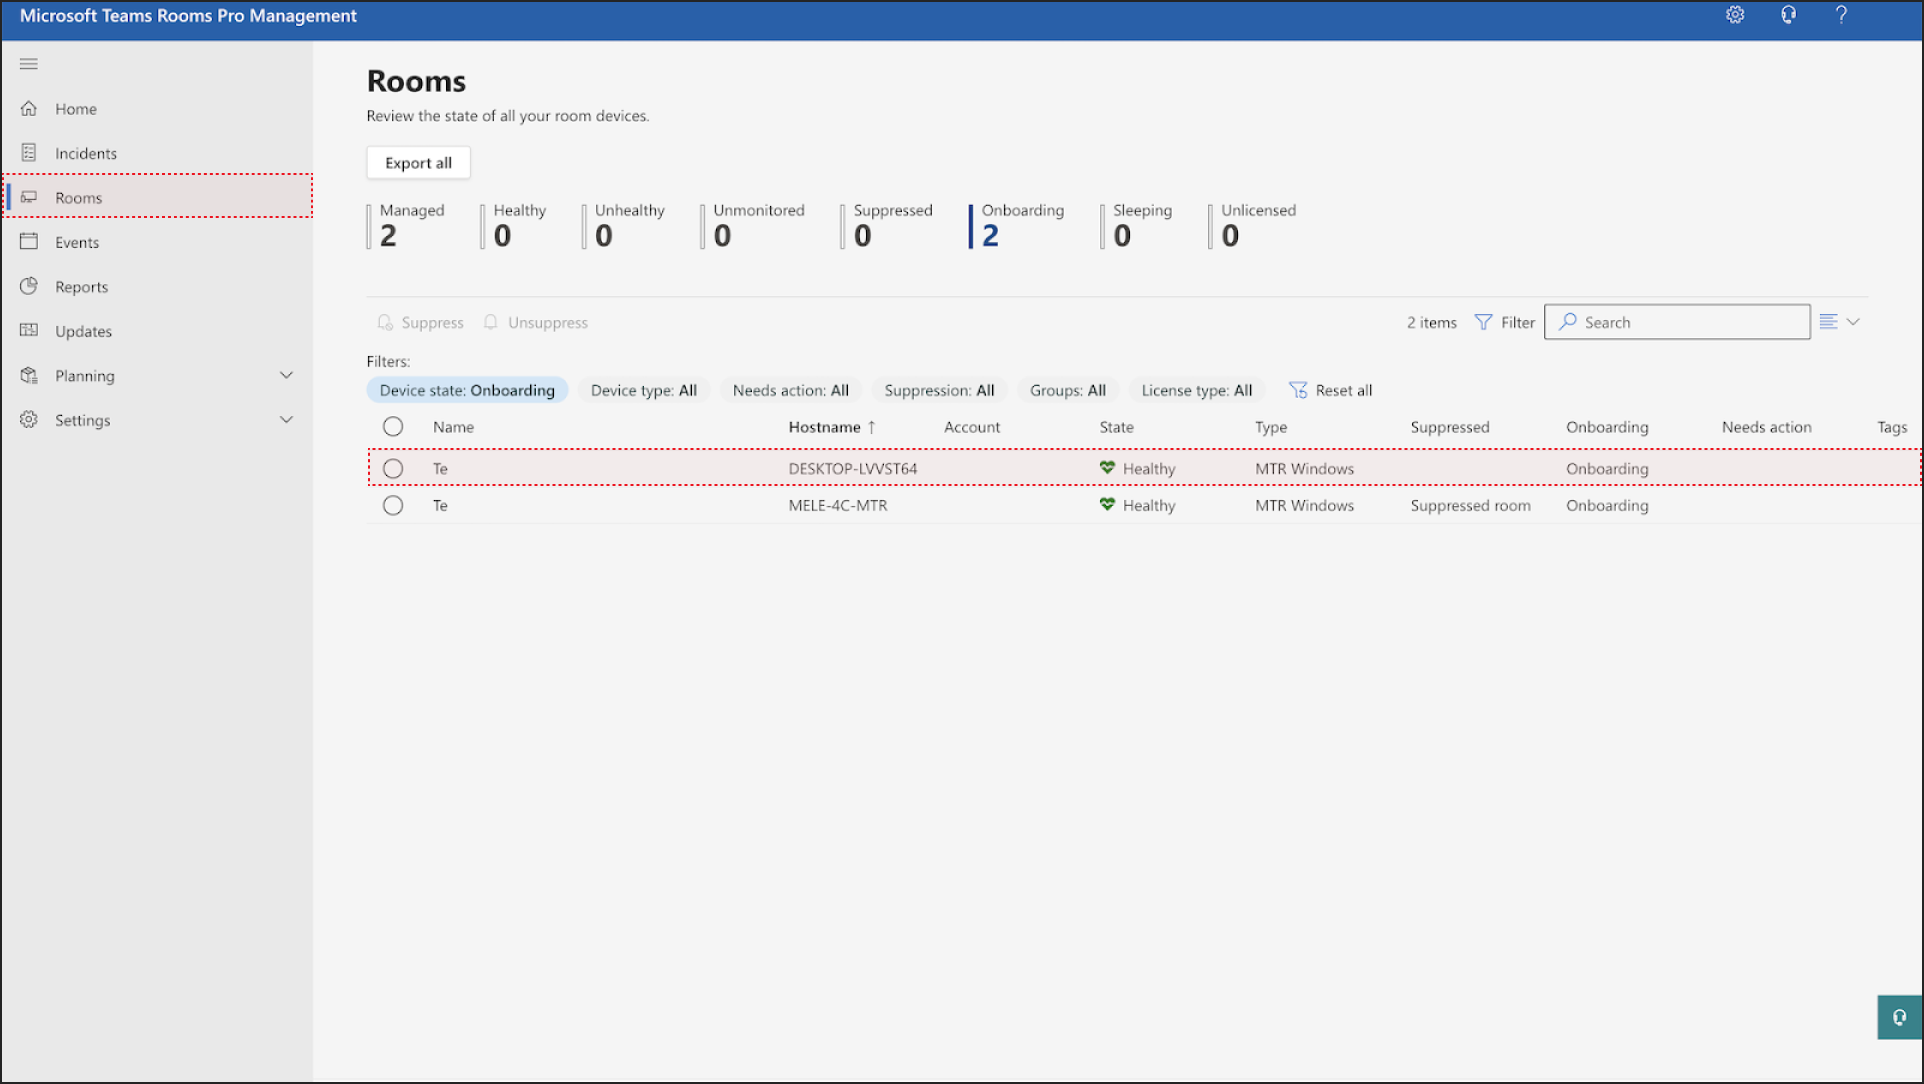
 ### Assign the Pickcel Source to a Room
In the Teams Rooms Pro Management Portal, navigate to **Rooms** from the sidebar. Select the Microsoft Teams Room you want to set digital signage content for.
### Assign the Pickcel Source to a Room
In the Teams Rooms Pro Management Portal, navigate to **Rooms** from the sidebar. Select the Microsoft Teams Room you want to set digital signage content for.
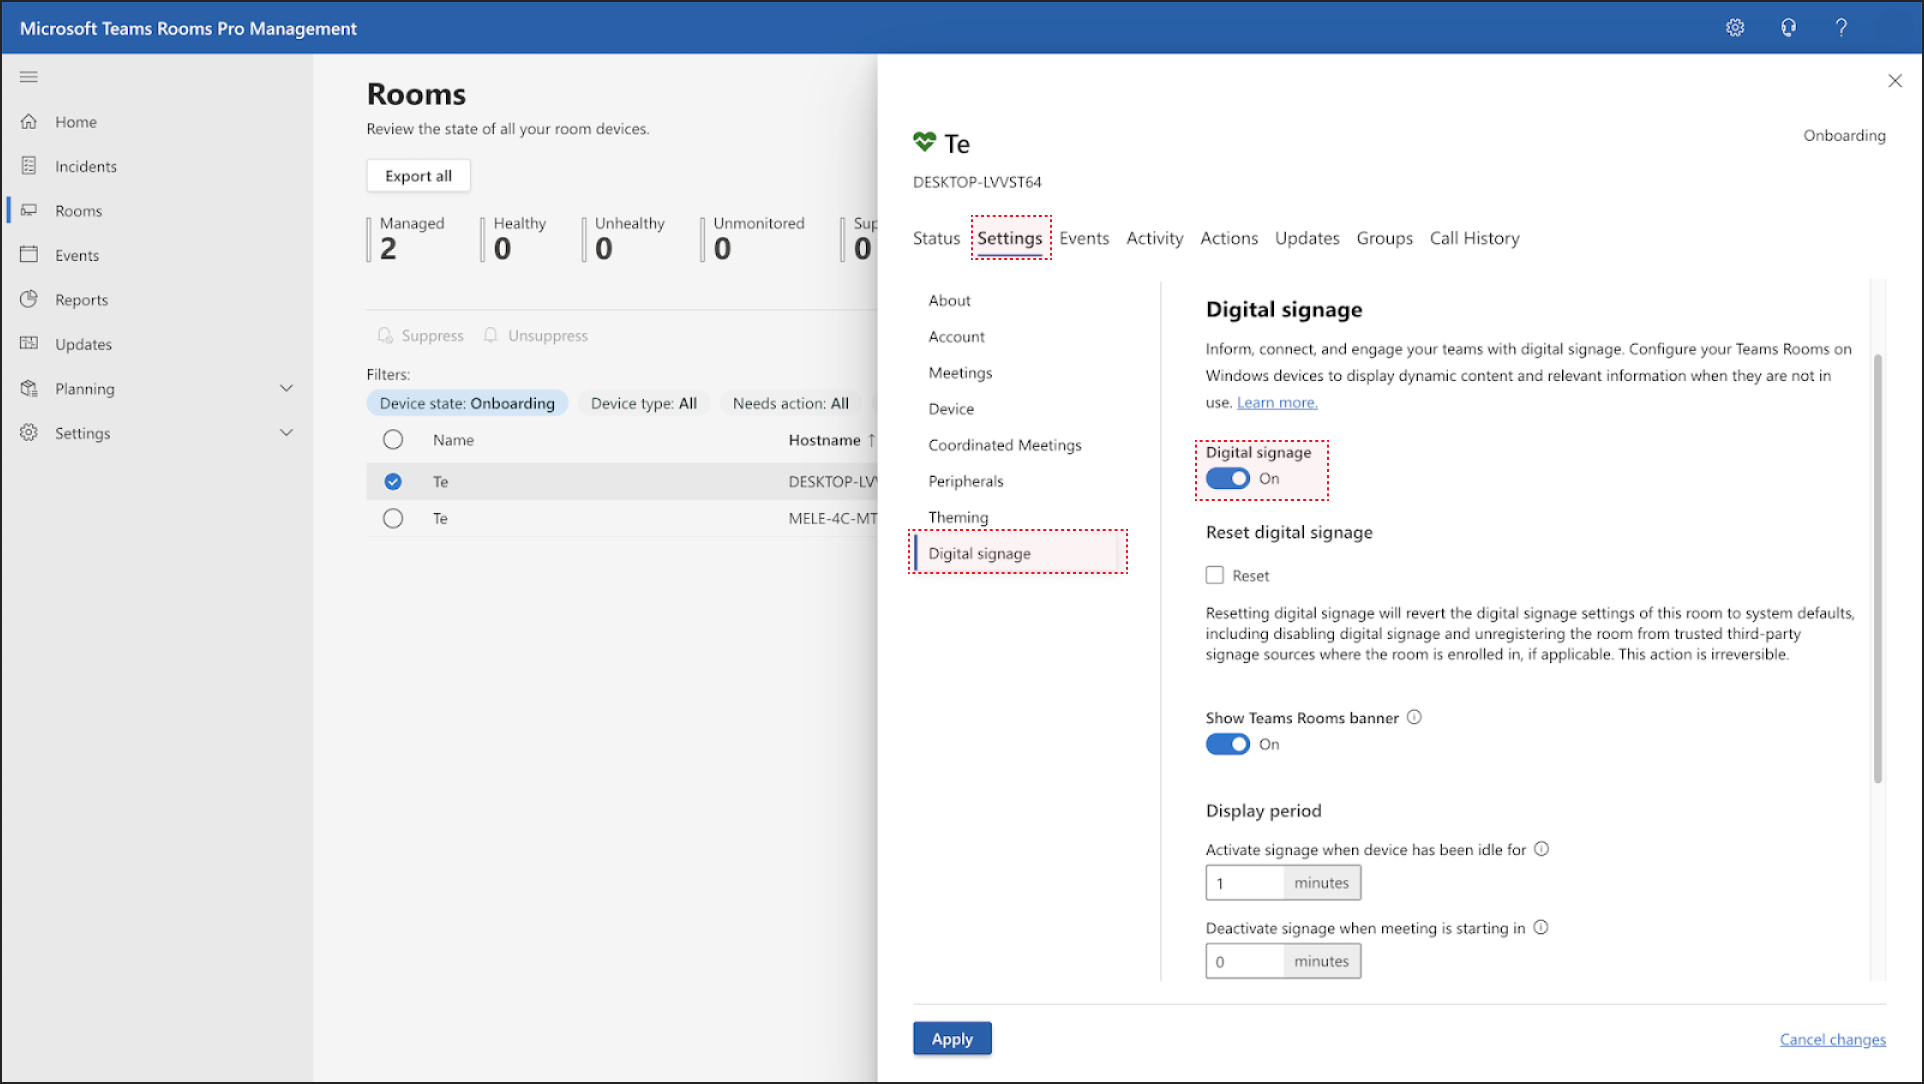
 In the pop-up, go to **Settings > Digital signage**. Ensure the **Digital signage** option is turned **On**, then ensure **Show Teams Rooms banner** is turned **On**, and set how long of a display period you want before your digital signage is activated.
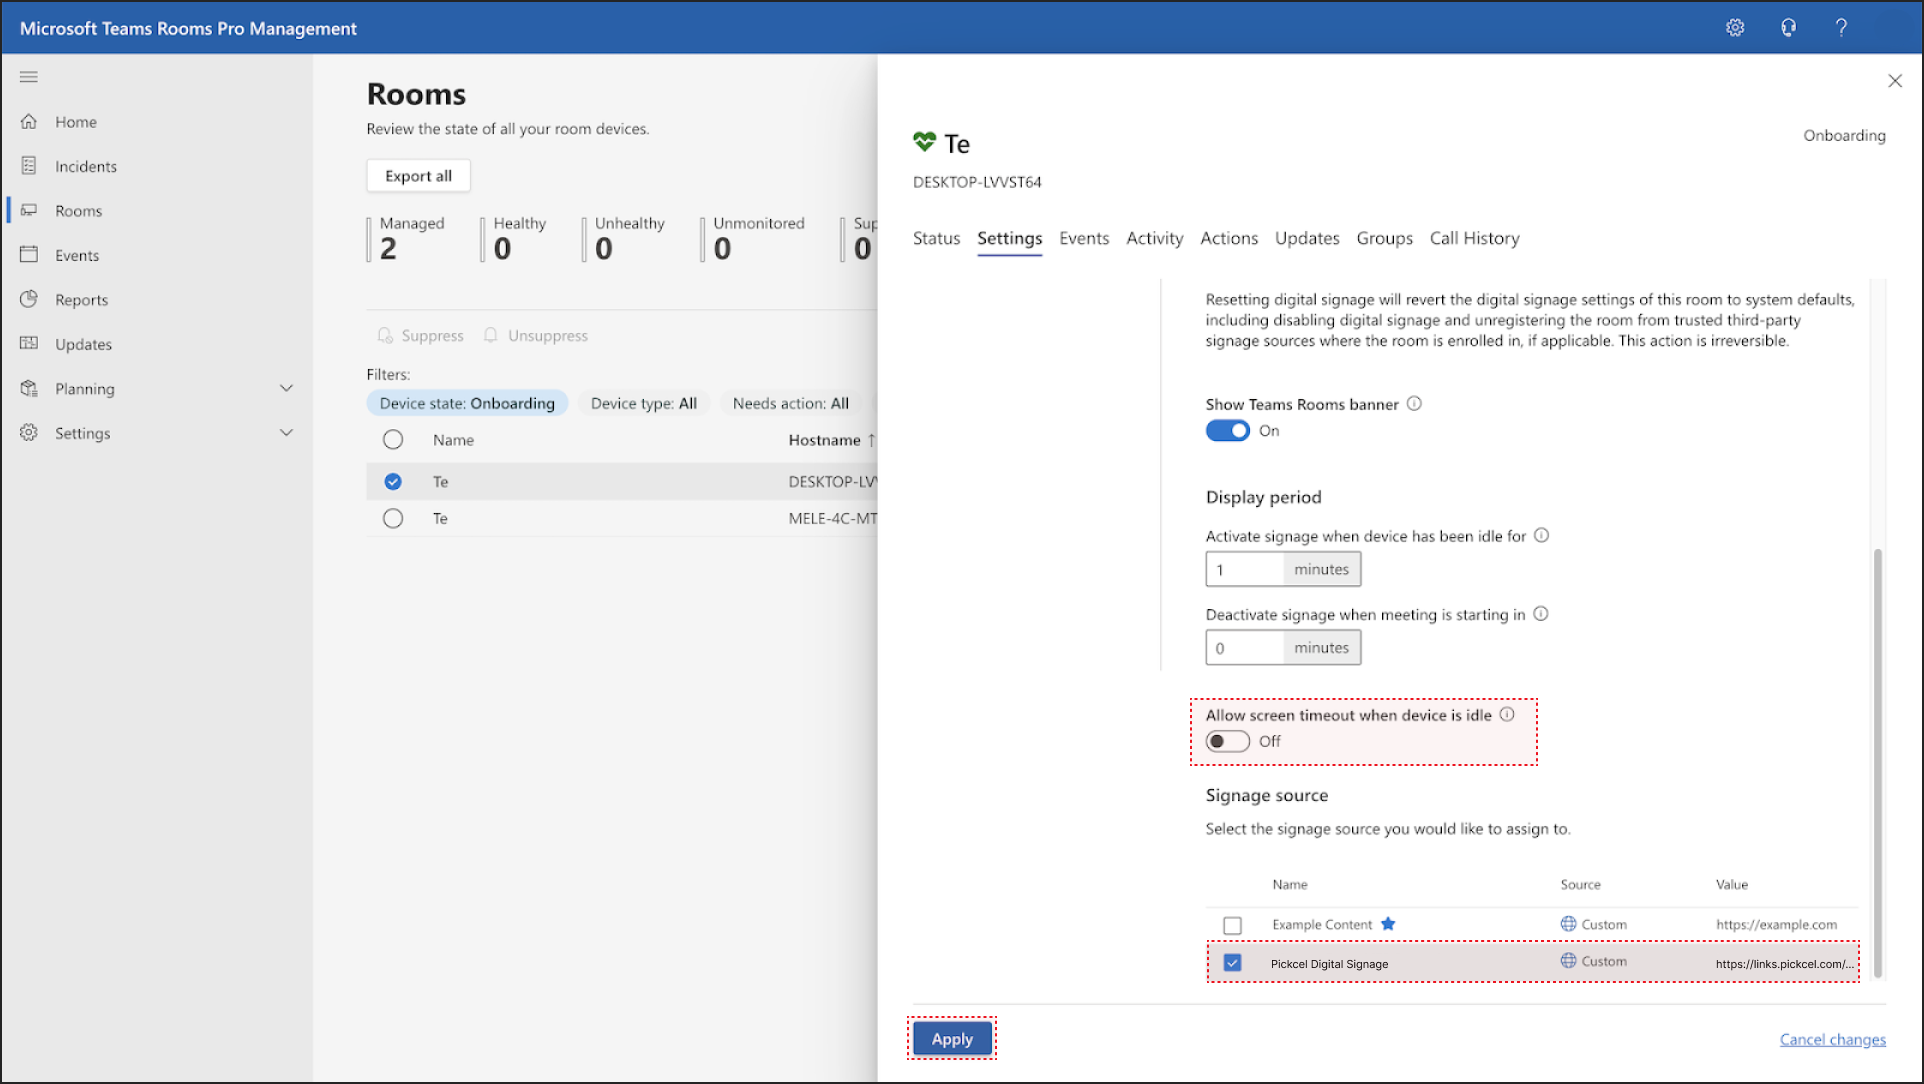
 Scroll down and ensure **Allow screen timeout when device is idle** is turned **Off**. Finally, select your Microsoft Teams Rooms player instance as the **Signage source**. Select **Apply**.
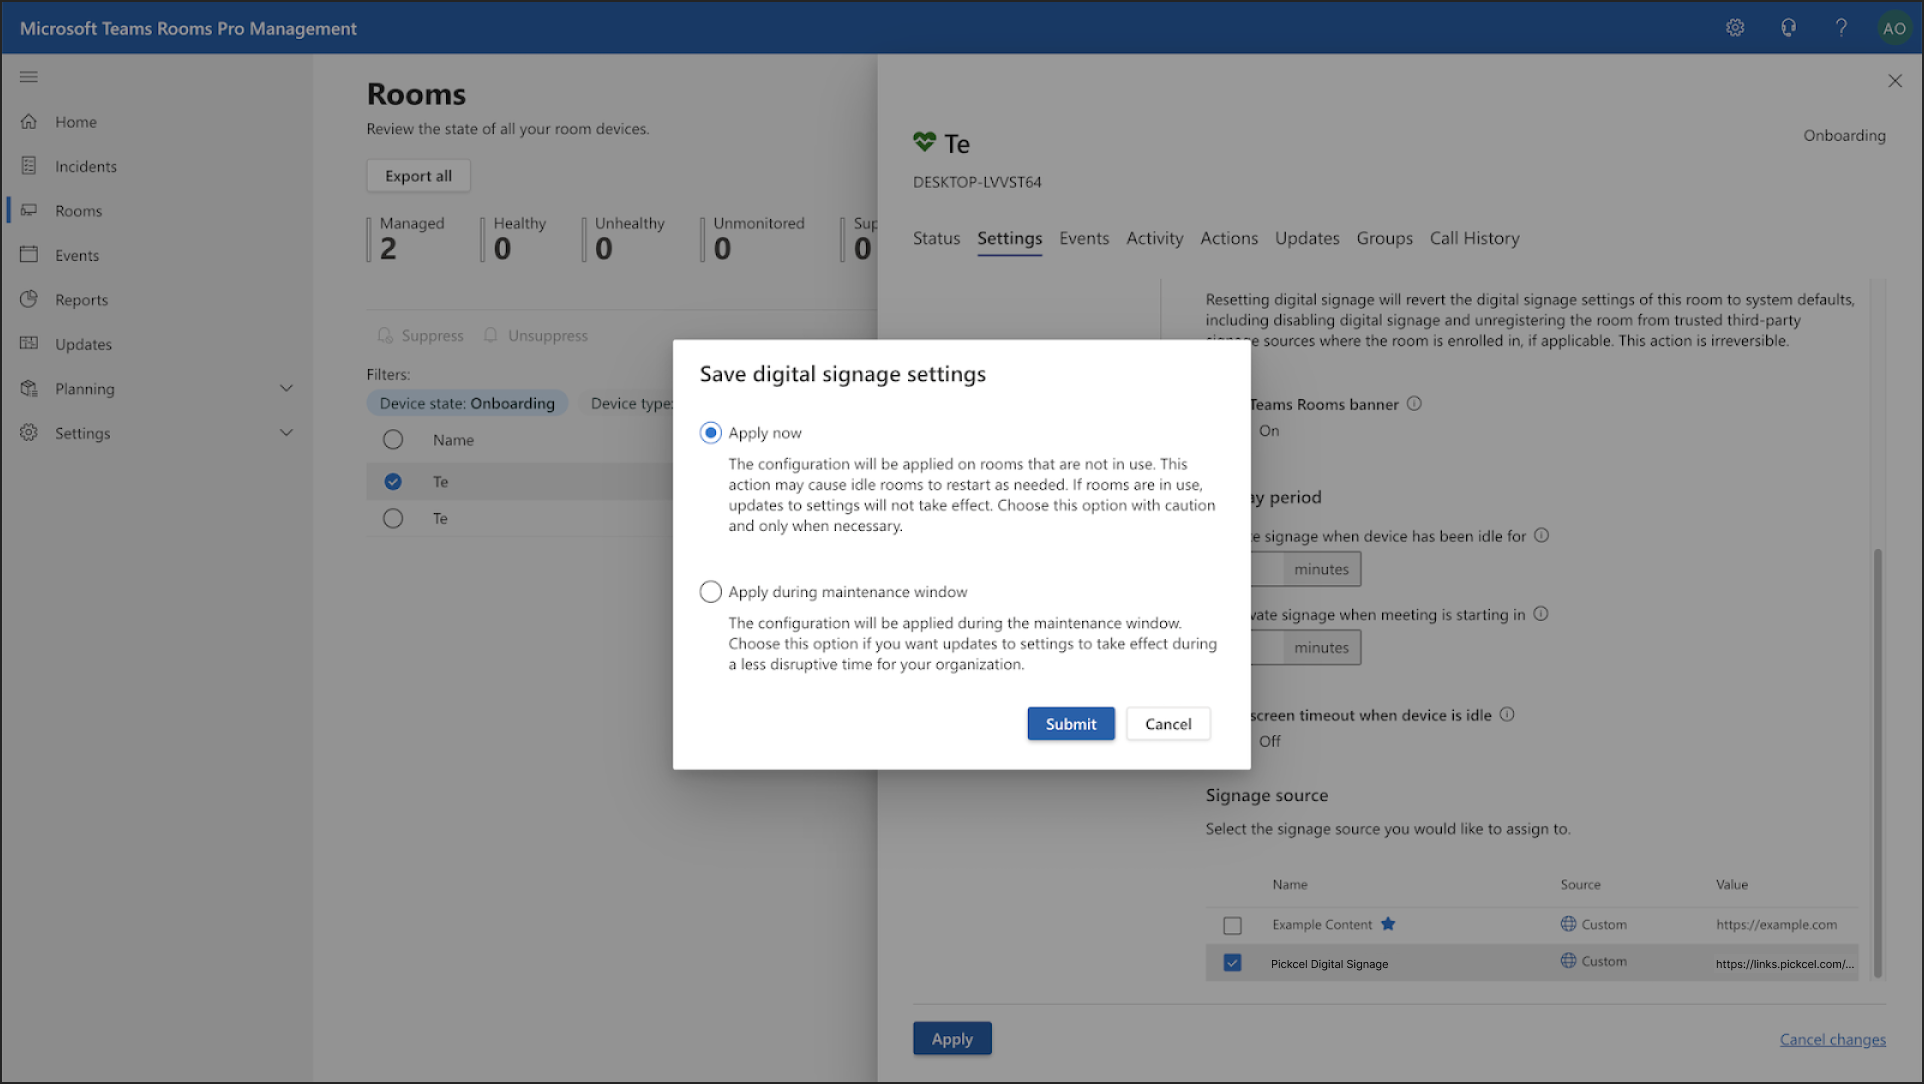
 You will see a pop-up asking you to save your digital signage settings. Select **Apply now**, then **Submit**. Another pop-up explains that the save process will happen in the background. Click **Skip and Close**.
 ***
## You're All Set!
You have successfully configured your Microsoft Teams Room to display Pickcel digital signage. Now, when the meeting room is not in an active call and the idle time you set has passed, the screen automatically switches to display the dynamic content managed from your Pickcel account.
For further reading:
* To create a multi-zone layout: Learn about [Compositions](/compositions/compositions)
* To send content to your screens: Learn how to [Publish or Schedule Content](/schedule-and-publish/publish-overview)
***
## You're All Set!
You have successfully configured your Microsoft Teams Room to display Pickcel digital signage. Now, when the meeting room is not in an active call and the idle time you set has passed, the screen automatically switches to display the dynamic content managed from your Pickcel account.
For further reading:
* To create a multi-zone layout: Learn about [Compositions](/compositions/compositions)
* To send content to your screens: Learn how to [Publish or Schedule Content](/schedule-and-publish/publish-overview)