> ## Documentation Index
> Fetch the complete documentation index at: https://docs.pickcel.com/llms.txt
> Use this file to discover all available pages before exploring further.
# How to Display a Zendesk Dashboard on Digital Signage Using Pickcel?
This guide explains how to display key Zendesk metrics on your digital signage to keep your support team informed about ticket volumes, response times, and CSAT.
## Prerequisites
Before you begin, make sure you have:
* A Zendesk account with access to the target dashboard
* Email and password login for that account
* 2‑Factor Authentication (2FA) enabled, with the 2FA secret key available
* The full dashboard URL you plan to display
See our guide: [How to Set Up 2FA and Get a Secret Key](/apps/dashboard-apps/2fa-setup)
**Best Practice:** For enhanced security and easier management, **create a dedicated agent account in Zendesk with read‑only access** to the reporting dashboards you want to display. Use this account's credentials in Pickcel.
***
## Step-by-Step Configuration
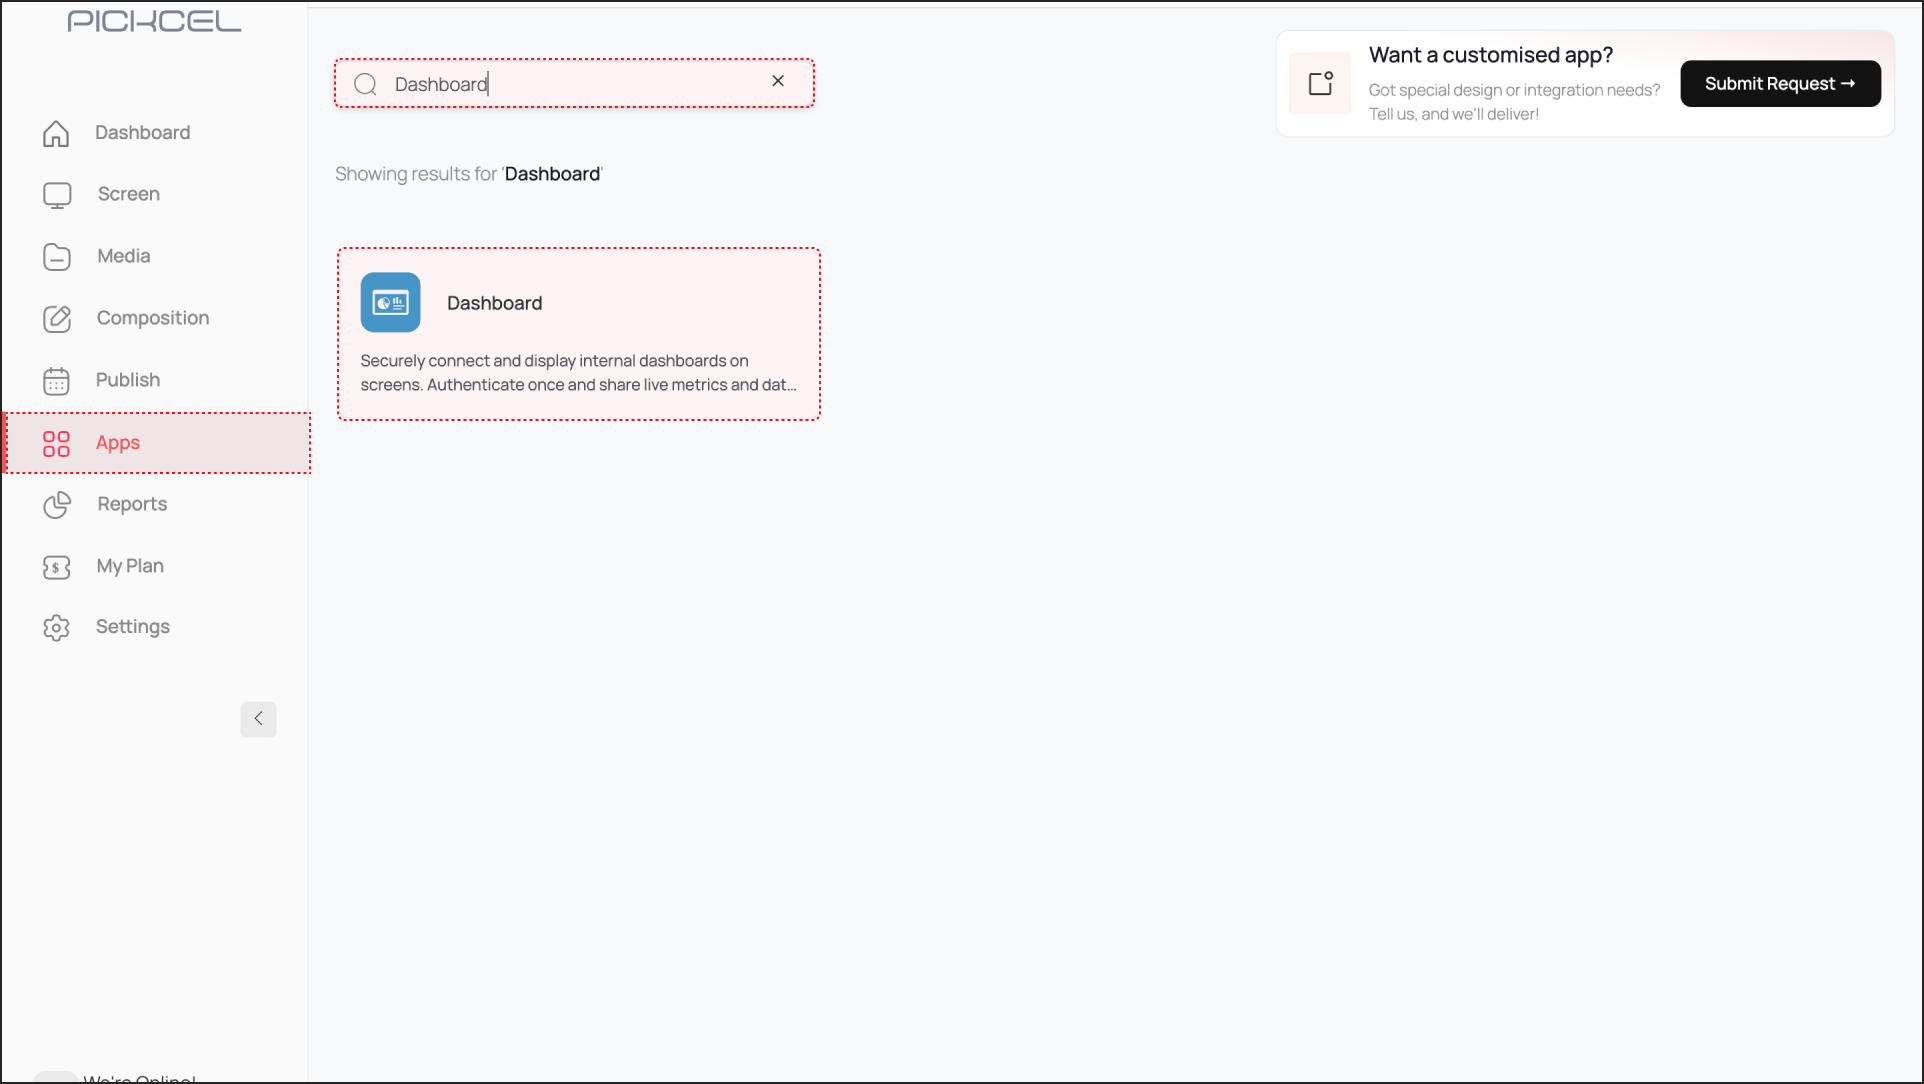
Log in to the Pickcel Console and navigate to **Apps**. Search for the **Dashboard** app and click it. Then click **Create App**.
 * Name the app instance based on the dashboard you're configuring (e.g., "Live Support Stats, Zendesk").
* From the dropdown, select **Zendesk**. The configuration fields will open on the right.
* Name the app instance based on the dashboard you're configuring (e.g., "Live Support Stats, Zendesk").
* From the dropdown, select **Zendesk**. The configuration fields will open on the right.
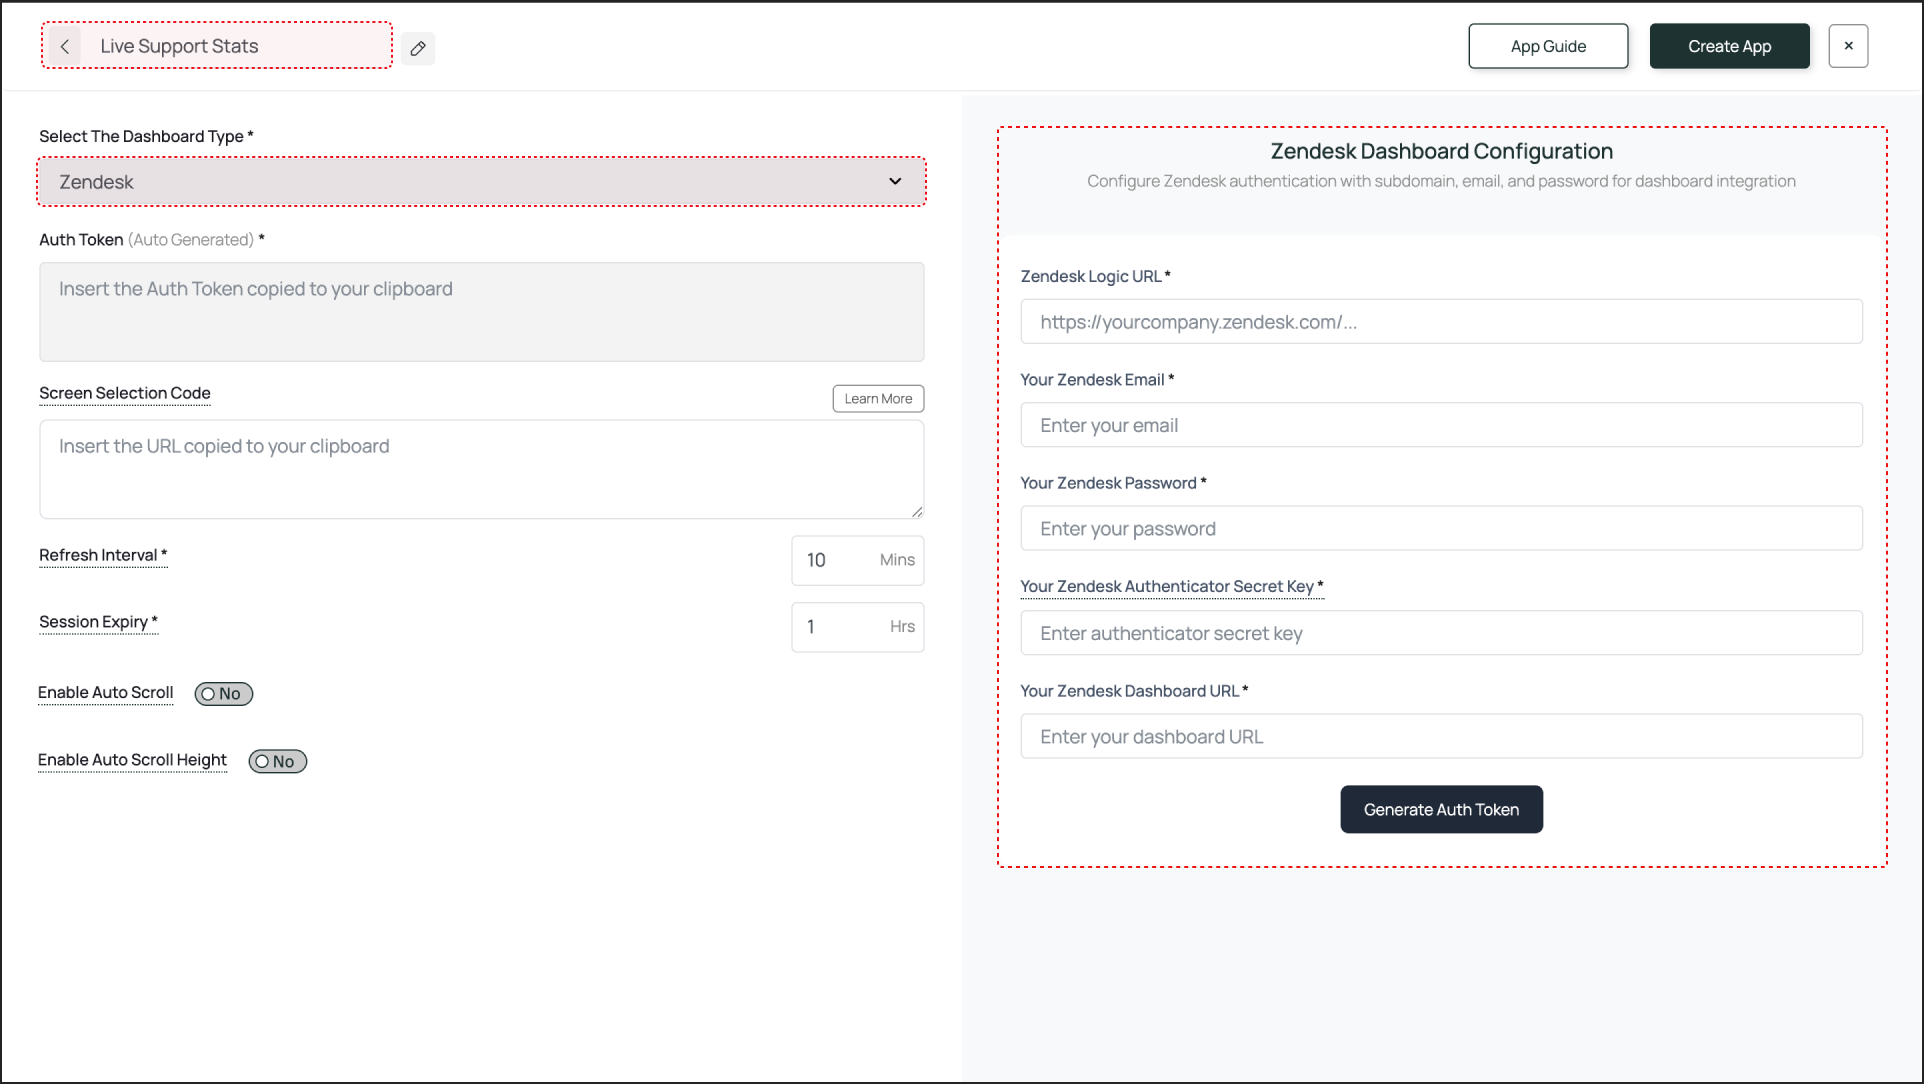 This section requires precise information to generate a correct and secure Auth Token.
* **Zendesk Login URL**: Enter your company's Zendesk URL (e.g., `https://yourcompany.zendesk.com`).
Copy the link of the Zendesk Login URL from the browswer address bar
This section requires precise information to generate a correct and secure Auth Token.
* **Zendesk Login URL**: Enter your company's Zendesk URL (e.g., `https://yourcompany.zendesk.com`).
Copy the link of the Zendesk Login URL from the browswer address bar
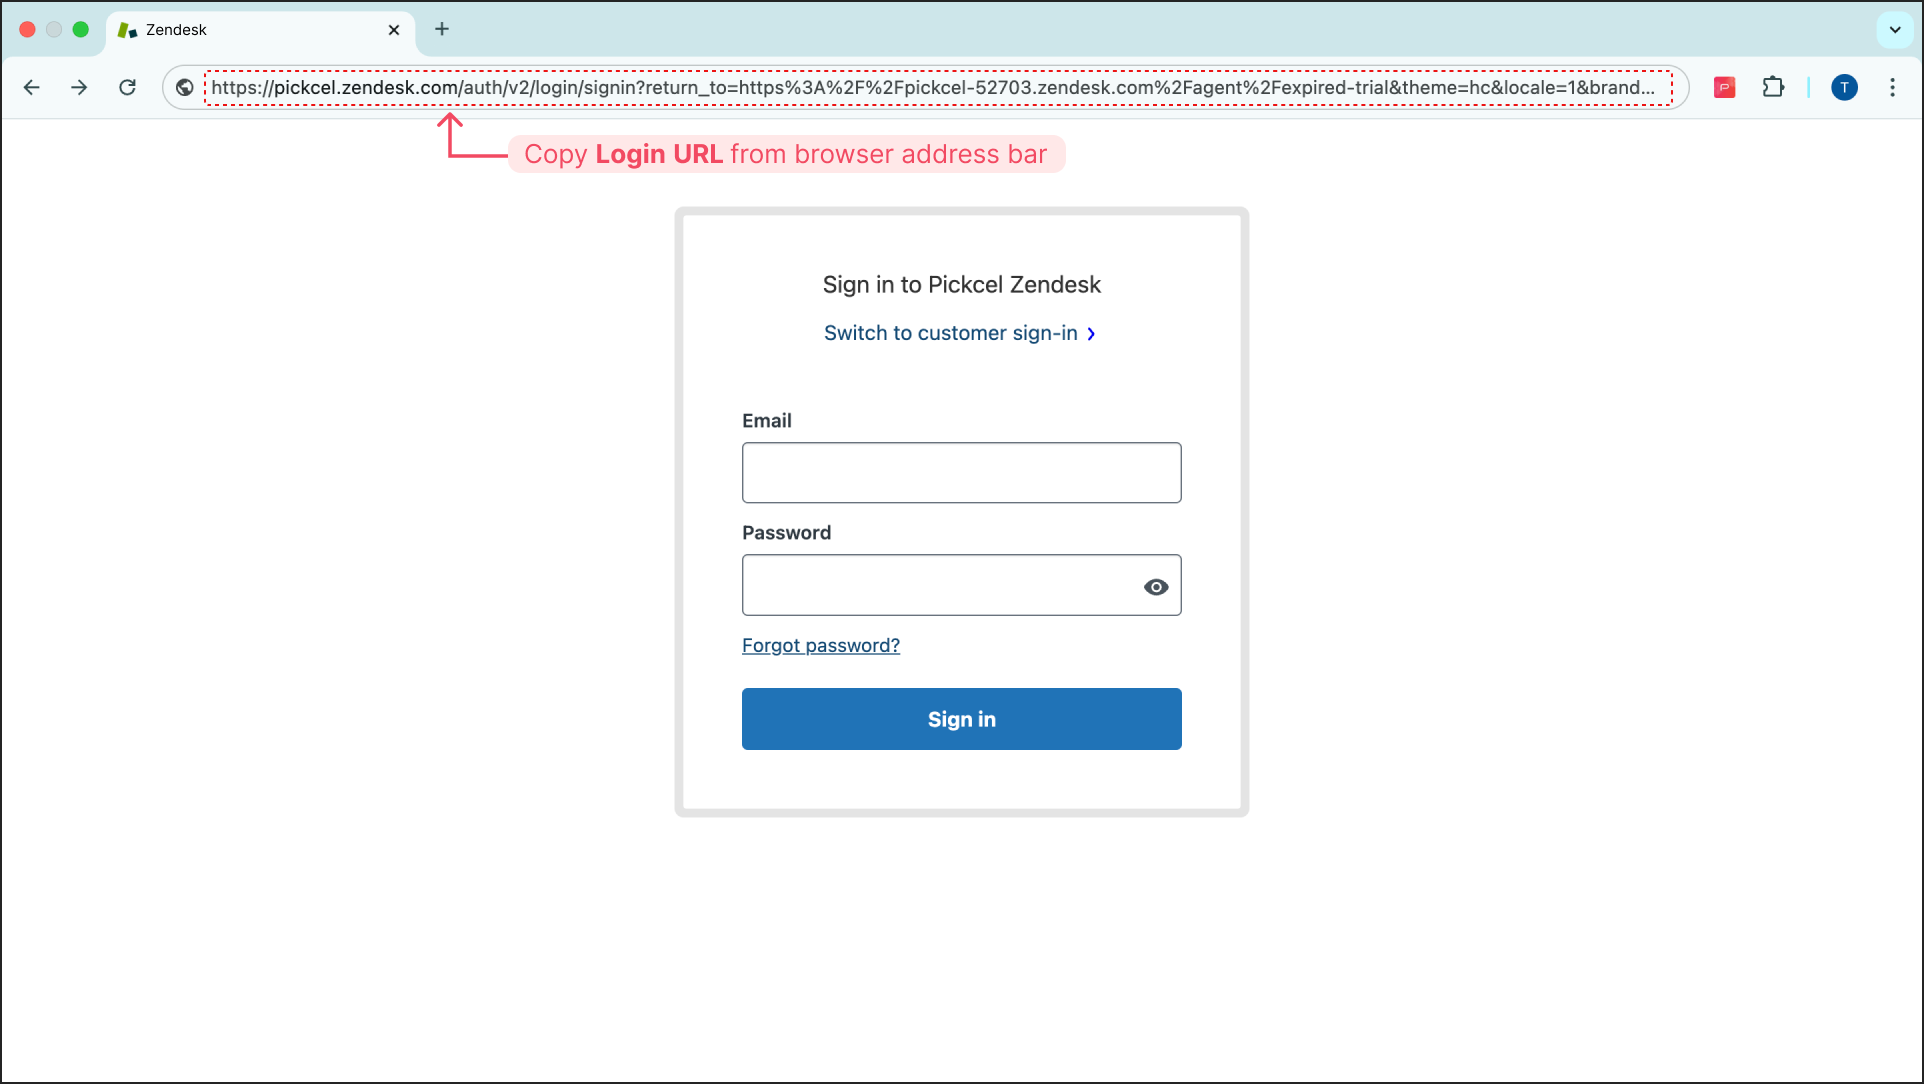 and Paste it in the `Zendesk Login URL` field, as shown below
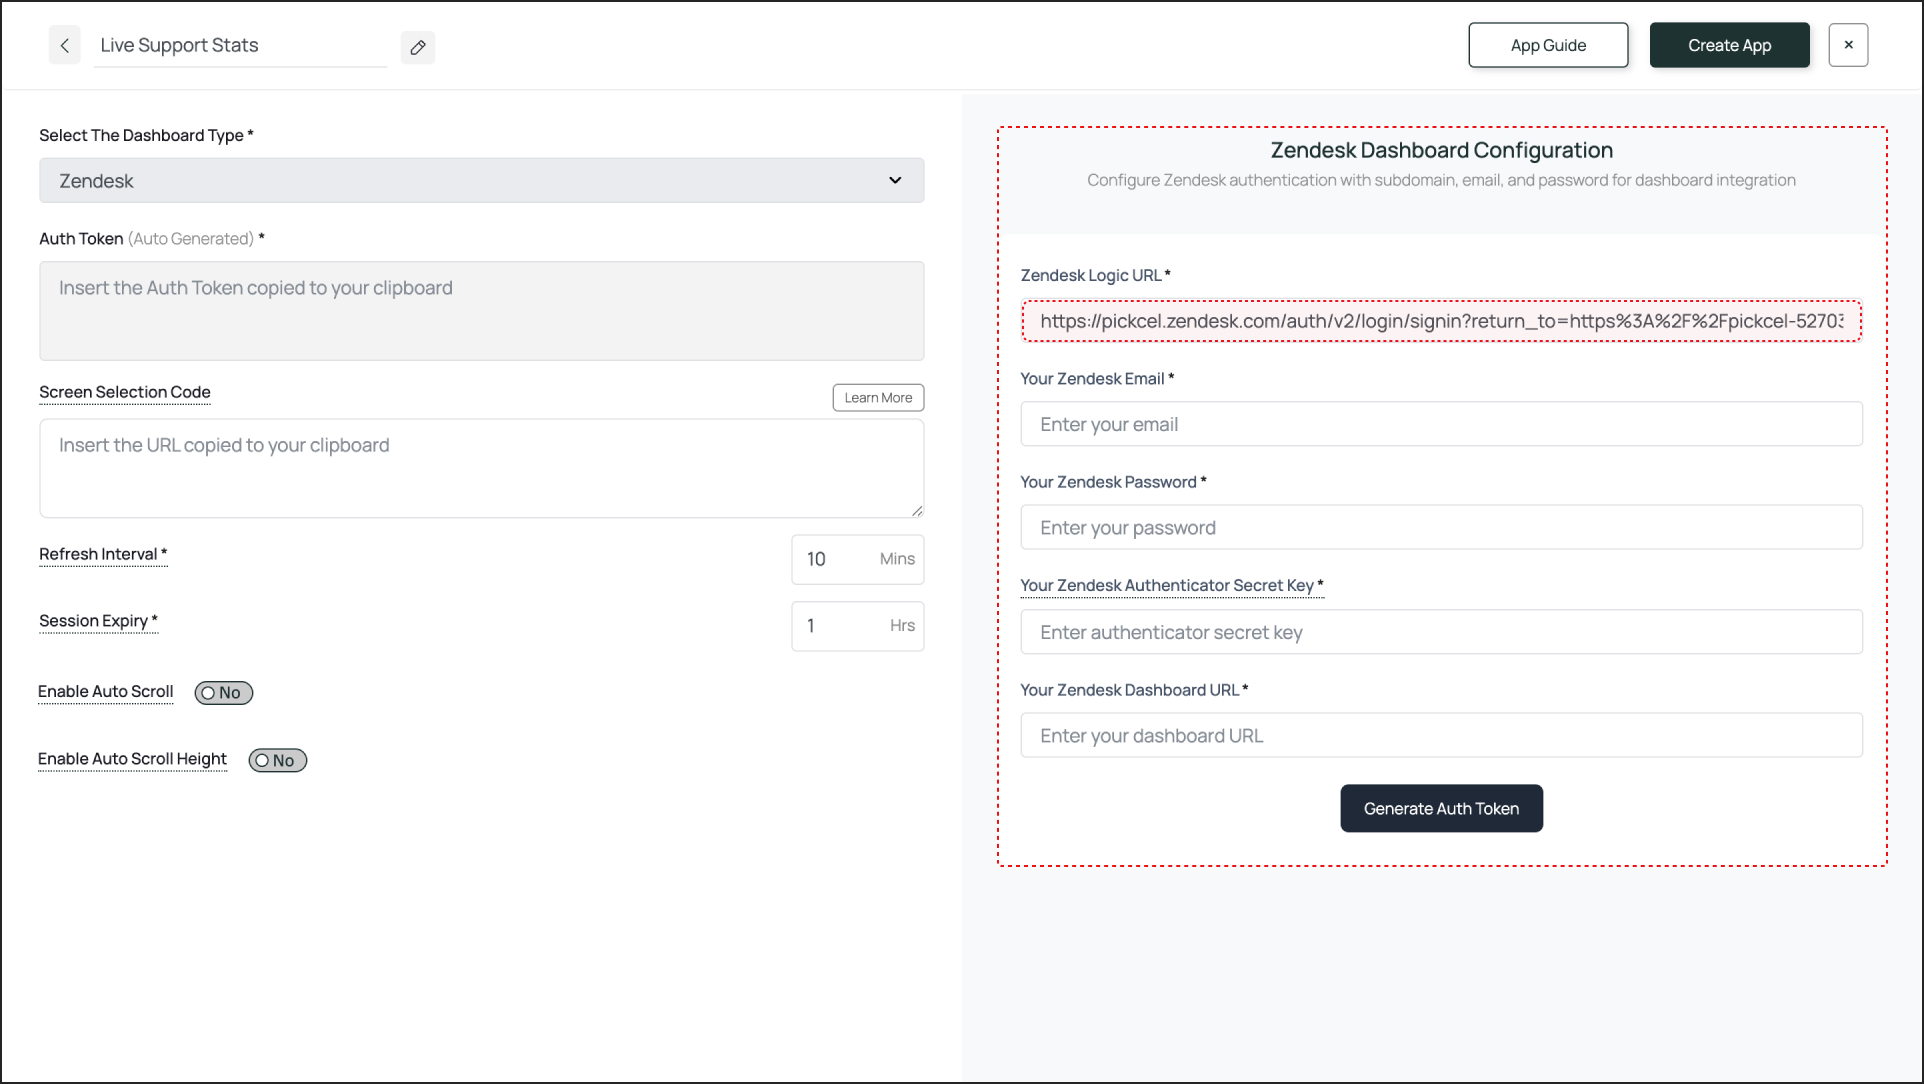 * **Email Address**: Enter the email for the dedicated Zendesk account.
* **Password**: Enter that account's password.
* **Auth Secret**: Paste the 2FA Secret Key you generated for the Zendesk account.
* **Output Screen URL**: Log in to Zendesk and navigate to the dashboard you want to display. Copy the full URL from the browser's address bar
* **Email Address**: Enter the email for the dedicated Zendesk account.
* **Password**: Enter that account's password.
* **Auth Secret**: Paste the 2FA Secret Key you generated for the Zendesk account.
* **Output Screen URL**: Log in to Zendesk and navigate to the dashboard you want to display. Copy the full URL from the browser's address bar
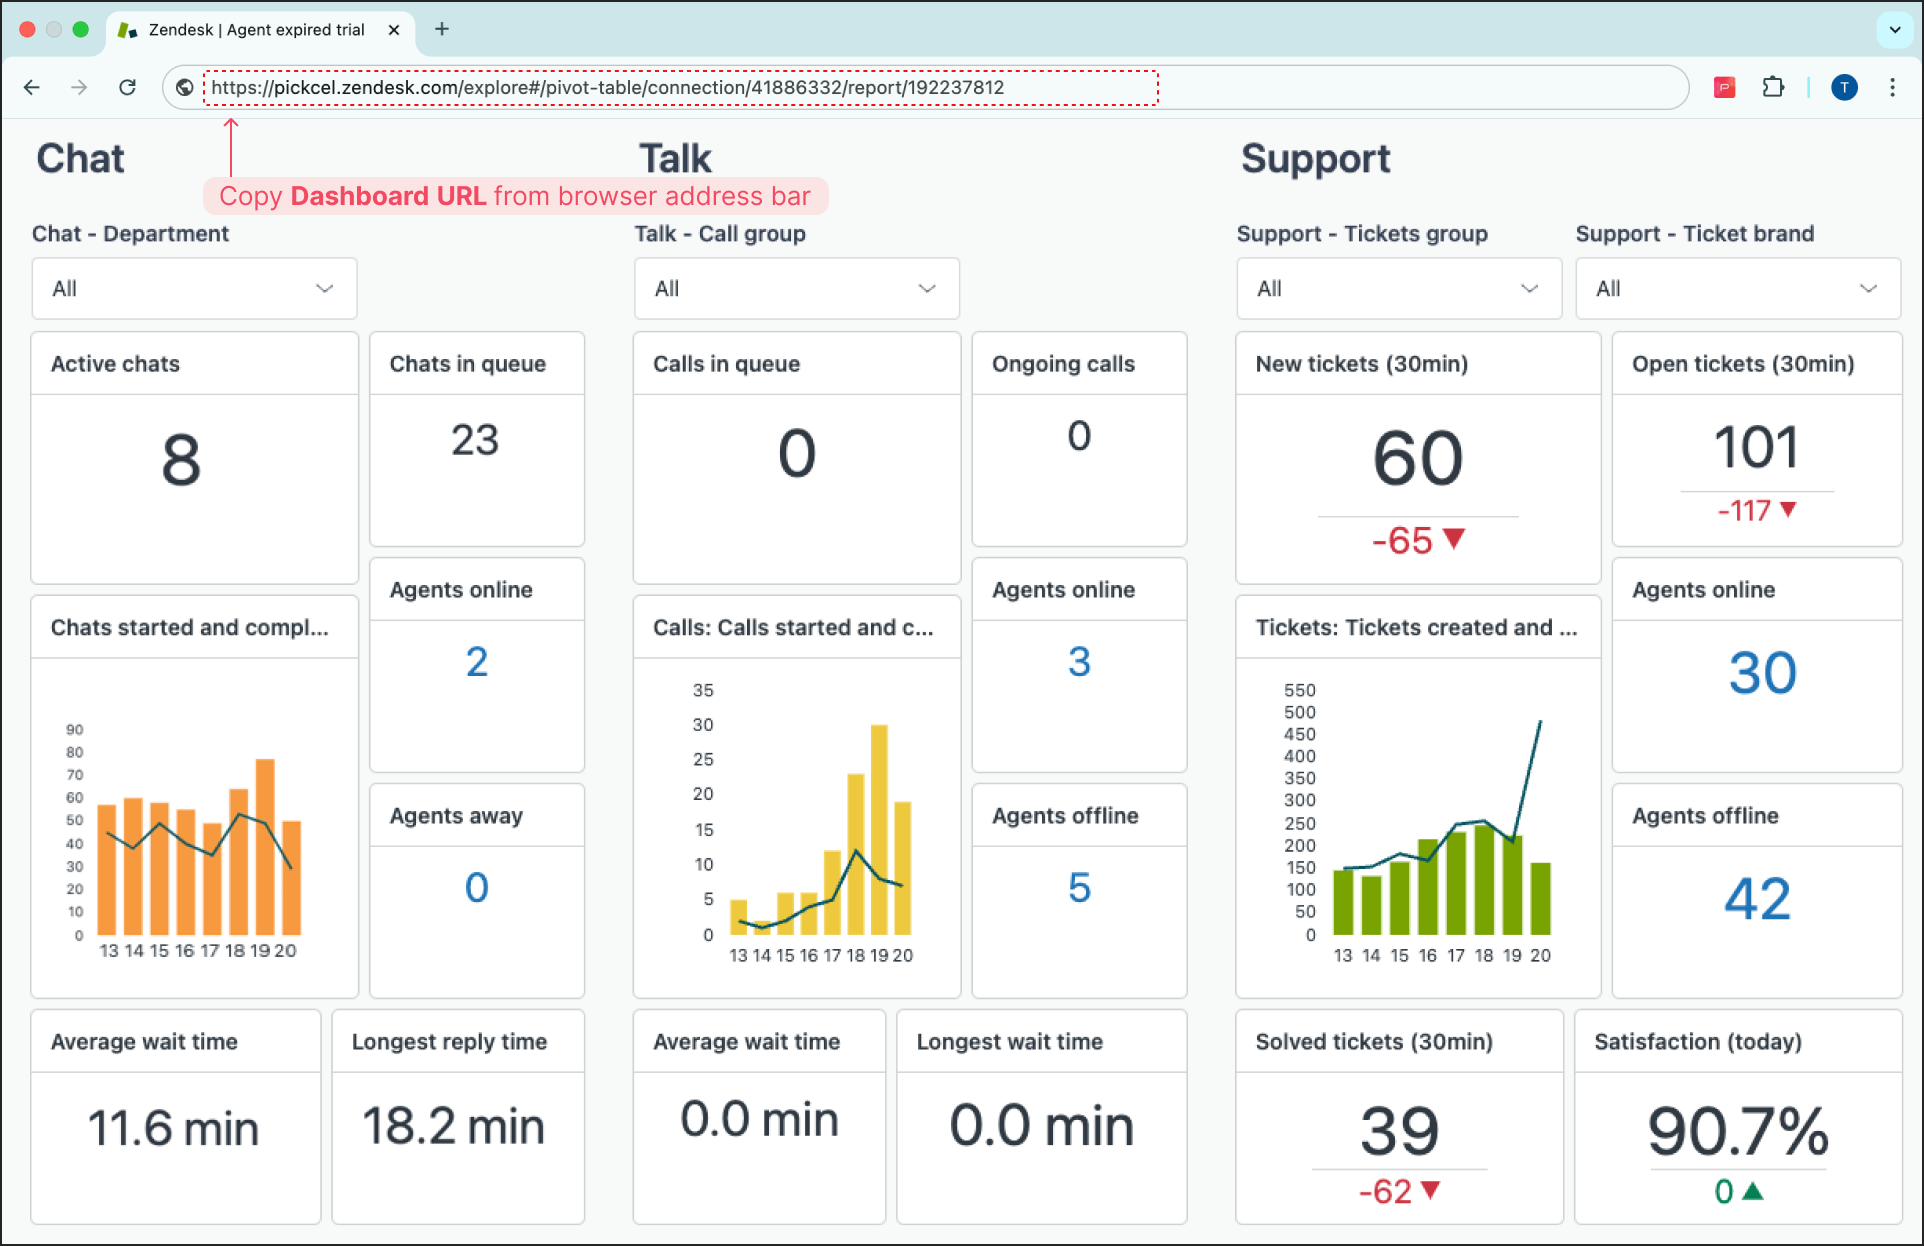 and paste it here.
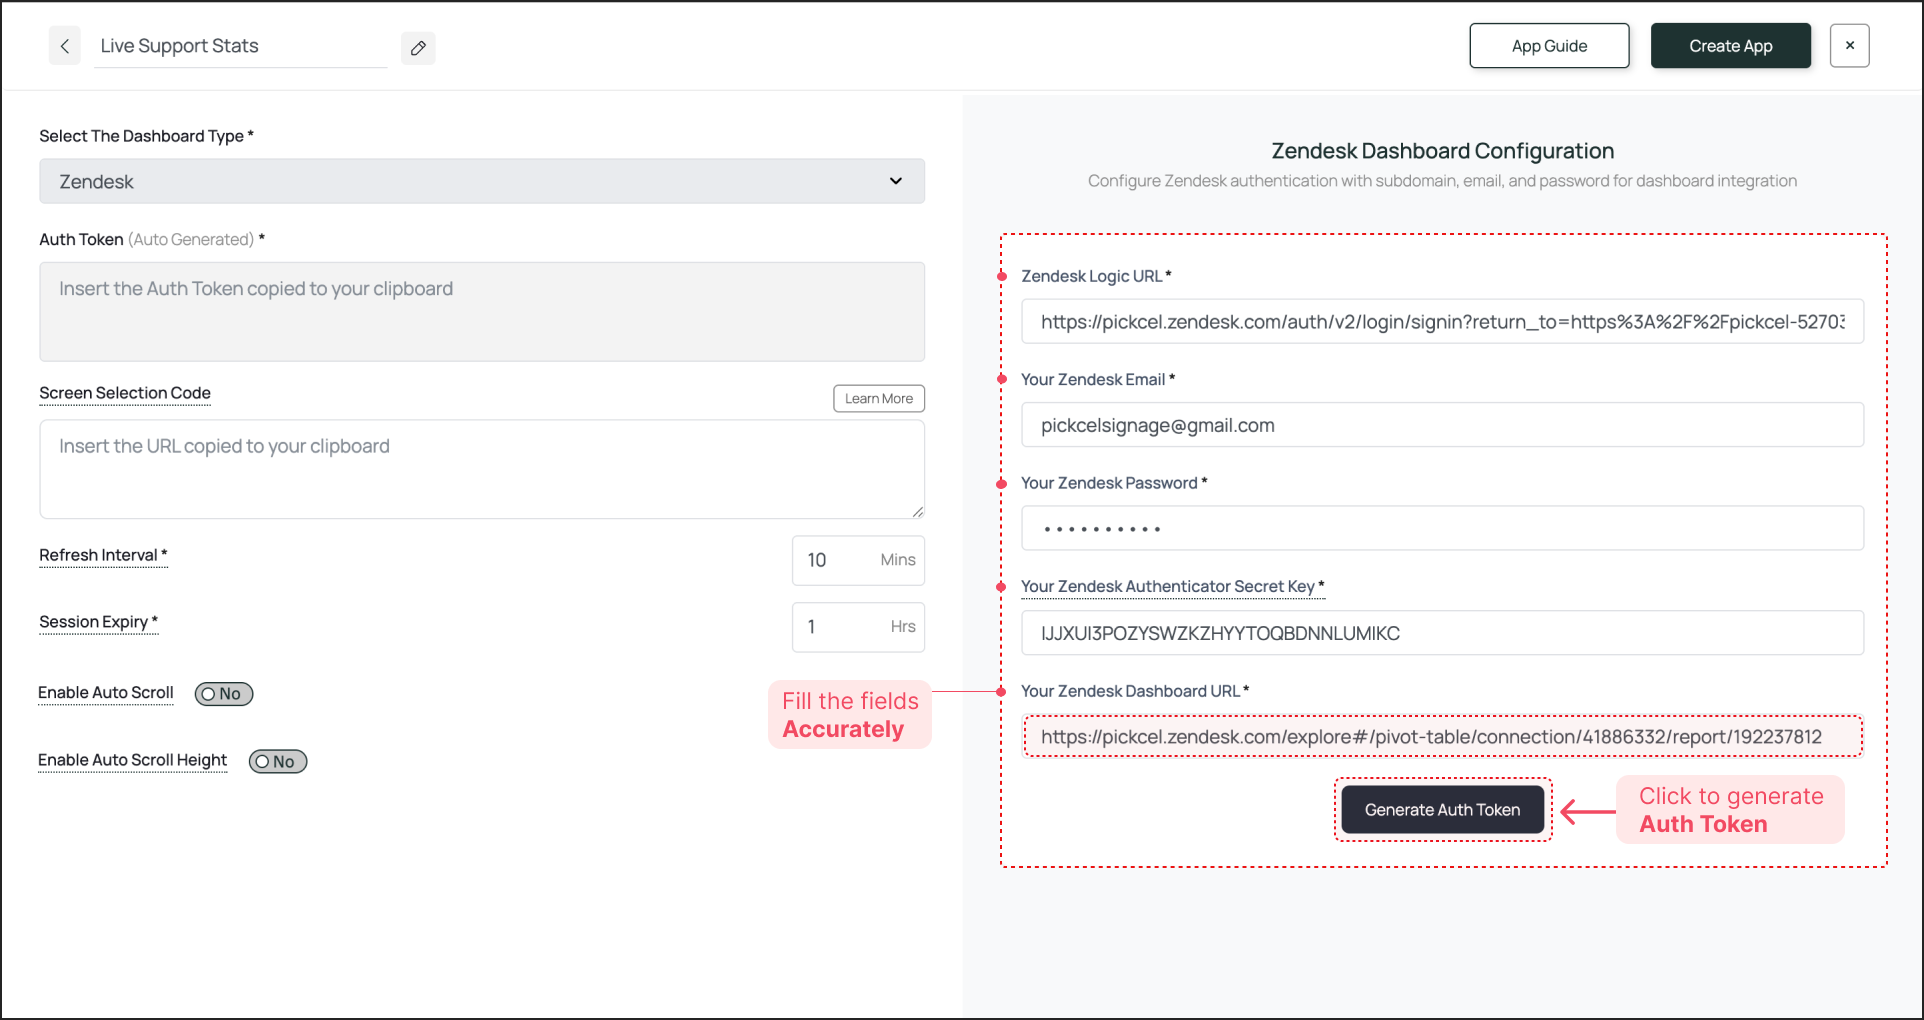 ***
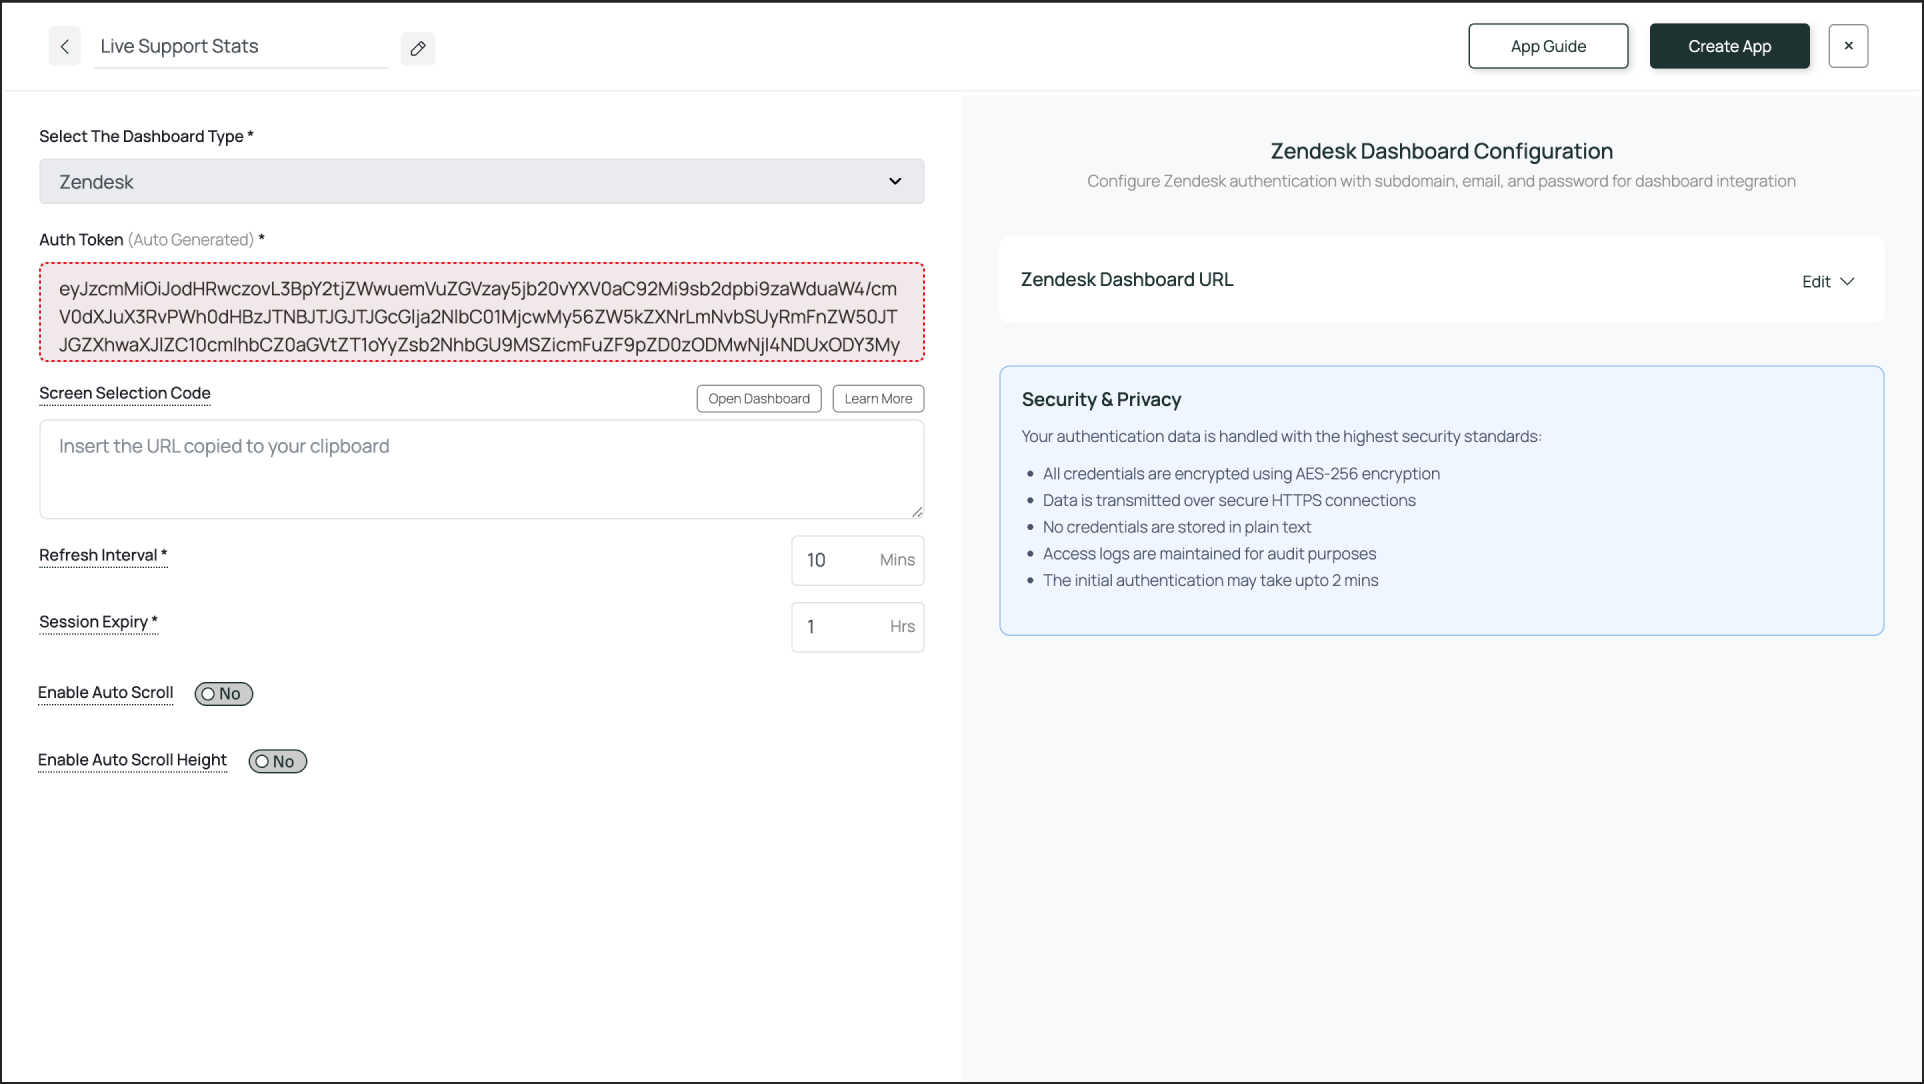
Click **Generate Auth Token**. The token will be generated, and automatically gets pasted into the **Auth Token** field on the left.
***
Click **Generate Auth Token**. The token will be generated, and automatically gets pasted into the **Auth Token** field on the left.
 ### Enter Screen Selection Code (Optional)
If you want to display only a specific portion of your Zendesk dashboard, use the Pickcel Dashboard Screen Mapper extension. Select the area you want to display, confirm the selection, and paste the generated code into the **Screen Selection Code** field.
Check this guide for more info: [How to Use the Dashboard Screen Mapper Chrome Extension?](/apps/dashboard-apps/screen-mapper)
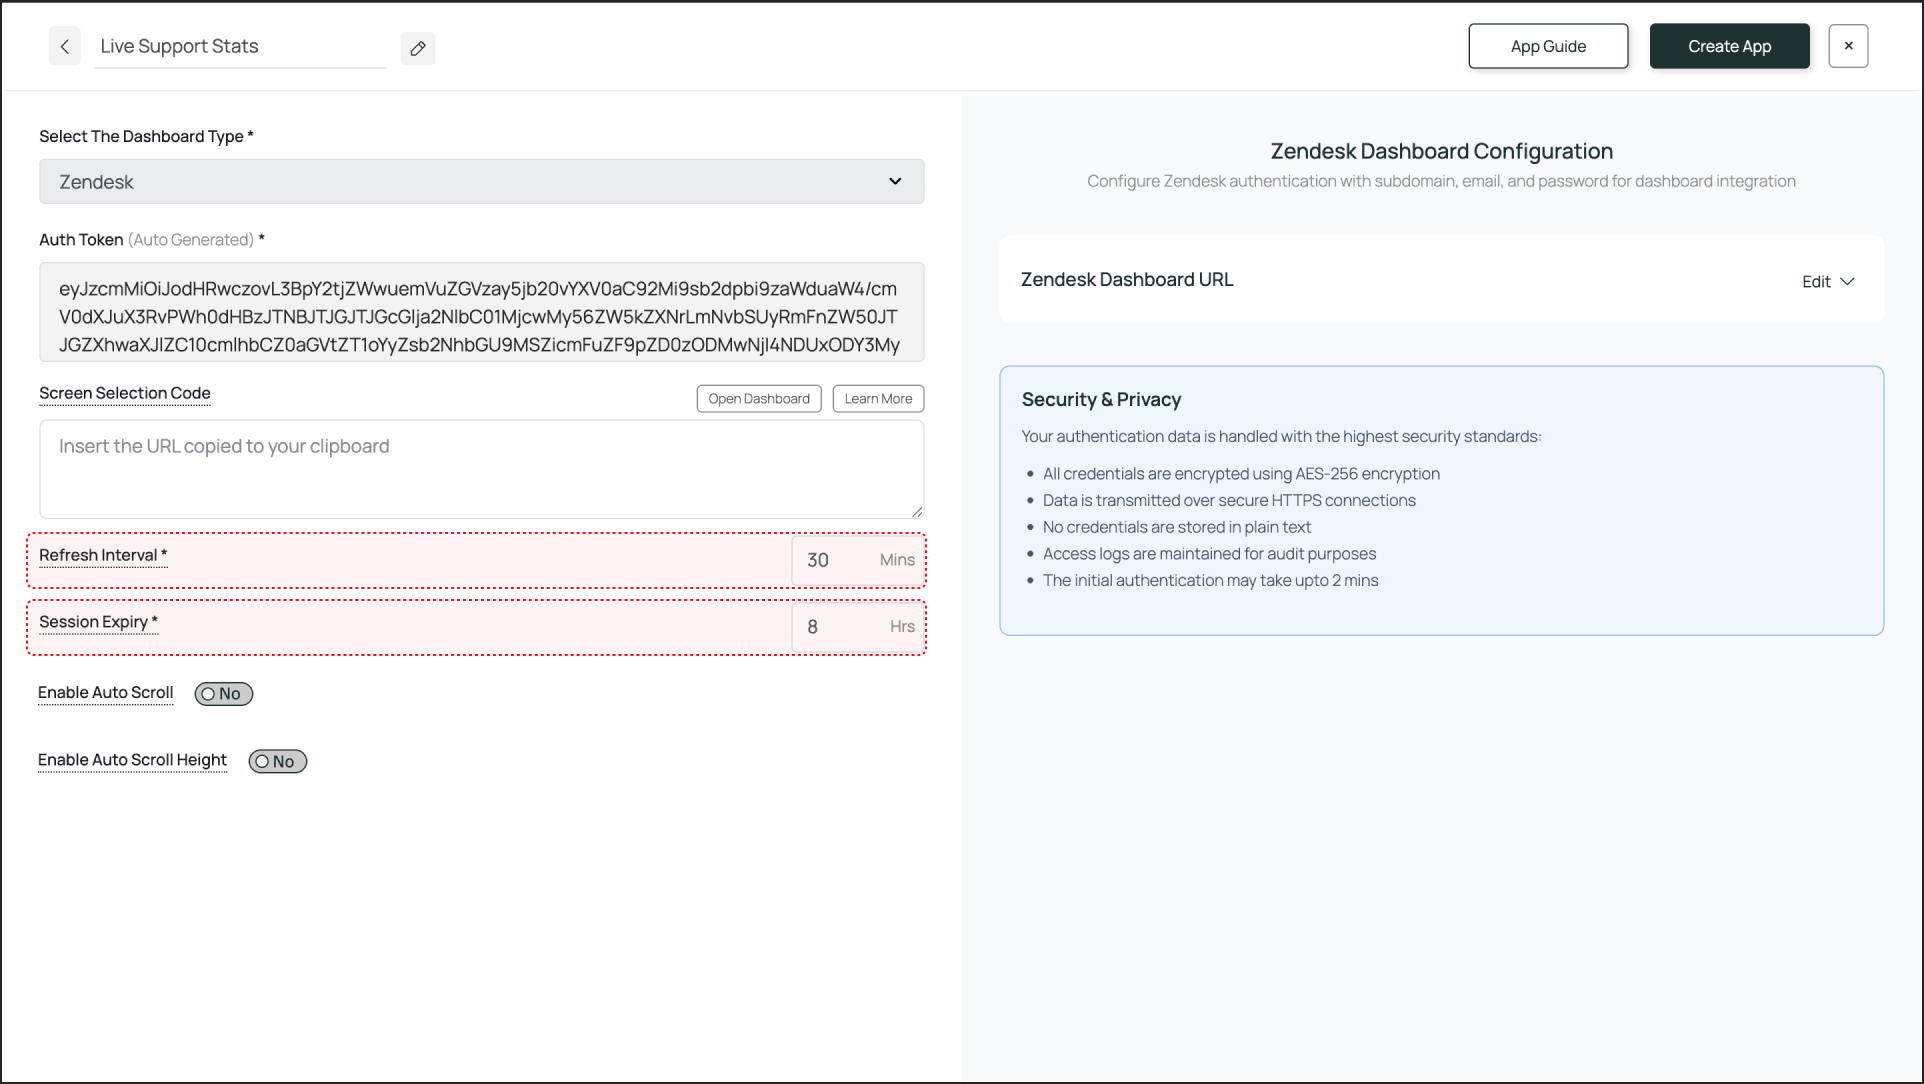
* **Refresh Interval**: Defines how often the dashboard screenshot is updated. For live support metrics, **30 minutes** is ideal.
* **Session Expiry**: Forces a fresh login to prevent timeouts. A value of about **8 hours** works well for a full support shift.
### Enter Screen Selection Code (Optional)
If you want to display only a specific portion of your Zendesk dashboard, use the Pickcel Dashboard Screen Mapper extension. Select the area you want to display, confirm the selection, and paste the generated code into the **Screen Selection Code** field.
Check this guide for more info: [How to Use the Dashboard Screen Mapper Chrome Extension?](/apps/dashboard-apps/screen-mapper)
* **Refresh Interval**: Defines how often the dashboard screenshot is updated. For live support metrics, **30 minutes** is ideal.
* **Session Expiry**: Forces a fresh login to prevent timeouts. A value of about **8 hours** works well for a full support shift.
 If your dashboard content doesn't fit on the screen vertically, you can use one of the following two scrolling options:
* **Enable Auto Scroll**: This lets you set a scroll duration in seconds. For example, if you set it to **60 seconds**, the entire dashboard will scroll from top to bottom over 60 seconds.
* **Enable Auto Scroll Height (Optional)**: This lets you set a scroll height in pixels. The screen will scroll down by the defined pixel height.
If your dashboard content doesn't fit on the screen vertically, you can use one of the following two scrolling options:
* **Enable Auto Scroll**: This lets you set a scroll duration in seconds. For example, if you set it to **60 seconds**, the entire dashboard will scroll from top to bottom over 60 seconds.
* **Enable Auto Scroll Height (Optional)**: This lets you set a scroll height in pixels. The screen will scroll down by the defined pixel height.
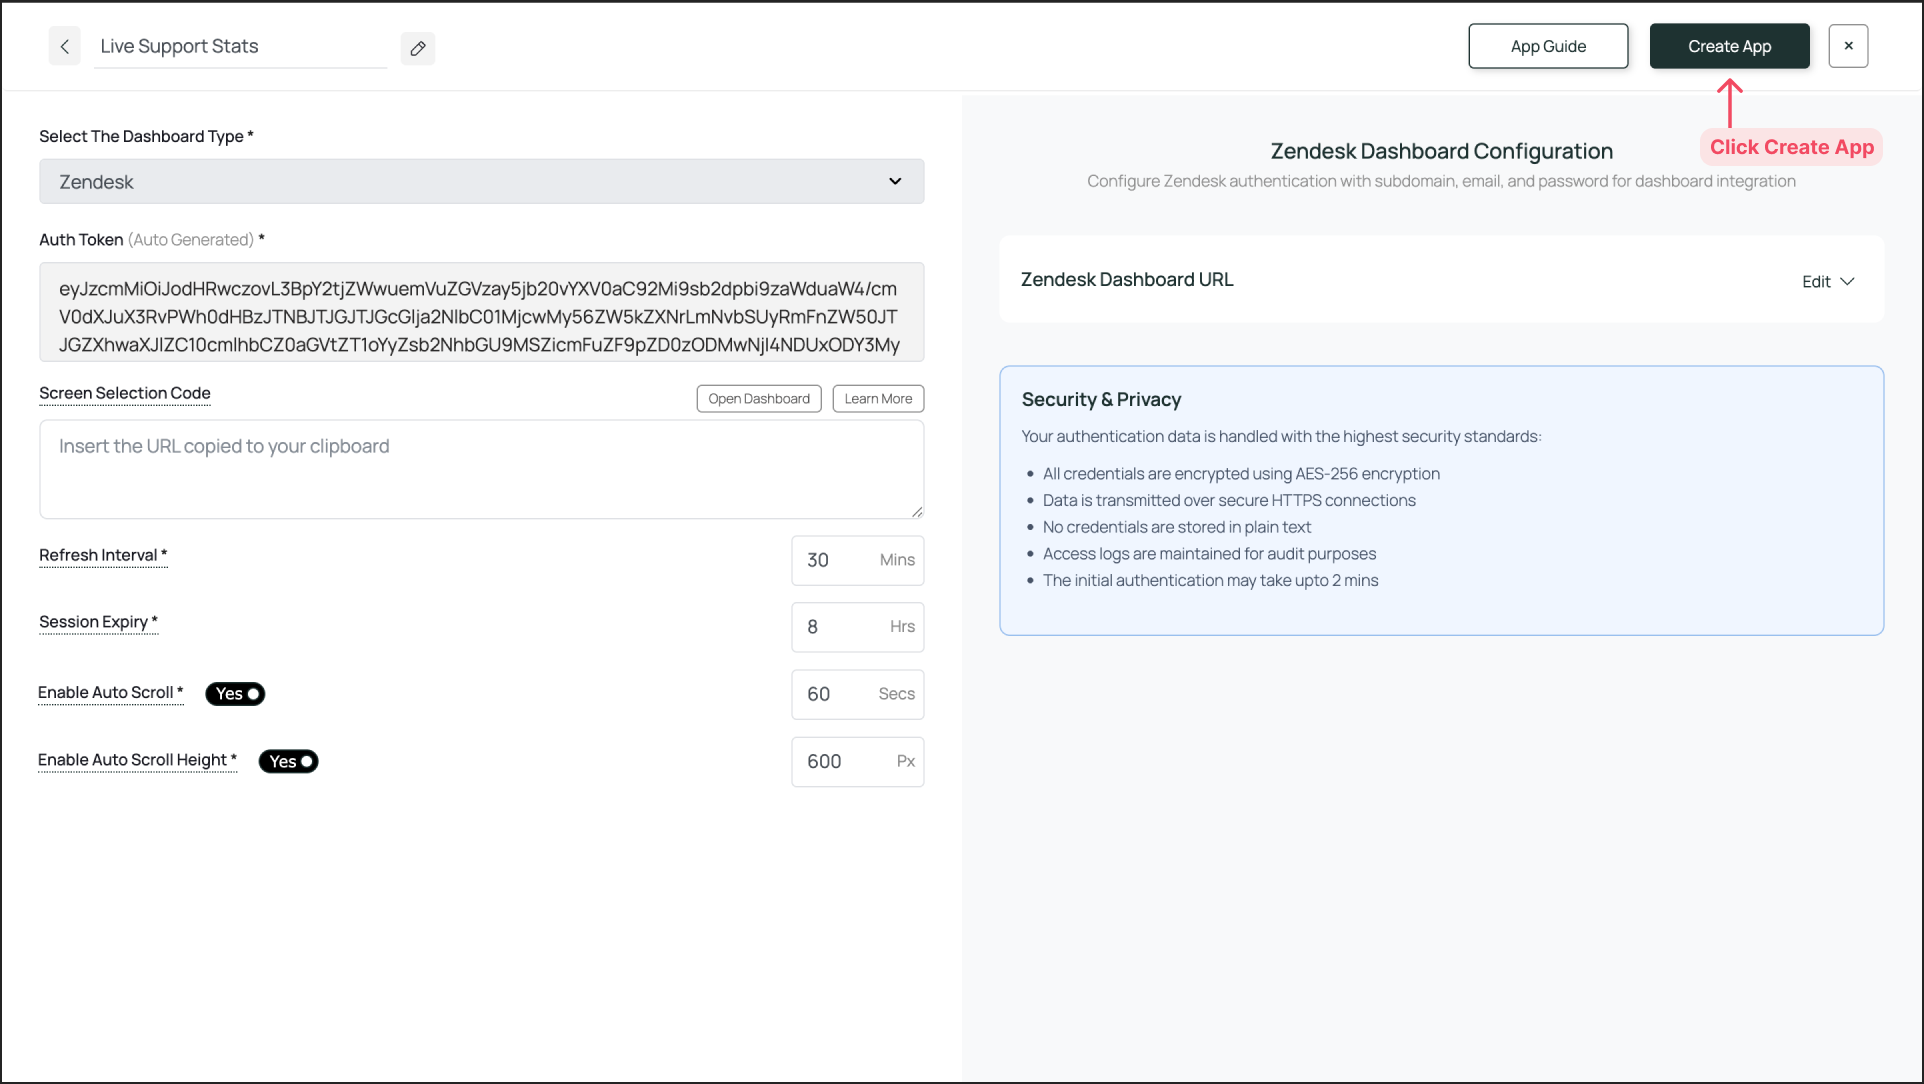
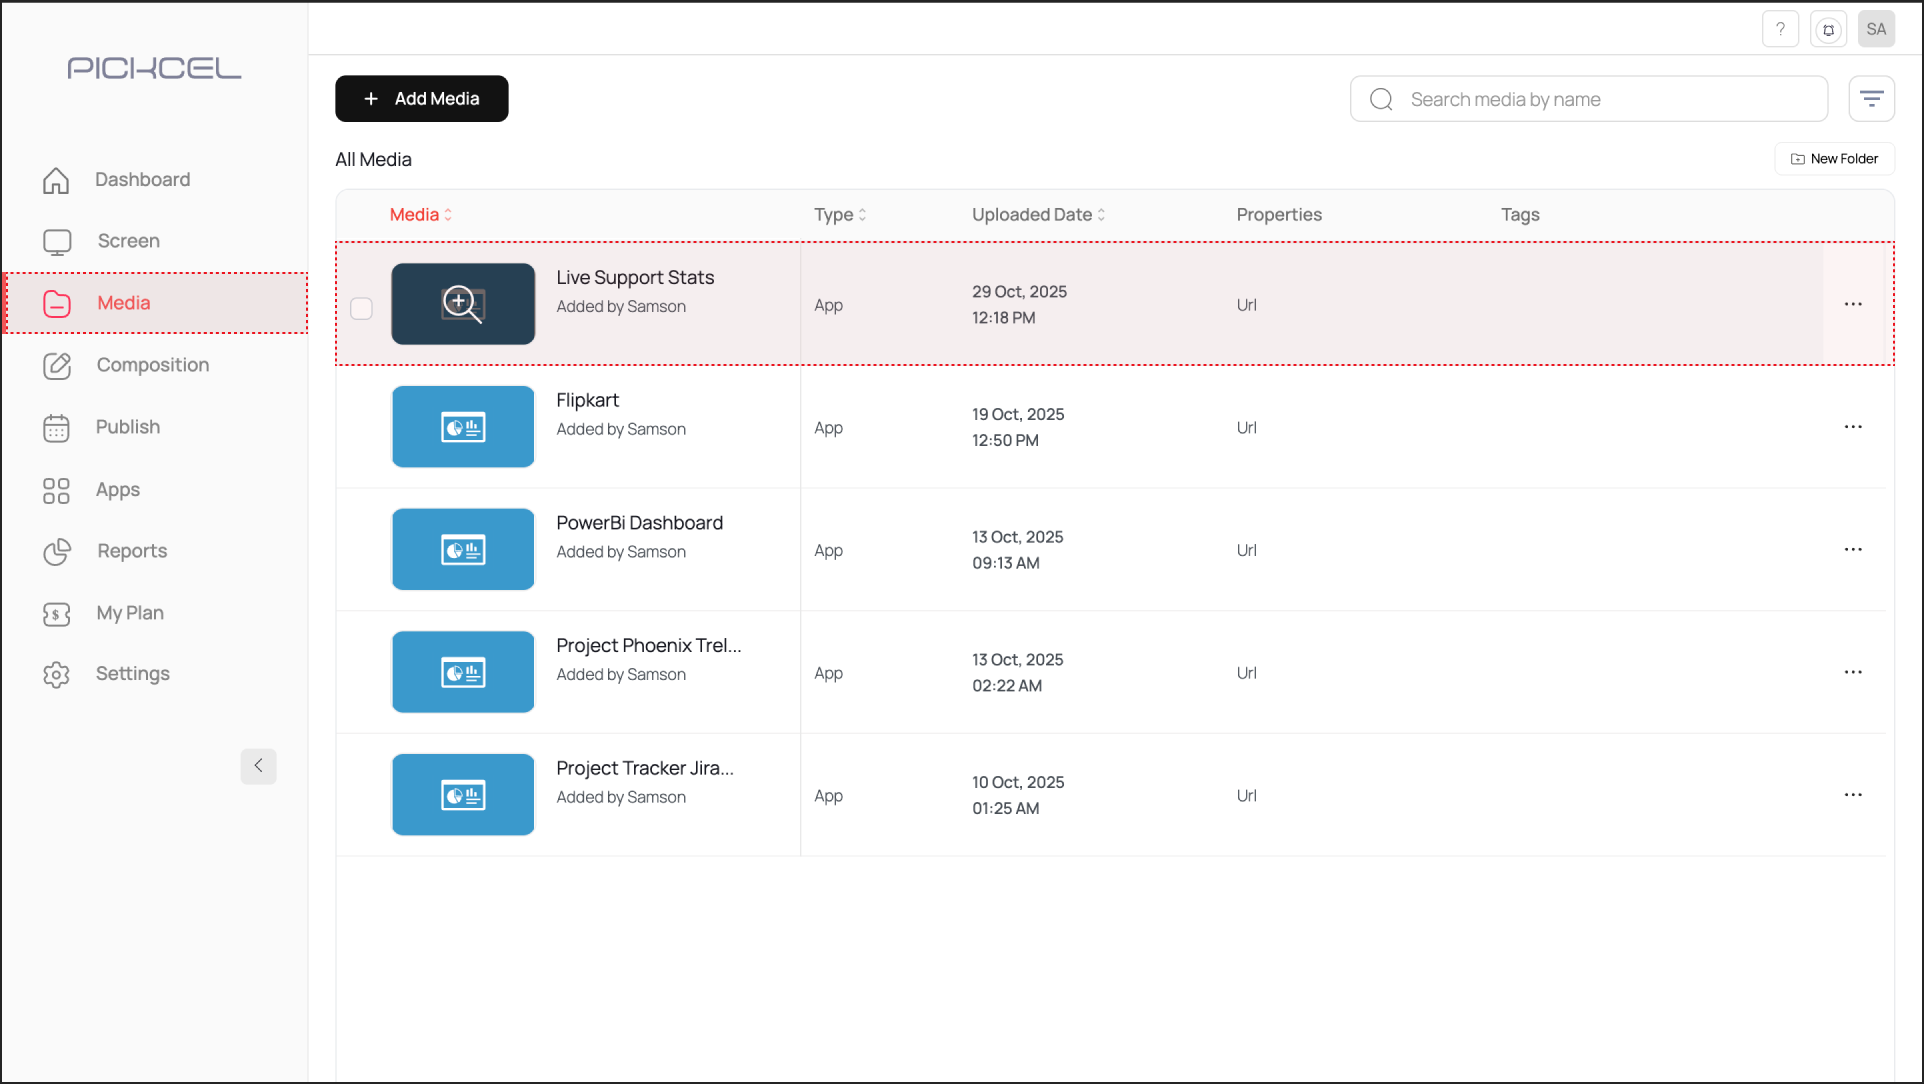
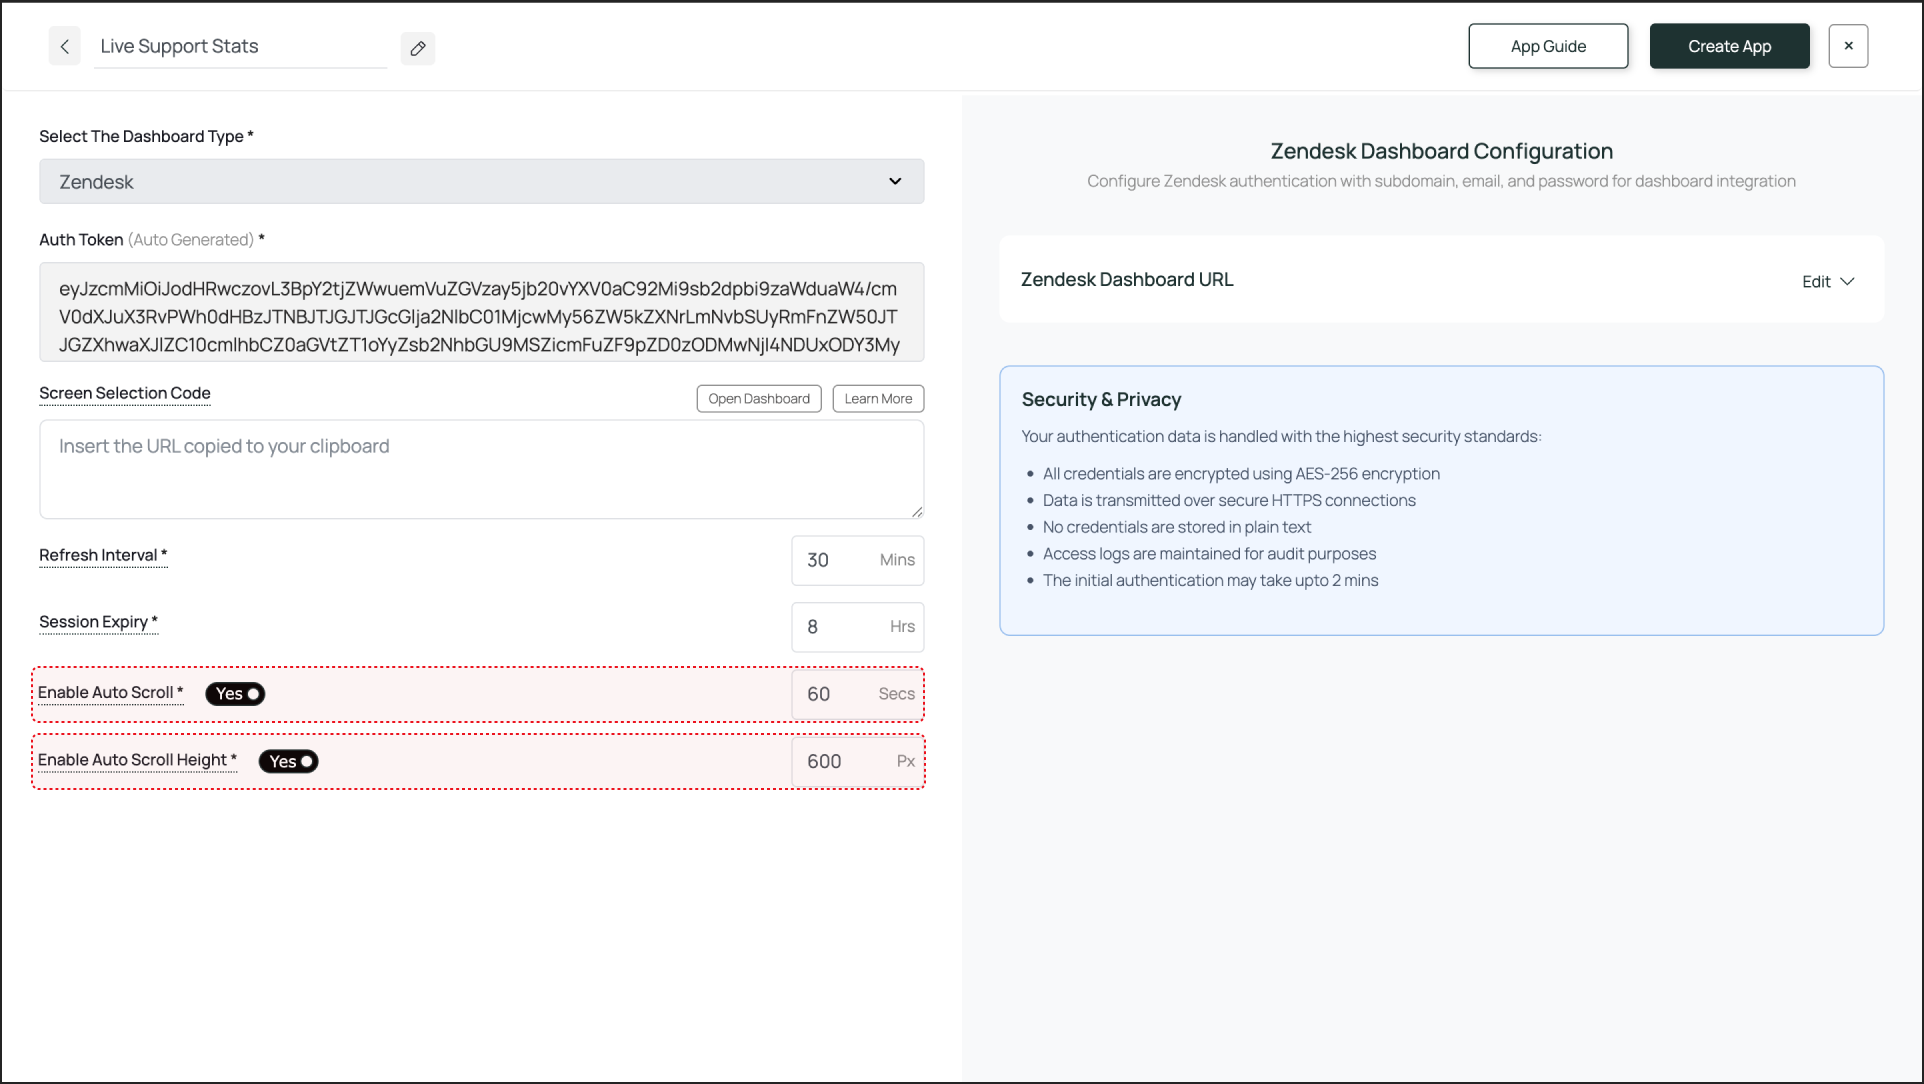 When configuration is complete, click **Create App**. The app instance will appear in the **Media** section.
 To preview the dashboard, go to **Media**, find the app instance by the name you created (e.g., "Live Support Stats"), and click on its thumbnail (magnifier icon).
 This will display a preview. If you are content with the result, assign it to your digital signage screens.
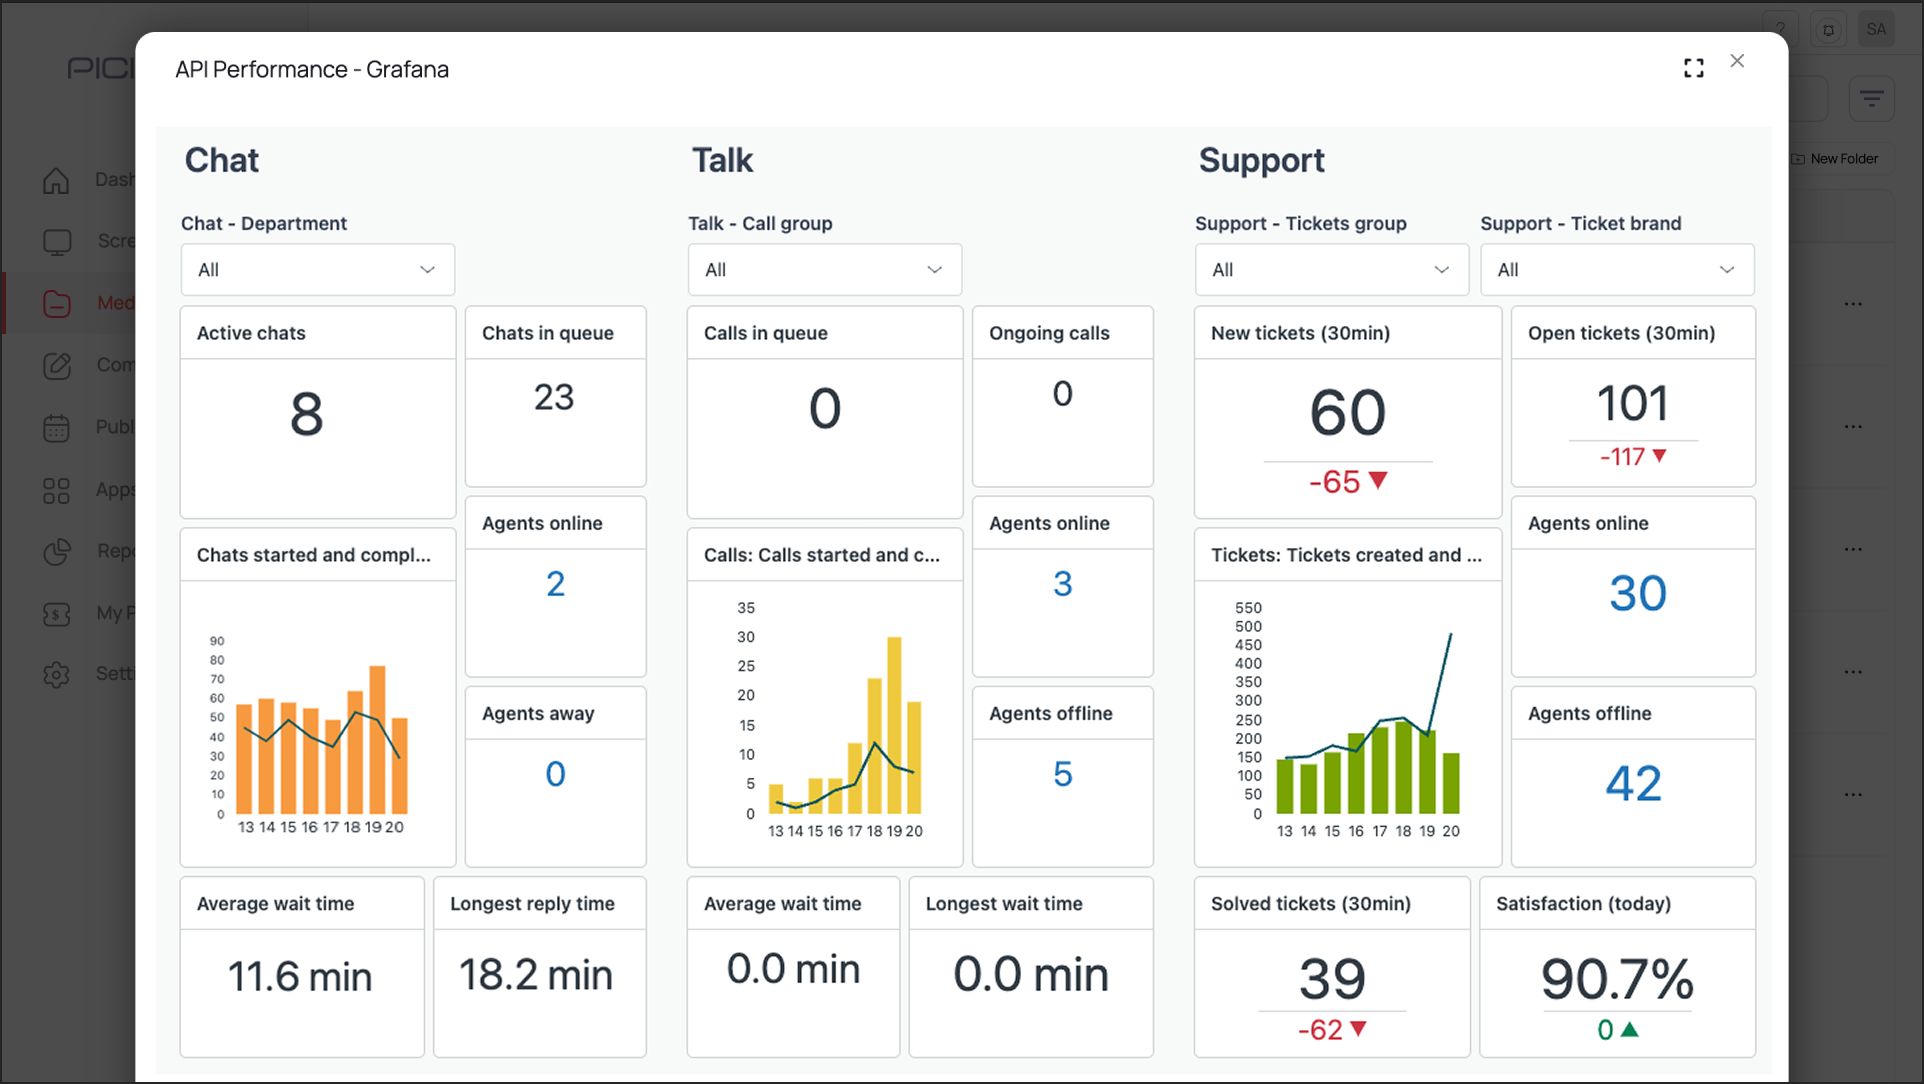 The output is visible as a preview in the media section as shown above. It may take some time for the dashboard screenshot to load, depending on the dashboard app that is configured.
If the password or any other credentials are incorrect, the process will stall on the login screen, displaying the login screen instead of the dashboard.
***
## What's Next?
Your Zendesk Dashboard App is now ready. For further reading:
* To create a multi-zone layout: Learn about [Compositions](/compositions/compositions)
* To send it to your screens: Learn how to [Publish or Schedule Content](/schedule-and-publish/publish-overview)
The output is visible as a preview in the media section as shown above. It may take some time for the dashboard screenshot to load, depending on the dashboard app that is configured.
If the password or any other credentials are incorrect, the process will stall on the login screen, displaying the login screen instead of the dashboard.
***
## What's Next?
Your Zendesk Dashboard App is now ready. For further reading:
* To create a multi-zone layout: Learn about [Compositions](/compositions/compositions)
* To send it to your screens: Learn how to [Publish or Schedule Content](/schedule-and-publish/publish-overview)