> ## Documentation Index
> Fetch the complete documentation index at: https://docs.pickcel.com/llms.txt
> Use this file to discover all available pages before exploring further.
# How to Display a Custom Web Application or Dashboard on Digital Signage?
> Show any internal web app or dashboard that signs in with an email or username and password on Pickcel digital signage screens. Record the login once with the Pickcel Auth Generator, then pick Live or Snapshot rendering.
Use **Custom Web Application** in the Pickcel Dashboard app to show any web app or dashboard that signs in with an **email or username and a password**. This covers internal ERP, MES, CRM and reporting pages, and any other dashboard without a built-in connector. You record the login once in Chrome, and Pickcel signs in by itself after that. Nobody has to sign in at the screen.
The sign-in must be a plain email or username and password form. "Sign in with Microsoft/Google" (SSO), SMS codes, push approvals and CAPTCHA can't be automated.
## Live or Snapshot
You choose the mode when you create the app.
| | Live Rendering (recommended) | Snapshot Rendering |
| :- | :- | :- |
| What the screen shows | The real page, updating in real time | An image of the page, refreshed at a set interval |
| Interaction | Interactive, including touch | View only |
| Supported players | Windows, Raspberry Pi | All players |
| Where it signs in | On the player | On Pickcel's rendering server |
* Choose **Live** when your screens run Windows or Raspberry Pi players and the data must update the moment it changes.
* Choose **Snapshot** when your screens use other players (Android, Samsung, LG and so on) or when a delay of a few minutes is fine.
## Before you begin
* A **read-only account** for the web app, used only for signage, not a personal or admin account
* The app's **login page URL** and the **dashboard URL** you want on screen
* **Google Chrome** on a computer that can open the web app
***
## Step 1: Record the login with the Pickcel Auth Generator
* Download the [Pickcel Auth Generator ZIP](https://console.pickcel.com/players/pickcel-auth-generator.zip) and extract it.
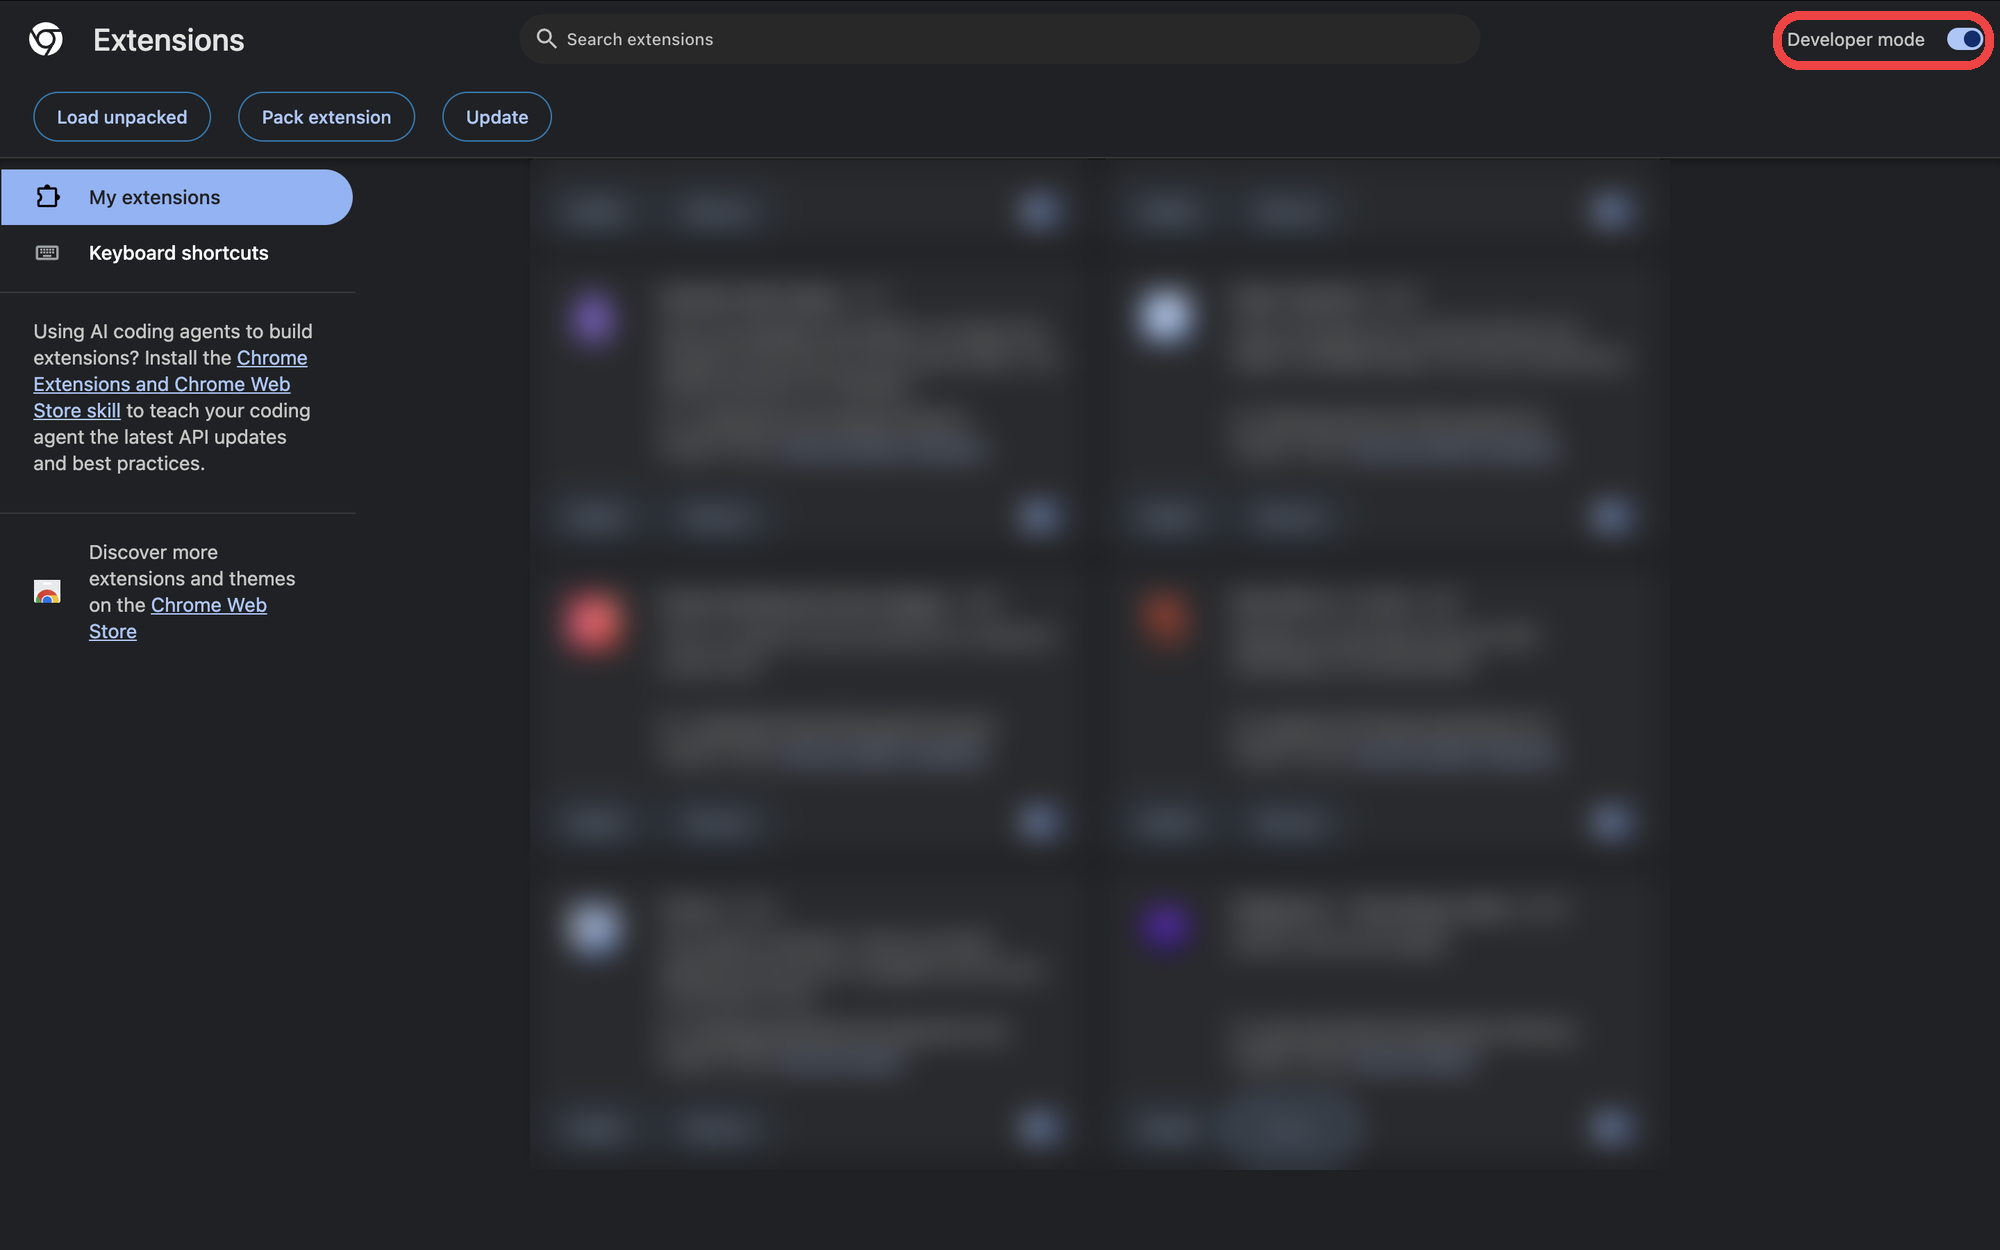
* In Chrome, open `chrome://extensions` and turn on **Developer mode** (top right).
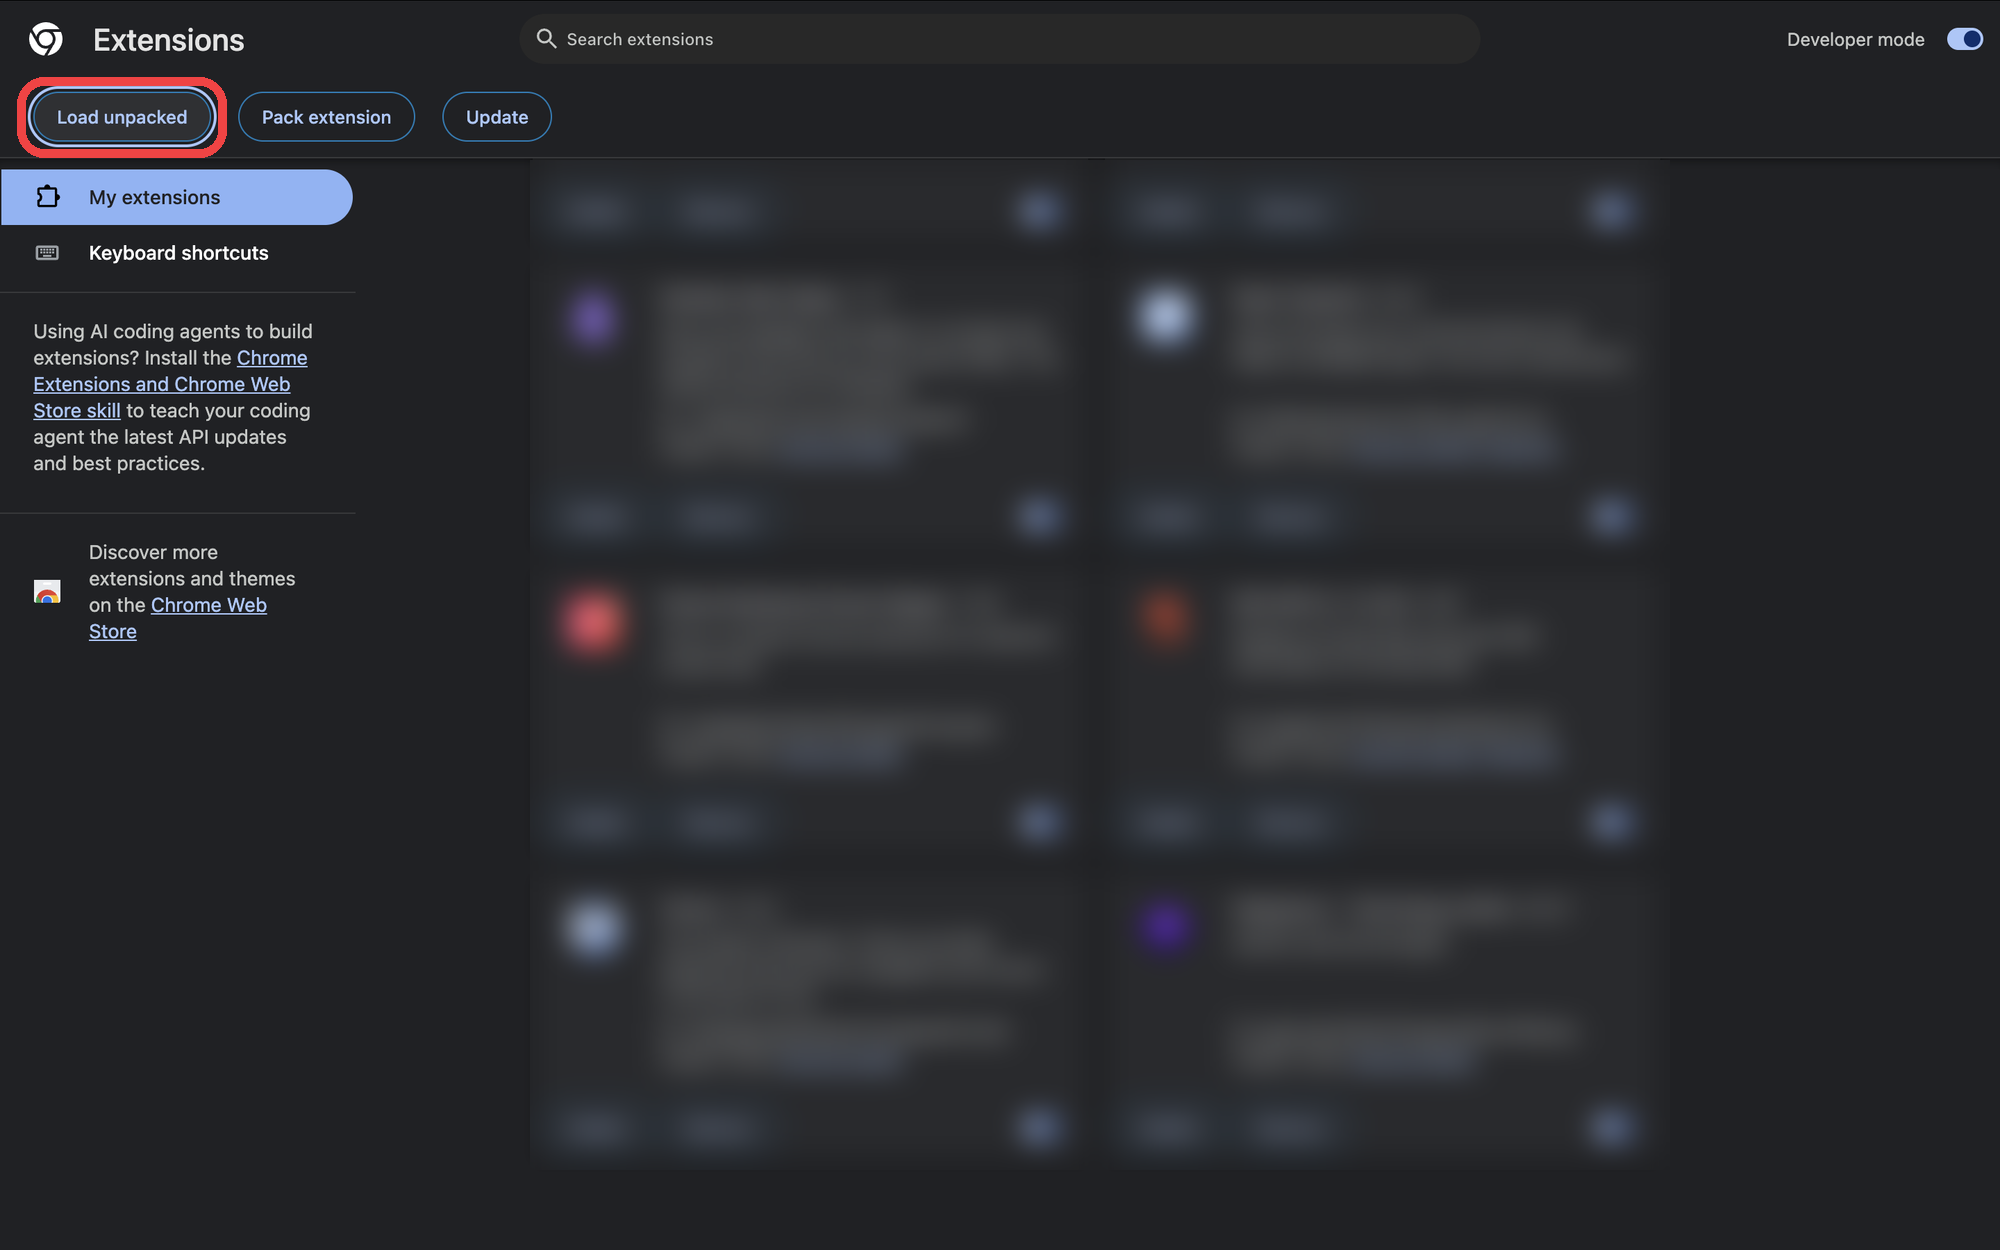
 * Click **Load unpacked**.
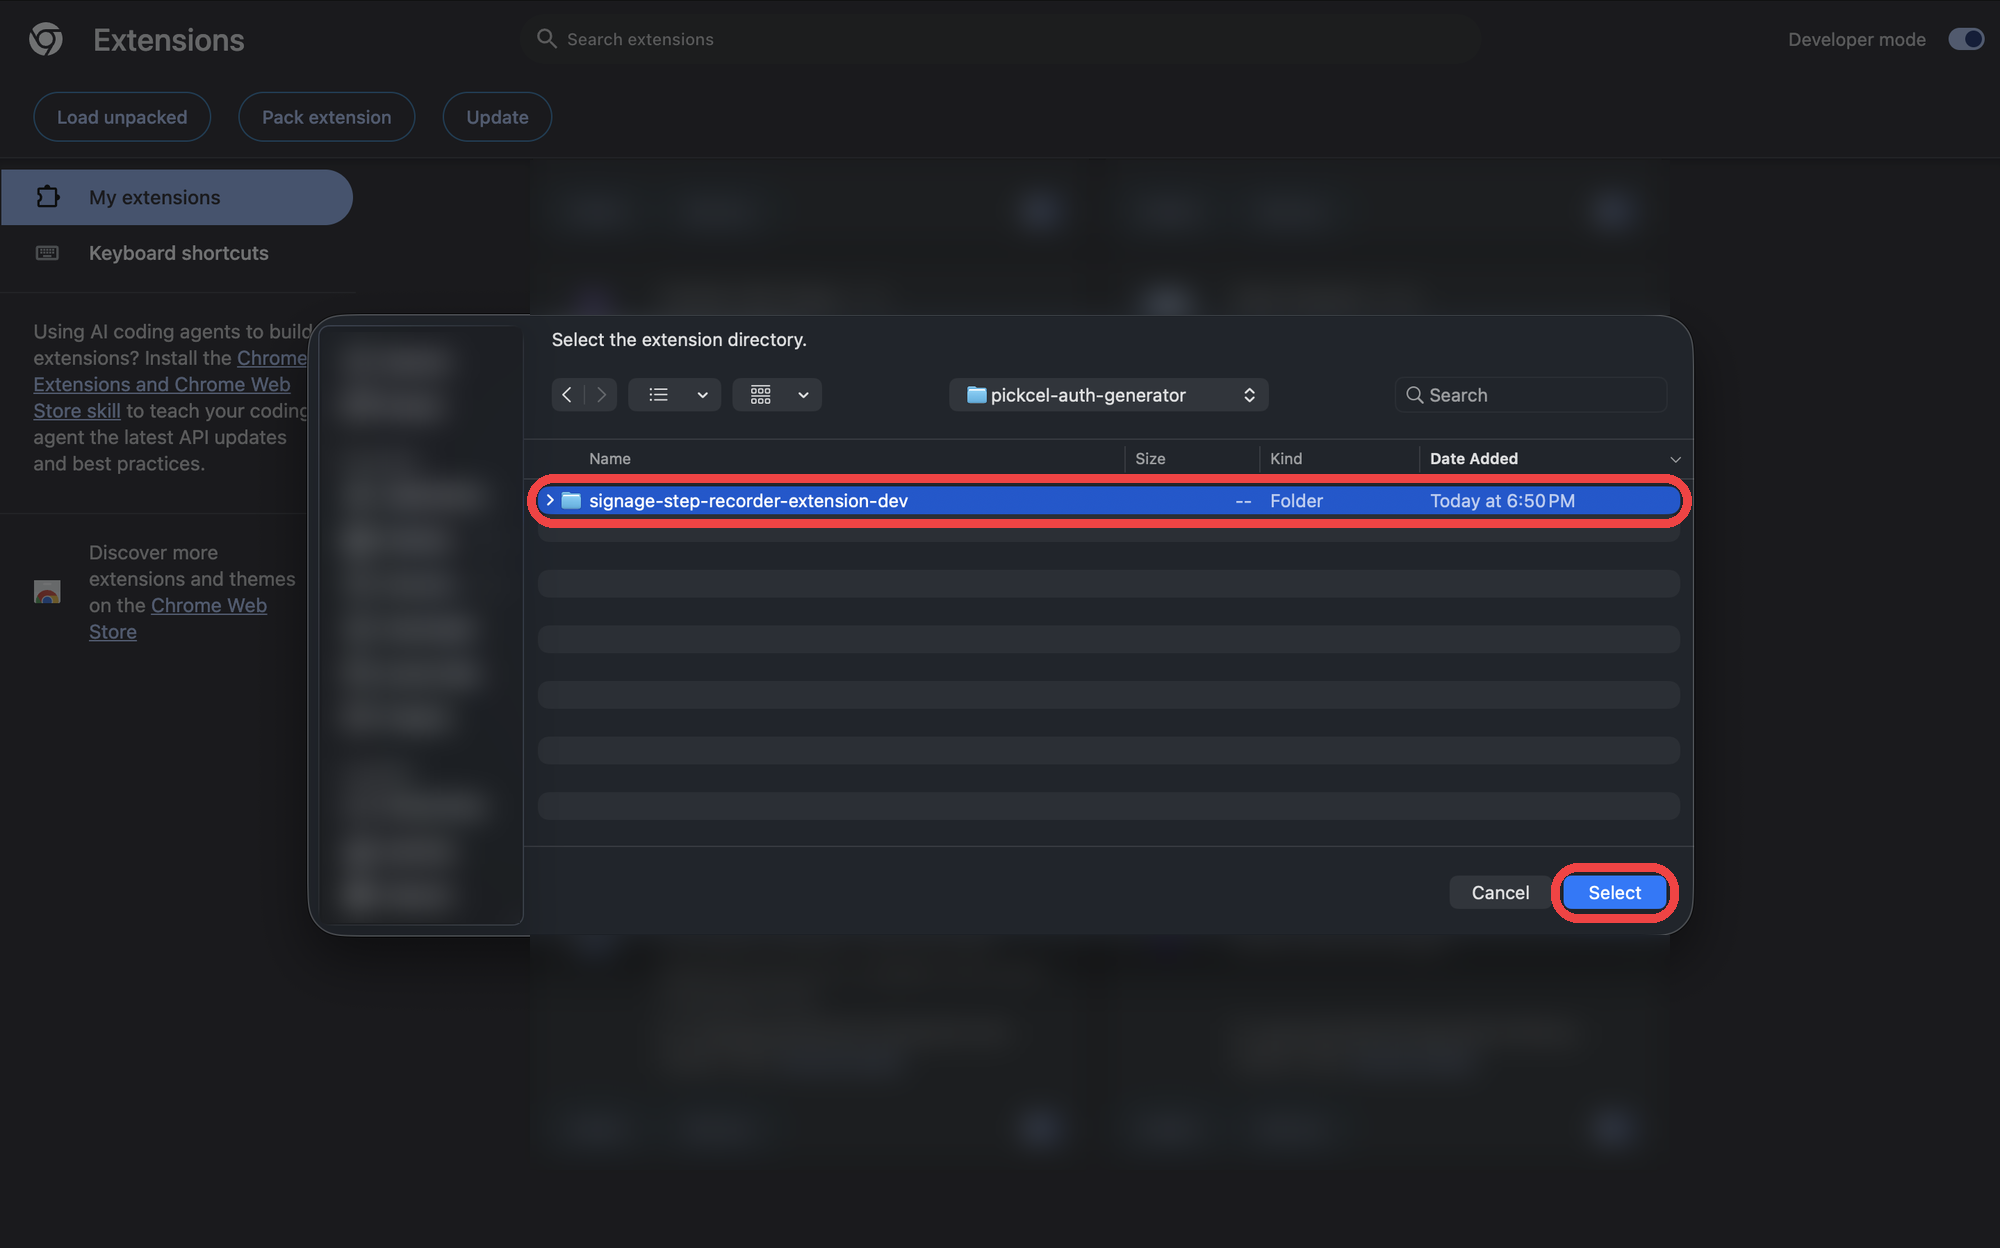
 * Select the extracted `signage-step-recorder-extension-dev` folder and click **Select**.
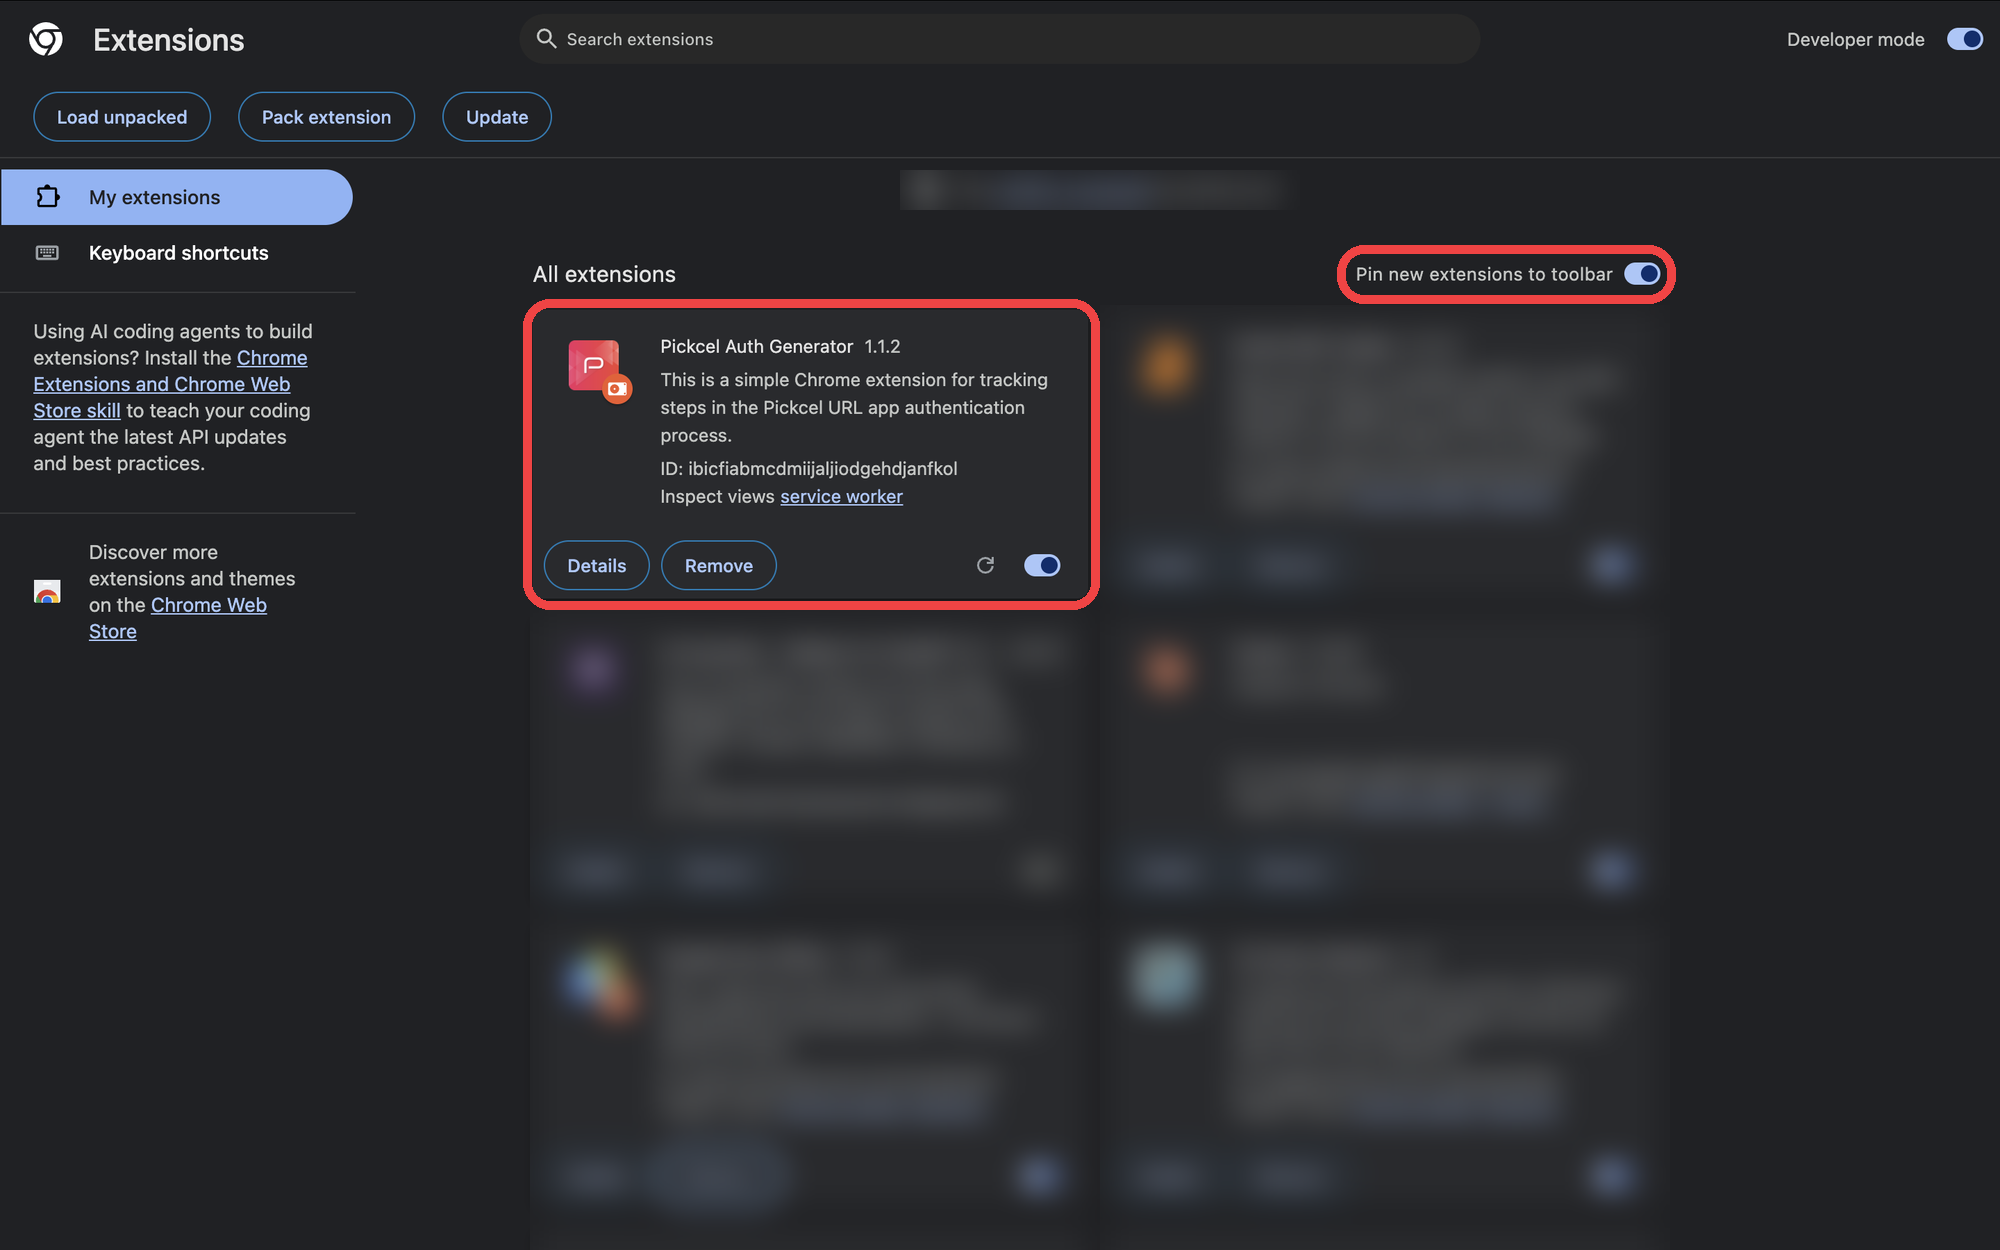
 * **Pickcel Auth Generator** now appears in your extensions. Turn on **Pin new extensions to toolbar** (or pin it from the puzzle-piece menu) for easy access.
 * Open the web app's login page in Chrome.
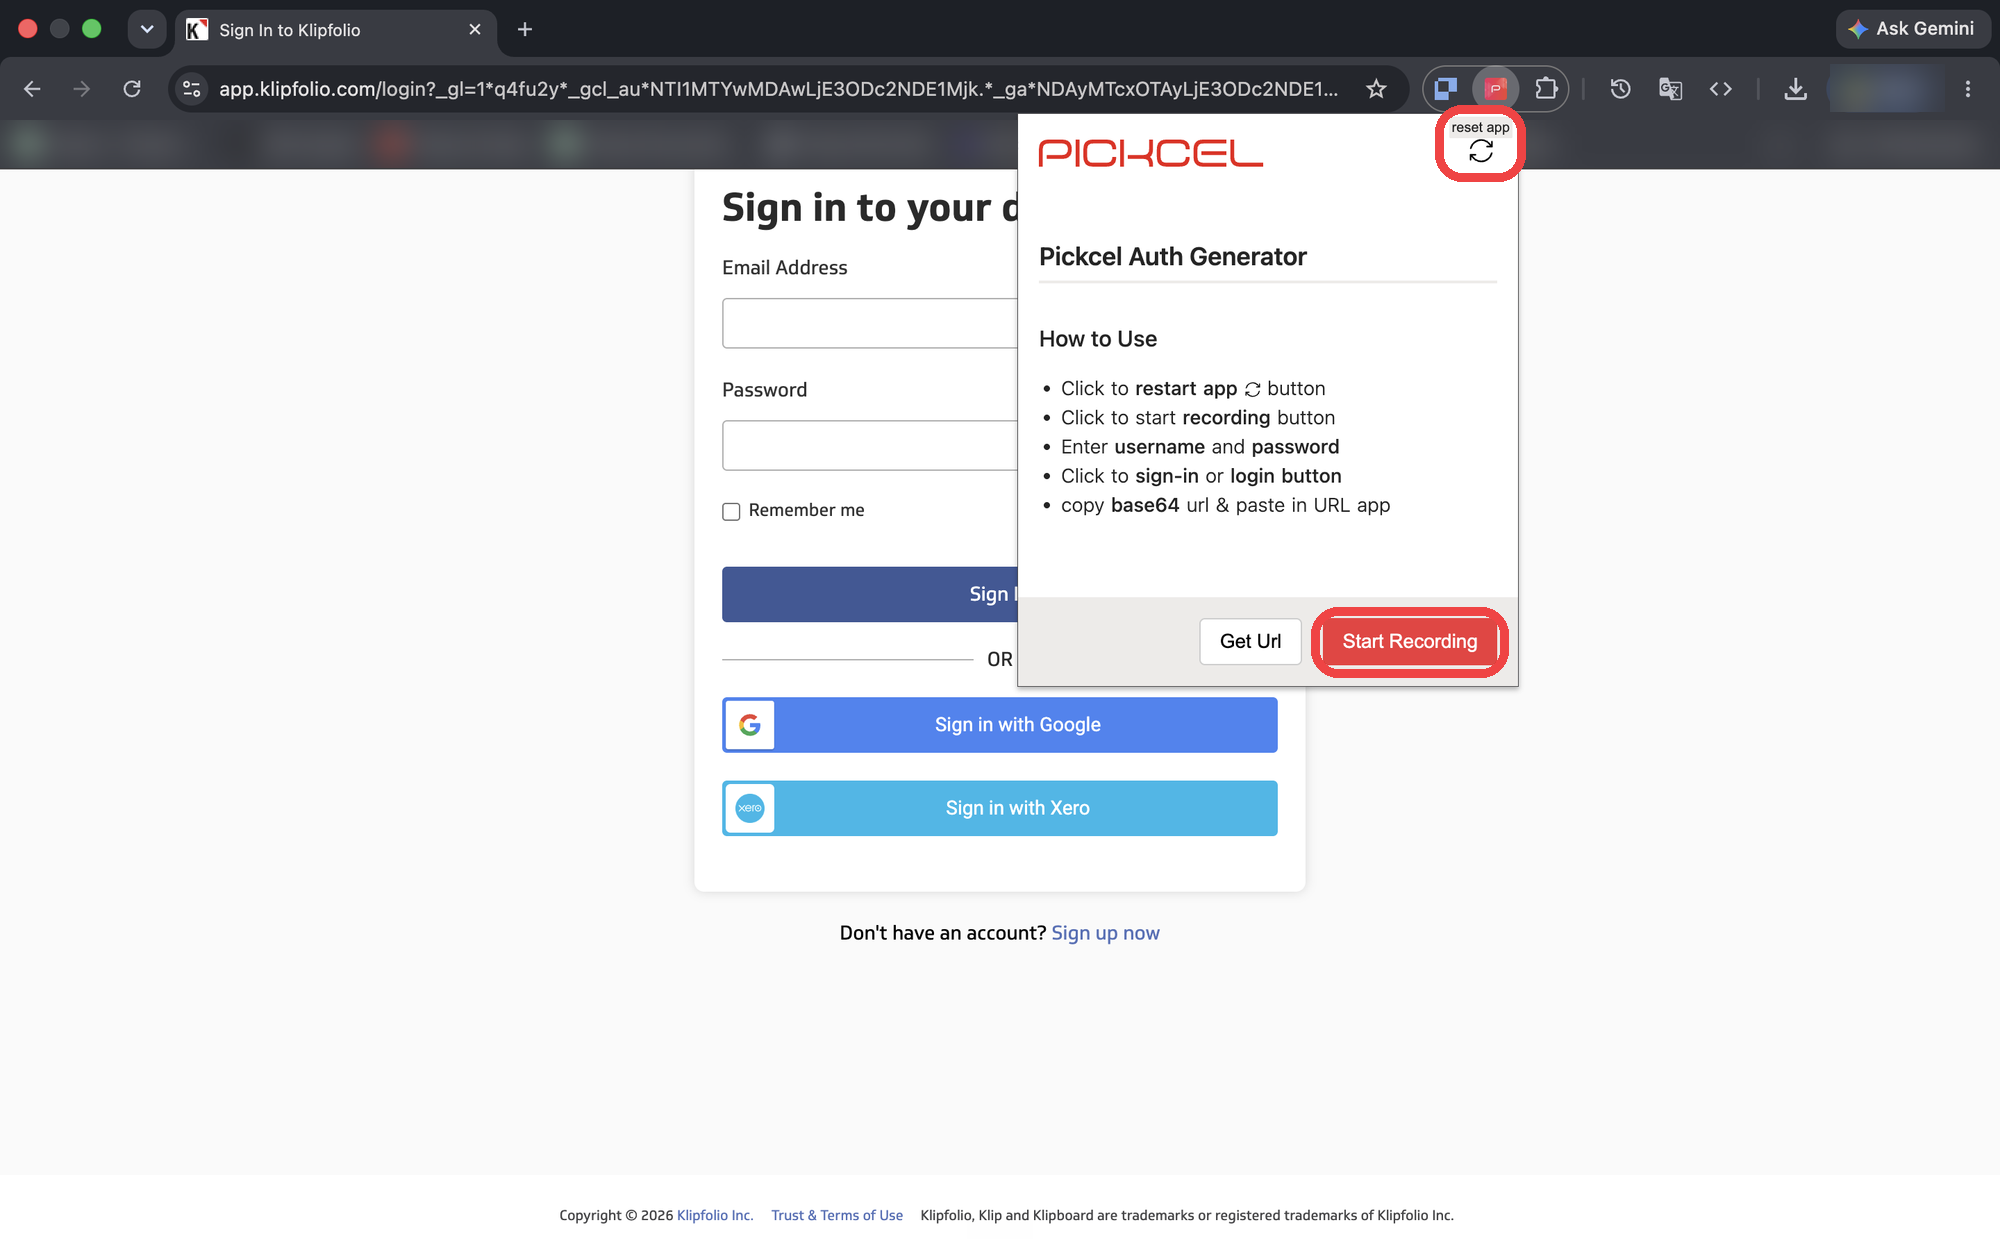
* Click the extension icon, then click the **reset app** icon (top right) to clear any earlier recording.
* Click **Start Recording**.
* Open the web app's login page in Chrome.
* Click the extension icon, then click the **reset app** icon (top right) to clear any earlier recording.
* Click **Start Recording**.
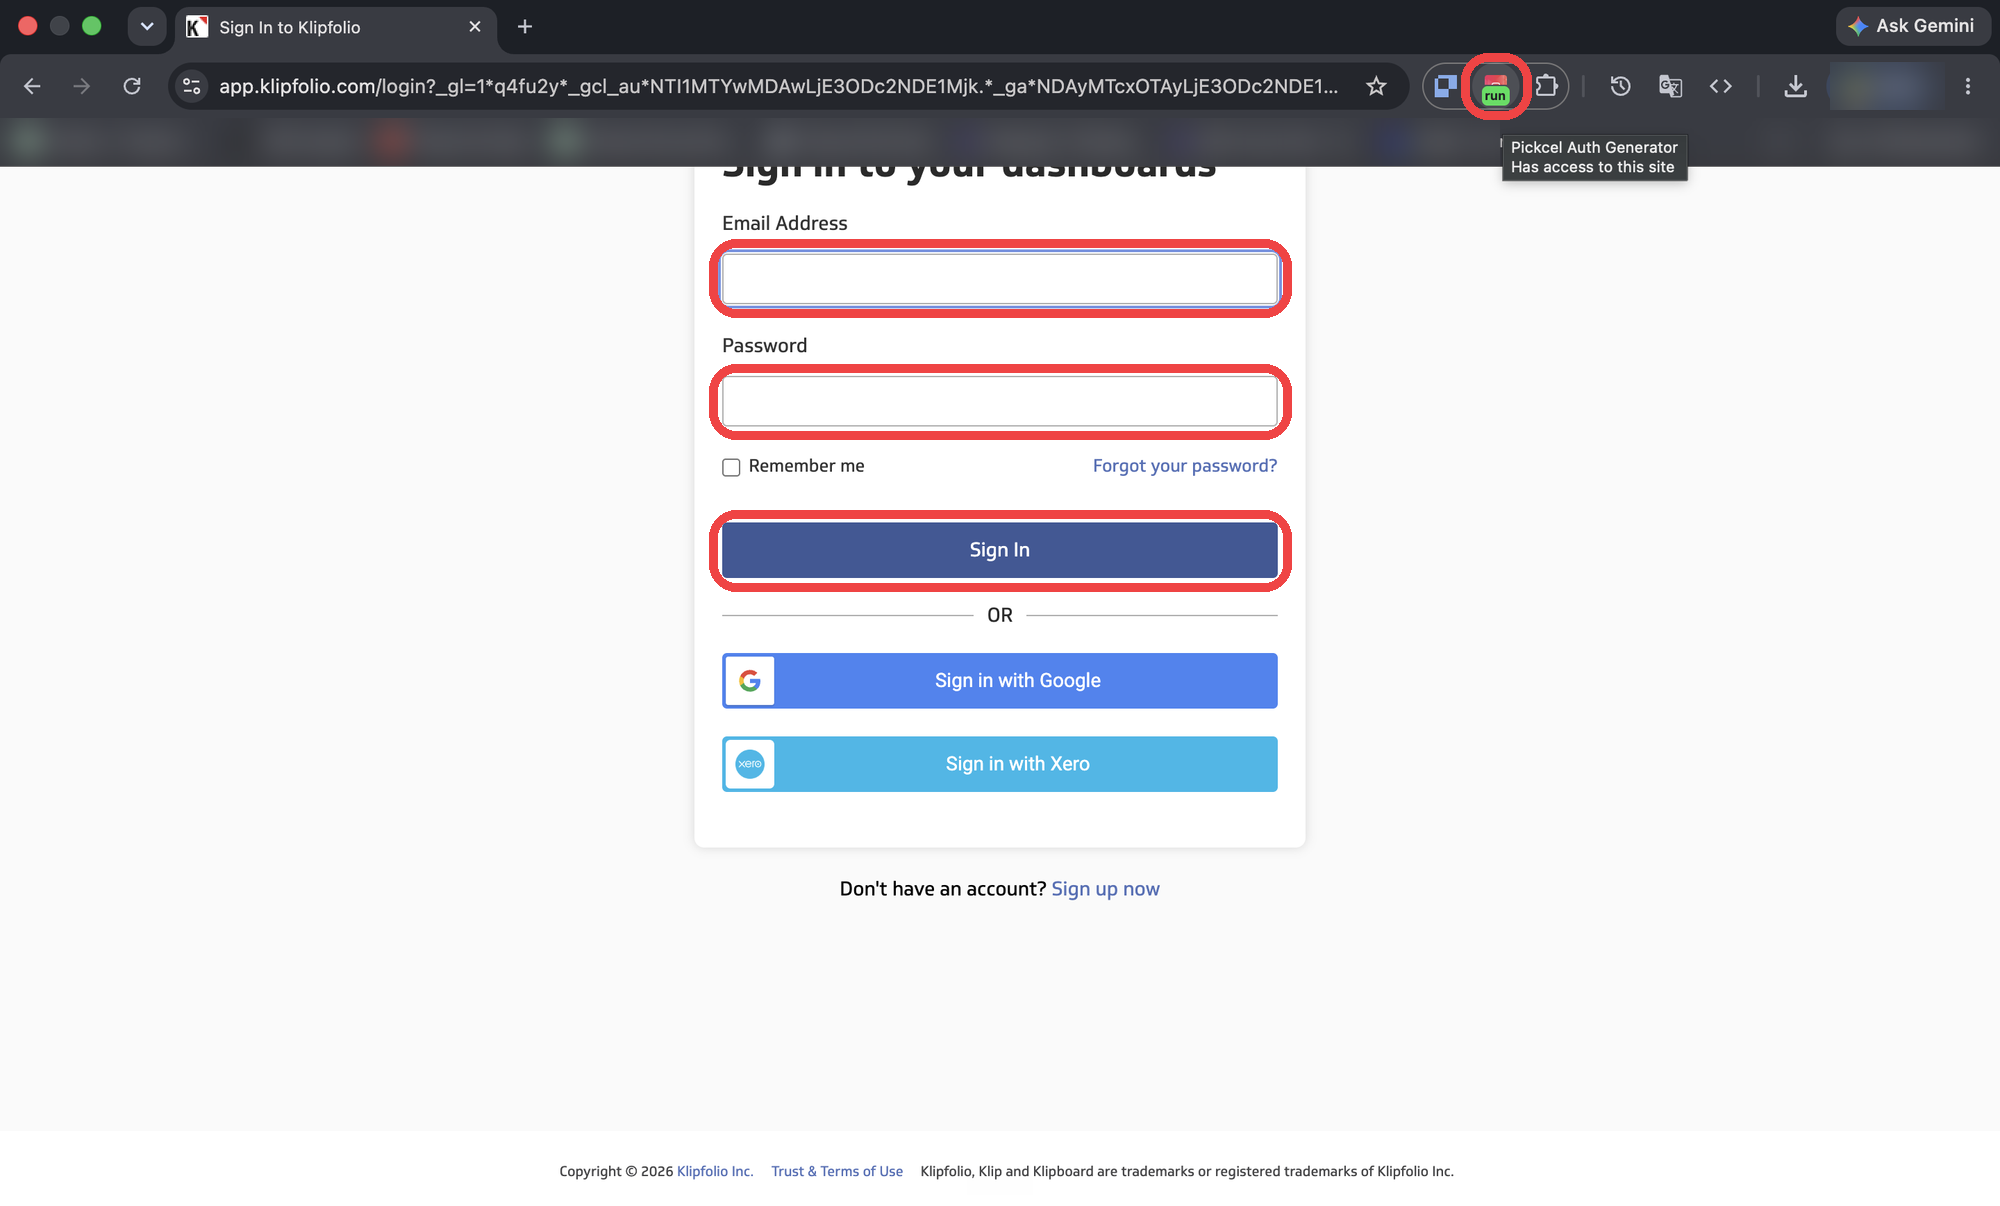
 * The extension icon shows a green **run** badge while it records.
* Click into each field, then type the email or username and the password.
* Click the sign-in button. Pressing **Enter** isn't recorded.
* The extension icon shows a green **run** badge while it records.
* Click into each field, then type the email or username and the password.
* Click the sign-in button. Pressing **Enter** isn't recorded.
 * Open the exact dashboard page you want on screen and wait for it to load fully.
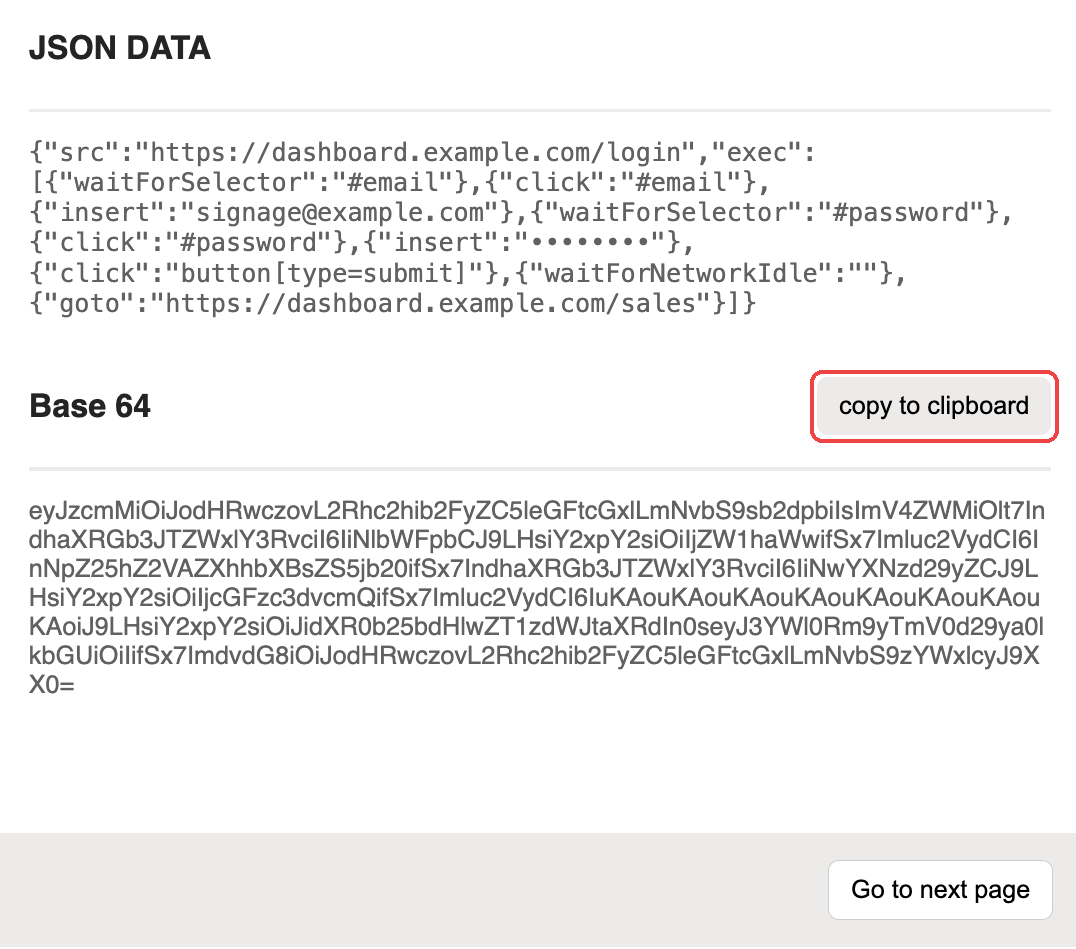
* Stop the recording: click the extension icon, then **Get Url**. A window opens with the recorded steps and the **Base 64** code.
* Click **copy to clipboard**.
* Open the exact dashboard page you want on screen and wait for it to load fully.
* Stop the recording: click the extension icon, then **Get Url**. A window opens with the recorded steps and the **Base 64** code.
* Click **copy to clipboard**.
 The copied code contains the username and password. Treat it like a password and don't share it over email or chat. Once applied in the console, Pickcel stores it encrypted.
## Step 2: Create the app in Pickcel
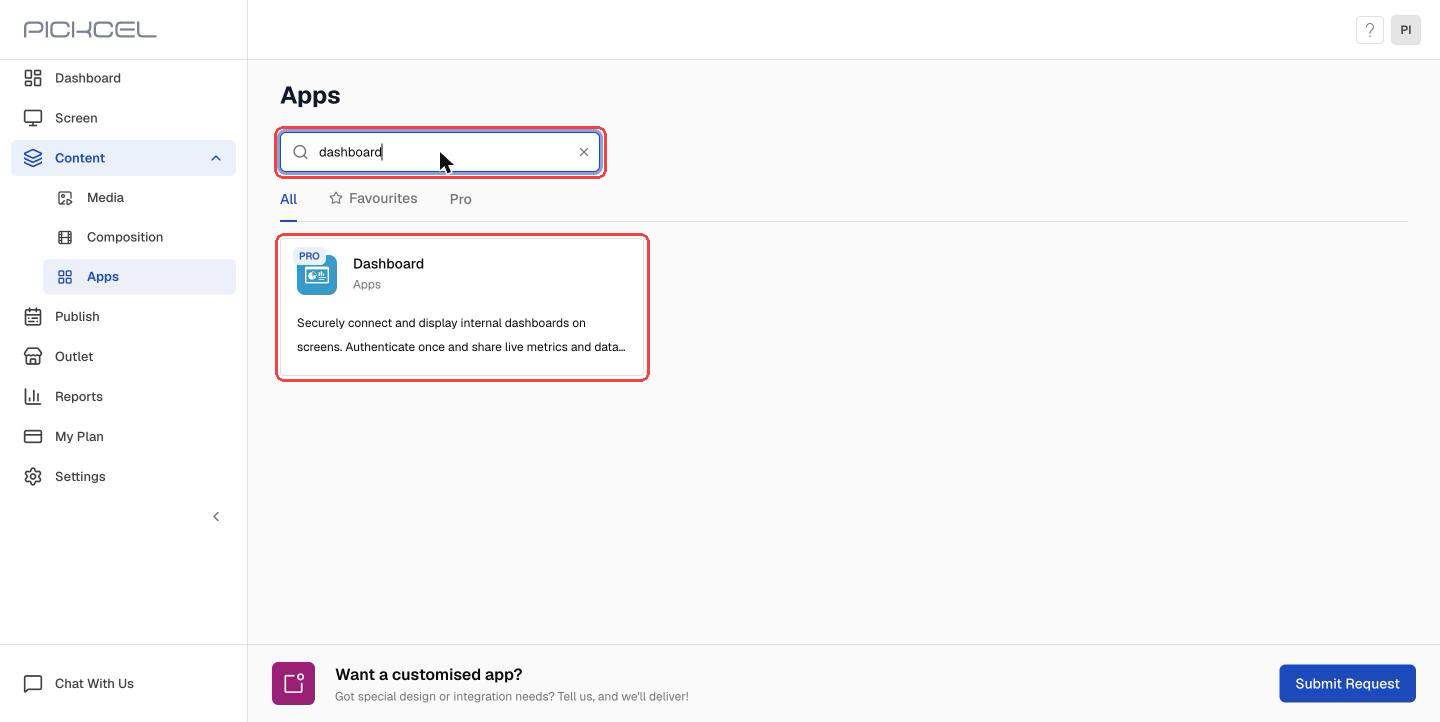
* In the Pickcel console, go to **Content** > **Apps**.
* Search for **Dashboard** and click it.
The copied code contains the username and password. Treat it like a password and don't share it over email or chat. Once applied in the console, Pickcel stores it encrypted.
## Step 2: Create the app in Pickcel
* In the Pickcel console, go to **Content** > **Apps**.
* Search for **Dashboard** and click it.
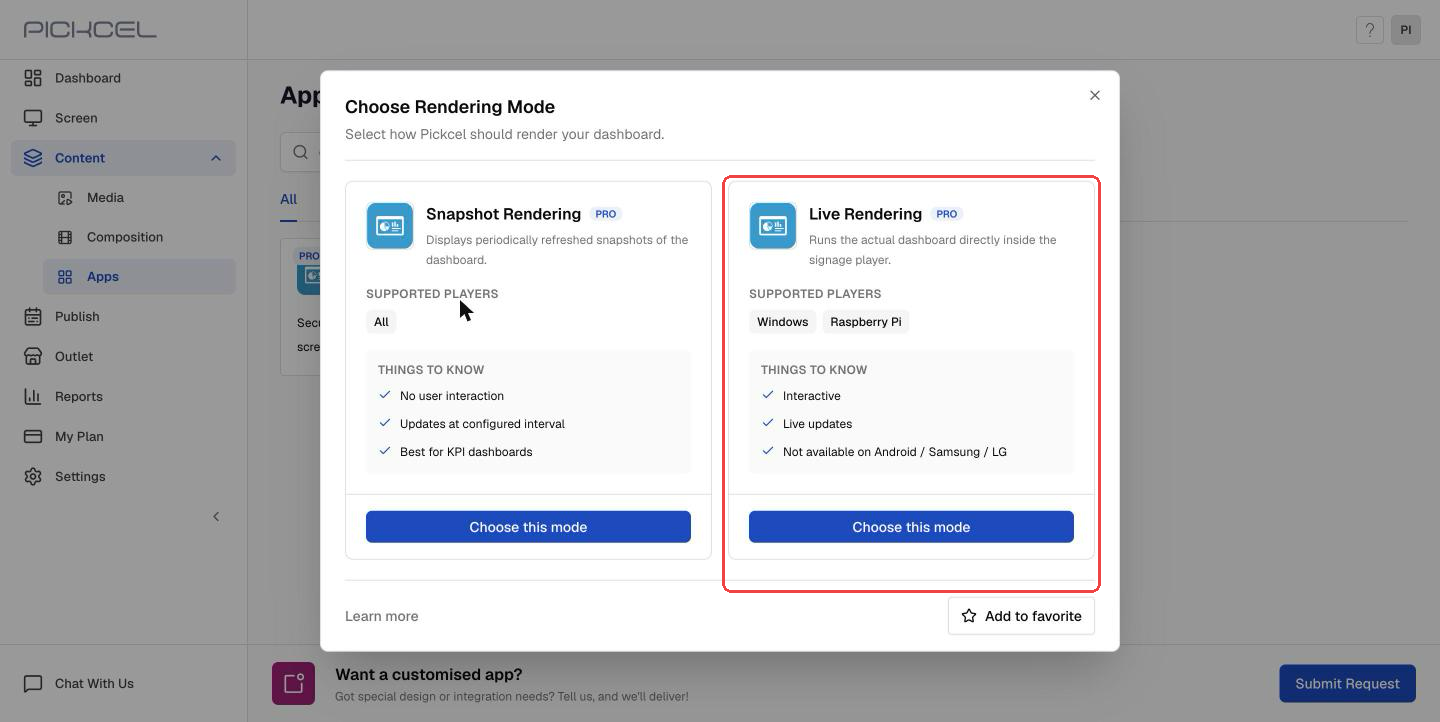
 * In **Choose Rendering Mode**, click **Choose this mode** under **Live Rendering** or **Snapshot Rendering**.
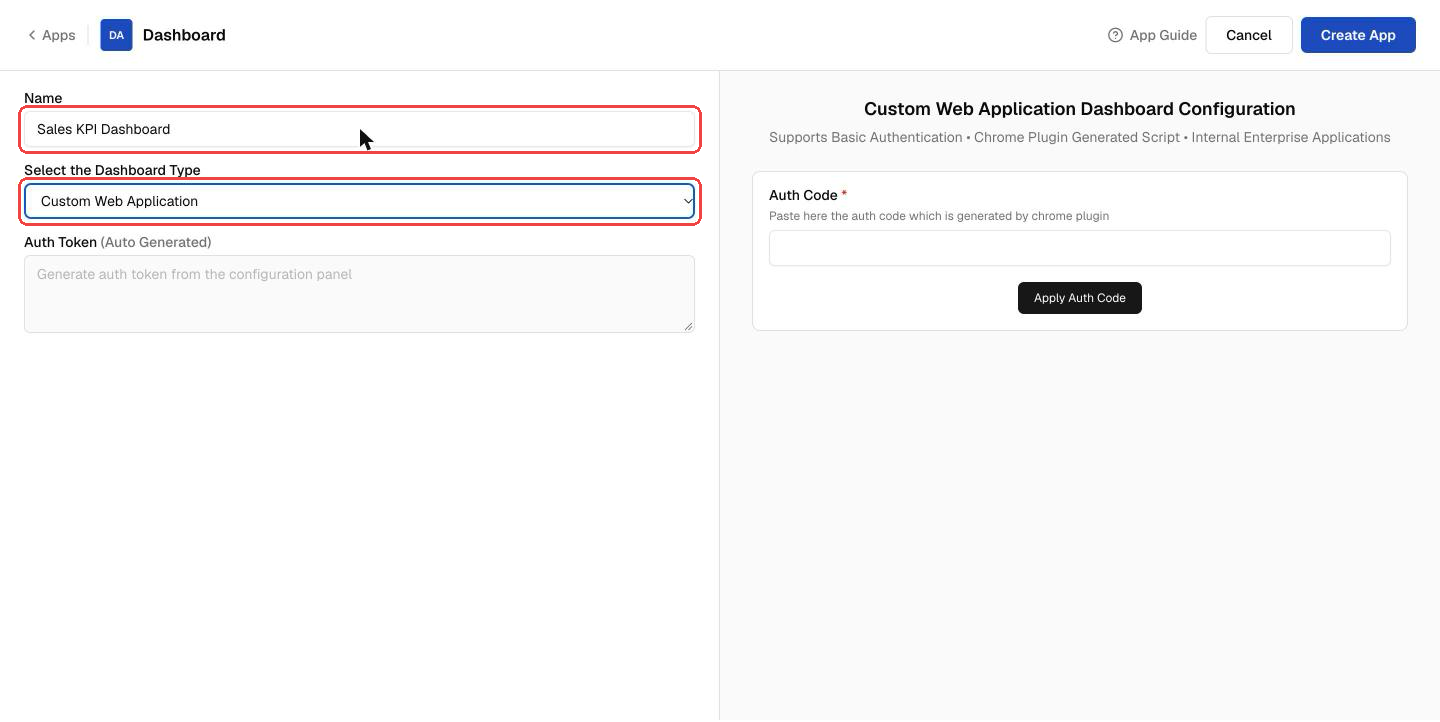
 * Enter a **Name** for the app, for example "Sales KPI Dashboard".
* In **Select the Dashboard Type**, choose **Custom Web Application**.
* Enter a **Name** for the app, for example "Sales KPI Dashboard".
* In **Select the Dashboard Type**, choose **Custom Web Application**.
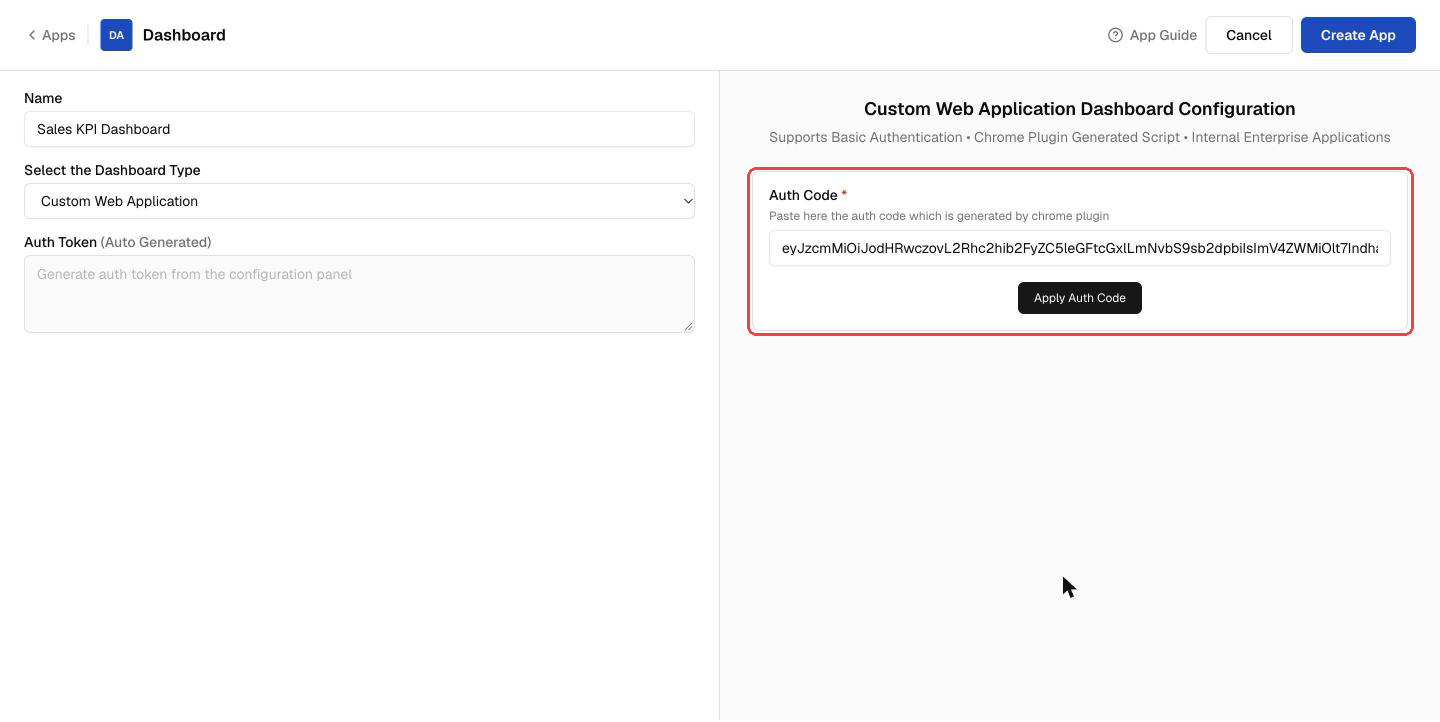
 * Paste the copied code into **Auth Code** on the right.
* Click **Apply Auth Code**. The **Auth Token** field on the left fills in.
* Paste the copied code into **Auth Code** on the right.
* Click **Apply Auth Code**. The **Auth Token** field on the left fills in.
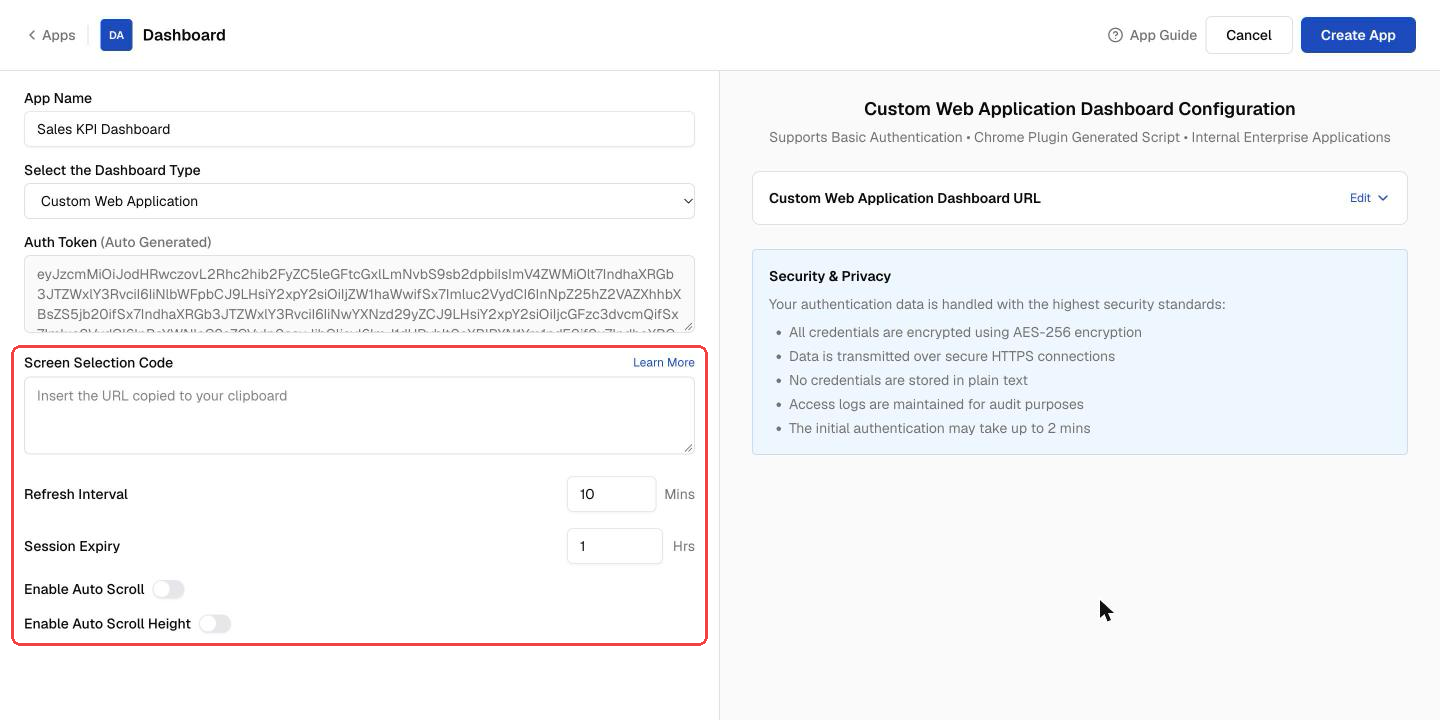
 Live mode has no extra settings, so skip to the next step. In Snapshot mode, set:
* **Screen Selection Code** (optional): show only part of the page. Create it with the [Dashboard Screen Mapper](/apps/dashboard-apps/screen-mapper).
* **Refresh Interval**: how often a new capture is taken. 5–10 minutes suits most dashboards.
* **Session Expiry**: how often Pickcel signs in again. Keep it shorter than the web app's own session timeout.
* **Enable Auto Scroll** / **Enable Auto Scroll Height** (optional): scroll tall pages.
Live mode has no extra settings, so skip to the next step. In Snapshot mode, set:
* **Screen Selection Code** (optional): show only part of the page. Create it with the [Dashboard Screen Mapper](/apps/dashboard-apps/screen-mapper).
* **Refresh Interval**: how often a new capture is taken. 5–10 minutes suits most dashboards.
* **Session Expiry**: how often Pickcel signs in again. Keep it shorter than the web app's own session timeout.
* **Enable Auto Scroll** / **Enable Auto Scroll Height** (optional): scroll tall pages.
 * Click **Create App**. The app appears in **Content** > **Media**.
* Click its thumbnail to preview. The first sign-in can take up to 2 minutes.
* Publish it to your screens like any other media, full screen or in a zone of a [composition](/compositions/compositions).
***
## Troubleshooting
The credentials are wrong or the login page has changed. Record the login again and apply the new code.
The code still holds the old password. Record the login again and update the app.
The web app's session expires before Pickcel signs in again. Lower **Session Expiry**.
The steps weren't captured. Click the **reset app** icon, then record again, clicking into each field and clicking the sign-in button.
Live mode runs only on Windows and Raspberry Pi players. Use Snapshot mode for other players.
## What's next?
* [Which dashboard app should I use?](/faqs/dashboard-matrix)
* [Publish or schedule content](/schedule-and-publish/publish-overview)
This documentation is built and hosted on [Mintlify](https://mintlify.com), a developer documentation platform.
* Click **Create App**. The app appears in **Content** > **Media**.
* Click its thumbnail to preview. The first sign-in can take up to 2 minutes.
* Publish it to your screens like any other media, full screen or in a zone of a [composition](/compositions/compositions).
***
## Troubleshooting
The credentials are wrong or the login page has changed. Record the login again and apply the new code.
The code still holds the old password. Record the login again and update the app.
The web app's session expires before Pickcel signs in again. Lower **Session Expiry**.
The steps weren't captured. Click the **reset app** icon, then record again, clicking into each field and clicking the sign-in button.
Live mode runs only on Windows and Raspberry Pi players. Use Snapshot mode for other players.
## What's next?
* [Which dashboard app should I use?](/faqs/dashboard-matrix)
* [Publish or schedule content](/schedule-and-publish/publish-overview)
This documentation is built and hosted on [Mintlify](https://mintlify.com), a developer documentation platform.